PBPI starts this Sunday! Our bags are (almost) packed; Chris and I can’t wait for this amazing opportunity to learn more about the industry, and spend time with as many of you as possible.
Here’s a sneak preview of the breakout sessions Chris will be running at PBPI this year.
Monday 3:30pm – Breeze Systems Photo Booth Software
The first session will focus getting the most from DSLR Remote Pro; including
Chris has a unparalled worldwide reputation in multi-camera arrays. DSLR Remote Pro Multi-Camera has been used in block buster movies, the video games industry and high profile activations for more than 10 years. Learn from the man himself:
What you can do with a camera array
Five, fifteen or ninety five cameras?
Choosing equipment and triggering the cameras
Time it right – syncing with flash
How to create animated GIFs and MP4 movies from your images
Wednesday 2:45pm – Open Session
On the final afternoon Chris will run an Open Session covering topics raised by delegates at PBPI. Likely subjects include
Panoramic photo booth photos
Green screen
Sharing for camera arrays
Hashtag Monitoring
Worked examples
Automation and startup scripts
Find us at the Breeze table in Tech Alley & around the Academy.
The content of sessions may vary to meet the needs of those attending.
PS Just heard from Lisa that there is still time to join in – Enroll here!
Profiles Part 2 explains how to add interest with random profiles
Profiles Part 3 includes a troubleshooting guide and creating a ‘Choose or Surprise me menu
Happy New Year! This first post for 2018 explains how to use profiles to create a touchscreen menu of print layouts.
Breeze photo booth profiles are powerful building blocks you can use to customize your booths to offer guests choices such as print layouts and green screen backgrounds; or add an element of surprise such as random comments in a magic mirror booth.
This blog post has been written for DSLR Remote Pro 3.8.1.
At Step 1 choose ‘1 large photo with 3 smaller ones below’
At Step 2 name the folder your images will be stored 1+3
At Step 3 make any other changes you need before selecting Finish
To customise the print or load predesigned layouts choose Print Layout. As you leave this screen you will be prompted to Save print settings to the default profile. Choose No.
Select the large ‘Advanced Settings’ button then, Save.
You will be asked whether to save the printer settings as well as the photo booth settings:
Saving photo booth settings (1) DSLR Remote Pro 3.8.1
Take care to save the settings in the correct folder; here …\PhotoboothImages\1+3\settings.xml . You are updating the settings saved by the Photobooth Wizard; so choose Yes when asked whether to replace settings.xml :
Saving photo booth settings (2). Overwriting the settings saved by the Photobooth Setup Wizard DSLR Remote Pro 3.8.1
Press OK to leave the Photobooth settings screen. Before moving on select Start Photobooth and check this layout works as you expect.
Run the photobooth setup wizard for a single photo layout
Now repeat the process for the second option on your menu, the single photo. Run the Photobooth Setup Wizard again.
At Step 1 choose ‘Single Photo’
At Step 2 name the folder your images will be stored single
At Step 3 make any other changes you need before selecting Finish
Customise the print using the Print Layout Editor and make any other changes you need.
Select the large ‘Advanced Settings’ button then Save. Take care to save the settings in the correct folder; here …\PhotoboothImages\single\settings.xml
When you have saved your settings Press OK to leave the Photobooth settings screen. Before moving on select Start Photobooth and check this layout works as you expect.
Tip: During this process you need to keep saving your updated settings. Take care to check you are saving them in the correct folder each time.
Run the photo booth setup wizard to create the menu
At Step 1 choose ‘Single Photo’ or any other option
At Step 2 name the folder Menu
Remove the live view from your menu screen
1. Select the large ‘Advanced Settings’ button and remove the live view by uncheckingEnable live view.
2. Select Save and update …\PhotoboothImages\Menu\settings.xml
Removing live view from menu and saving the settings: Photobooth Settings Screen DSLR Remote Pro 3.8.1
Create profiles for the menu and each option
Next create three profiles: one each for the menu, 1+3 print layout, and single print layout. The menu profile needs to be loaded each time the photo booth is started; and after each guest session finishes:
3. Stay in the Photobooth Settings screen and select the Profiles… button. This takes you to the Photobooth Profiles screen.
Defining profiles for the menu and each option: DSLR Remote Pro 3.8.1
4. Set Profile 1 to C:\Users\sue\Documents\PhotoboothImages\menu\settings.xml
5. Set Profile 2 to C:\Users\sue\Documents\PhotoboothImages\1+3\ settings.xml
6. Set Profile 3 to C:\Users\sue\Documents\PhotoboothImages\single\settings.xml
7. Set Default profile loaded at startup and after each shooting sequence to Profile 1. This will display your menu each time the photo booth is started; and after each guest session finishes.
8. Click on OK to leave the profiles screen
9. If you want to be able to use this set of profiles again; save them using the Save Profiles button. I have called the profiles xml file demoprofiles.xml and saved this in my menu folder : …\PhotoboothImages\menu\demoprofiles.xml
Create a new menu screen
Use an image editor to create a new jpg image containing icons for the 2 print layouts. This should be the same size as the screens generated by the wizard. Replace the original ready.jpg screen in PhotoboothImages\Menu with this image.
Photobooth ready.jpg screen: menu offers choice of print layouts. DSLR Remote Pro 3.8.1
Link the menu screen to each menu option using profiles
If necessary start DSLR Remote Pro and select Advanced Settings to Load your menu (…\PhotoboothImages\menu\settings.xml).
Start the booth to check that your new menu screen is displayed; then <Esc> to return to the main DSLR Remote Pro screen.
10. Select Advanced Settings; and select the Settings button for the touchscreen
Touchscreen Settings Screen DSLR Remote Pro 3.8.1
Tip: Touchscreen actions. The Touchscreen settings screen allows you to choose what action the program takes when a guest touches different parts of the screen. These are called touchscreen actions.
11. Select Show/edit touchscreen areas to display a copy of the screen layout showing the ‘Touchscreen actions’ currently enabled. Each action and the part of the screen affected is shown like this
Touchscreen Actions for menu screen before changes DSLR Remote Pro 3.8.1
First remove the actions you no longer need
Remove each action you no longer need from the screen (here Photo Start, Photo Select Color mode, Photo Select B&W mode) by right clicking on the action and choosing Delete Action..
Deleting the Photo Start Touchscreen action from the new menu screen. DSLR Remote Pro 3.8.1
Then add the new actions
Move the mouse over your 1+3 icon and right click; then choose Add Action.
Right click to add a new touchscreen action to the screen DSLR Remote Pro 3.8.1
Choose Profile 2 from the drop-down list.
Selecting the required action from the drop down list. DSLR Remote Pro 3.8.1
Click on OK. Move and resize the red dotted action box to cover your icon.
Resizing the touchscreen action box to cover the icon. DSLR Remote Pro 3.8.1
Repeat for your single photo icon; choosing Profile 3.
Optional: Add a hidden button to the main menu to exit Full screen photobooth mode
Adding a hidden action
You may also wish to add a secret or hidden button to exit the full screen photo booth.
Position the mouse roughly where you want the hidden button (usually a corner of the screen so the operator can find it easily). Right click, choose Add action and then Exit Fullscreen photobooth from the drop down list. Resize and position the red dotted action box as before.
Adding a touchscreen action for a hidden button
Right click the mouse on an unused part of the screen and choose Exit from the list. You will be prompted to save your edited settings – select Yes to return to the touchscreen settings screen.
Saving the new tocuhscreen actions for the menu screen. DSLR Remote Pro 3.8.1.
Add a password to stop guests using the hidden button. Save the changes you have made by choosing OK on the touchscreen Settings Screen:
Adding a password to the hidden option to exit the photo booth. DSLR Remote Pro 3.8.1.
When you leave this screen you will return to the Photobooth Settings screen. Press Save and save the changes you have made to …\PhotoboothImages\Menu\settings.xml as before.
You now have a menu offering a choice of print layouts. The final stage is to add a mechanism for guests to return to the menu from each option screen. You need to add an exit button to each option.
Add an exit button to each option so that guests can return to the main menu
Tip: if you are using the predesigned sets of buttons (such as those provided with DSLR Remote Pro 3.8 and later releases) you may want to use one of these as your back button. They are usually kept in sub-directories at C:>Program Files(x86)>Breezesys>DSLR Remote Pro>wizard as shown here
Tradewind Blue button set used in this example ( kindly provided by Wilkes Photobooth Co http://wilkesbooth.co/breeze-themes). Included with DLSR Remote Pro 3.8.
Use an image editor to edit the ready.jpg image containing icons for the 2 print layouts. These should be the same size as the screens generated by the wizard.
Add a back button to the 1+3 ready.jpg screen
Use an image editor to edit the …\PhotoboothImages\1+3 \ready.jpg image. The final image should be the same size as the screens generated by the wizard. Replace the original ready.jpg screen in …\PhotoboothImages\1+3 with this image.
Updated ready.jpg for 1+3 print layout includes a back button. DSLR Remote Pro 3.8.1. (This screen was created using an image editor outside DSLR Remote Pro.)
Start DSLR Remote Pro, choose Advanced Settings and select Load. To load the settings for your 1+3 layout; select …\PhotoboothImages\1+3\settings.xml
Stay on the Photobooth Settings screen, select the Touchscreen Settings button and then Show/Edit touchscreen areas to display the Touchscreen Actions for the 1+3 ready screen:
Move the mouse to your new back icon and right click to add an action for this icon. Select Add Action as before, then Select Profile 1 from the drop down list. (Profile 1 is the menu profile we set up earlier.)
Adding a touchscreen action to go back to the main menu using Profile 1. DSLR Remote Pro 3.8.1.
Exit and save your updated settings to …\PhotoboothImages\1+3\settings.xml. Click OK to leave the touchscreen settings screen and return to Photobooth Settings. Press Save and update …\PhotoboothImages\1+3\settings.xml before hitting OK to return to the main screen.
Add a back button to the single photo ready.jpg screen
Repeat the steps above for the second print layout. To load the settings for your single print layout; select …\PhotoboothImages\single\settings.xml and save them to the same directory and file when you finish.
Start the photo booth and check everything works correctly
Check that the booth operates as you expect for both options, returning to the main menu ready for the next guests.
Find yourself a drink and take a well earned break
Congratulations – you have learnt how to use one of the most important features of DSLR Remote Pro. You can use the same method to create other menus (and sub menus if you wish).
Want to know more?
Note: This section was updated on February 17th and July 11th 2018.
PBPI starts one month today in Dallas. Have you booked your place yet?
The Academy focuses on business and technical education for Photo Booth Industry professionals. It is also a lot of fun!
Chris will give presentations on both photo booth shooting and multi-camera rigs; there will be plenty of opportunities to learn more about Breeze software and to talk in more detail than is practical at a trade show.
1.Run the setup wizard to create simple boomerang GIFs. You can find details in the the video for the 3.12 Setup Wizard
Customise the boomerang GIF
2. Next click on File (A) then Videobooth Settings (B) to show the Videobooth Settings screen.
3. Check that the boxes for Create Animated GIF and Use camera’s photo mode are both checked, then select the Animated GIF Settings buttom (C) to see the Animated GIF Settings (video booth) screen
Video Booth Settings screen choosing settings for boomerang animated GIF DSLR Remote Pro 3.8.1
3. The settings below create a ‘boomerang’ animated GIF from the whole photo (landscape orientation) without any border. This GIF will be 600 wide x 400 pixels high. When you have chosen the settings you need click OK (here and the other pop up windows until you return to the main screen).
Add the animated overlay
4. You need the same number of overlay images as frames in the boomerang GIF. In this example the animated GIF has 29 frames (separate images) created from 15 original images*. You need 29 overlay images; called video_stills_overlay_1.png, video_stills_overlay_2.png …. video_stills_overlay_29.png .
*If you don’t use a title, there are 28 frames so you only need 28 overlays.
DSLR Remote Pro 3.8 boomerang GIF: 29 overlay images placed in folder used for screens
Give your boomerang GIF a title
Note: Boomerang GIFs need one extra overlay if they have a title.
For a single title create a title image named video_stills_title.jpg and insert this into the same PhotoBoothImages folder.
For an animated title replace video_stills_title.jpg with several images called video_stills_title_1.jpg, video_stills_title_2.jpg, video_stills_title_3.jpg etc
You can adjust the length of time the title is displayed (D) and whether it is shown at the start or end of the animation (E) in the Animated GIF Settings (videobooth mode) screen
Adjusting the title for a boomerang (burst) animated GIF DSLR Remote Pro 3.8
Run the photobooth and boomerang GIFs created by guests will have animated overlays.
This example uses DSLR Remote Pro’s simulated camera; a handy feature which lets you try out features and set up designs without connecting a real camera to the computer. The GIF has an animated overlay of falling snow and a title. It has been captured in black & white.
Boomerang GIF with animated overlay and title Breeze DSLR Remote Pro 3.8.1
The falling snow effect here uses 29 images to create the animation. The snow flakes are in a different position on each image.
You are welcome to use these snowflake overlays in your own booth with DSLR Remote Pro. If you found this post useful please share it with others.
DSLR Remote Pro 3.12 is a free upgrade for all registered users who purchased a license on or after 26th November 2017.
This release adds support for the Canon EOS 6D Mark II and includes a number of enhancements to the Multi-Camera Animator:
Save the current calibration settings with each set of downloaded photos. This makes it much easier to regenerate GIF or MP4 files after an event using the calibration settings that were used when the photos were taken.
Integrate multi-camera array shooting into a workflow e.g. post processing photos using Adobe After Effects or copying files to a viewing or sharing station. An optional command can be run on the calibration settings file that is saved after each set of photos has been processed.
Shoot in portrait orientation. The auto alignment tool now supports cameras in portrait or landscape orientation.
Raw+JPEG support for the Multi-Camera Animator. JPEG images are used to create animated GIFs/MP4s. The raw files can be used for high quality post-processing after an event.
This release is a free upgrade for all registered users who purchased DSLR Remote Pro Multi-Camera after 11th December 2016. Customers with older licenses need to buy an upgrade license to use this release.
This maintenance release fixes a problem with using droplets in photo booth mode that affected v3.8. The HideWindowsTaskbar utility, which helps to hide Photoshop windows when running droplets, has been updated to work with the latest version of Photoshop.
This release is a free upgrade for all registered users who purchased DSLR Remote Pro after 11th December 2016. Customers with older licenses need to buy an upgrade license to use this release.
New controls for the size of the image cache held in memory to allow more images to be loaded on computers with limited RAM
New ability to share event info via the Windows registry
Fixed a problem with a blank frame being displayed initially for GIFs when running a slideshow
This release is a free upgrade for all registered users who purchased Breeze Kiosk after 11th December 2016. Customers with older licenses need to buy an upgrade license to use this release.
Added support for Canon EOS 6D Mark II raw conversion, shooting data and focus point overlay display
Performance enhancements reading shooting data from some Canon DSLR models
Fixed a problem displaying focus points from some Canon cameras that affected v1.9.8.10
Fixed a problem printing photos that caused v1.9.8.10 to crash
This release is a free upgrade for all registered users who purchased BreezeBrowser Pro after 11th June, 2016. Customers with older licenses need to buy an upgrade license to use this release.
You can make two kinds of animated GIFs using DSLR Remote Pro 3.8 and Webcam Photobooth 2.4 : slideshow and boomerang. Slideshow GIFs contain still photos taken during normal photobooth operation. You can set up your booth to print the strips (or other layout) and share the same photos in an animated GIF – which looks much more interesting than viewing a strip on a phone.
Boomerang aka Burst GIFs are captured with a short video clip. Both types of GIF can be shared via MMS/SMS, emailed and uploaded to social media.
How to create slideshow GIFs
This blog post explains how to create slideshow GIFs with animated overlays using the Photo Booth Setup Wizard in DSLR Remote Pro 3.8. Photos are printed in the usual way; guests can share the same images as an animated GIF. You can customize your GIFs using the advanced settings.
Start DSLR Remote Pro and run the Photobooth Setup Wizard. This example uses a strip of 4 photos. Choose whether to share via Twitter, MMS/SMS or email at Step 3. (Leave these boxes unchecked if you are using a separate sharing station.) This example creates a 4 photo strip; guests can share their GIFs using MMS/SMS.
2. Choose Settings on the Photobooth Settings screen
3. Check Share animated GIFs so that guests can share their GIF from the booth. (Leave this box unchecked if you are using a separate sharing station.)
4. Check Create an animated GIF from the photos
5. Then choose the Animated GIF settings to display the Animated GIF settings screen:
Animated GIF settings screen DSLR Remote Pro 3.8
6. A photo width of 600 pixels is a good start point. Use the settings in the image above to create an animated GIF from the whole photo (landscape orientation) without any border. Check the final box if you want to make an MP4 copy of each GIF.
7. When you have chosen the settings you need click OK (here and the other pop up windows until you return to the main screen).
Adding an animated overlay to a slideshow GIF
You can create an animated overlay from a set of transparent png images. The falling snow effect here uses 12 images to create the animation. The snow flakes are in a different position on each image. (3 snowflake overlays are shown over each of the 4 photos.) You can download the snowflake overlays here .
To add an animated overlay return to the Animated GIF Settings screen (Repeat 1 to 5 above, selecting Advanced Settings, then Settings, then Animated GIF Settings.)
Change the number of overlays per photo to 3 and click OK (here and the other pop up windows until you return to the main screen).
Animated GIF settings for animated overlay (here 3 overlays per photo)
Now copy the overlay images you downloaded into the PhotoBoothImages folder containing your screens (A). The overlays must be named GIF_overlay_1.png through to GIF_overlay_12.png (B).
PhotoBoothImages folder containing screen layouts and overlay png files
Run the booth and you will create both a strip of four photos and a slideshow GIF with the animated overlay here:
Christmas slideshow GIF with animated overlay DSLR Remote Pro 3.8
Breeze Systems is proud to announce the release of DSLR Remote Pro 3.8. Easier to use and more powerful than ever before, DSLR Remote Pro 3.8 includes two free button sets designed by Wilkes Booth Co.
Highlights of the new release
Fast simple branding for photo booth screens
Create and save new photo booth screen themes
Transfer themes between PCs
Free sets of touchscreen buttons
Create custom caption sets in any almost language
Photobooth Setup Wizard now simplifies screen customization
Brand screens quickly and easily with new DSLR Remote Pro themes
Create themed photobooth screen sets
Create, load and save DSLR Remote Pro themes containing screen background, touchscreen button, and caption sets
DSLR Remote Pro 3.8 theme including (A) screens, (B) buttons & (C) captions
A. Complete sets of custom photo booth screen backgrounds can now be generated from a single image. The same background image can be tiled, stretched or cropped to fit any screen with new themes
DSLR Remote Pro 3.8 single background_tiled.jpeg image used to create themed set of background screens
B. Create your own buttons or choose from those shipped with DSLR Remote Pro 3.8. Touchscreen buttons can be placed below the image or to one side using the Setup Wizard.
C. Customize captions in almost any language. Adjust the color of your text.
Transfer themes between PCs
To generate themed screens on PCs with different screen size/aspect ratio by just copy the theme to the new PC and run thePhotobooth Setup Wizard.
Free touchscreen button sets
Breeze DSLR Remote Pro 3.8 includes 2 new free button sets created by Wilkes Booth Co
DSLR Remote Pro 3.8 Welcome screen: Wilkes Booth Co Tradewind White buttonsDSLR Remote Pro 3.8 Sharing screen: Wilkes Booth Co Tradewind Blue buttons
Choose whether to run buttons across the screen or to the side using the Photobooth Setup Wizard.
Create custom caption sets
Breeze software is used in over 80 countries world wide. DSLR Remote Pro already supports Unicode and handles characters in most languages. Use the Photoboth Setup Wizard to create reusable caption sets, and apply them to different themes.
DSLR Remote Pro 3.8 is shipped with English, German, Polish, Italian and Romanian captions.
Canon’s DSLR cameras can be set to auto focus (AF) or manual focus (MF). The auto focus setting is very convenient for photo booth operators, but when the camera cannot find anything to focus on it will not take a photo.
This post was originally written for DLSR Remote Pro 3.7.3 and last updated to include more recent camera models in October 2022
What can go wrong using auto focus?
You may notice a long pause before the camera takes a photo. The focus motor whirrs and the camera lens moves as the camera tries to focus. Two different error messages may be displayed: ‘Unable to release shutter’ or ‘Unable to focus’.
Unable to release shutter
When setting up the booth the operator presses Release(F8) or Preview (F9) to check camera operation. No photo is taken and this error message is displayed:
DSLR Remote Pro 3.7.3 ‘Unable to release shutter’ error message
Unable to focus
After the countdown there is a long pause before the camera takes the first photo. The focus motor whirrs and the camera lens moves as the camera tries to focus. Eventually this message* is displayed:
DSLR Remote Pro 3.7.3 ‘Unable to focus!’ error message *
*Hint (localization)You can translate this message into your local language using the PhotoboothAfErrorMsg message in the configuration files
Why does this happen?
Usually the camera cannot focus because
there is not enough light
the booth is empty and has a plain background
guests are too close to the camera
the lens cap has not been removed
Autofocus works best with good lighting and guests positioned at the right distance from the camera. It may be improved by changing from a plain background. The most reliable solution is to switch the camera to manual focus.
How to make sure the camera will fire: Set the camera to manual focus
Exception : cameras with dual pixel AF. If your camera has dual pixel AF please see the Camera Settings section of the program help files.
At present (October 2022) the Canon EOS cameras with dual pixel AF we support are:
R Series : EOS R, RP, R5, R6, R7, R10
M series: M6 Mark II, M50 Mark II/EOS M50M2/Kiss M2, M50, M200
DSLR models: EOS 800D/Rebel T7i, 200D/Rebel SL2, 90D, 70D, 77D, 80D, 7D Mark II, 5D Mark IV and 6D Mark II.)
Simplest way to set the camera to manual focus
Set the AF/MF switch on the camera lens to the MF (manual focus) position.
Each time you set up the booth turn the focus ring on the camera lens until you see a sharp image on the PC live view display.
Canon REBEL T5 (1200D) showing AF/MF switch Photo by Kārlis Dambrāns (edited to highlight AF MF switch)
Use the screen on the back of the camera to set the custom function “C.Fn IV: Operations/Others – Shutter/AE lock button” to “1:AE lock/AF” (refer to your camera manual if necessary).
Customer function IV screen on Canon EOS 200D camera
This setting has the advantage that focus can still be adjusted remotely from the PC but auto focus won’t be used when taking a photo. The lens can be focused in fullscreen photobooth mode by typing Ctrl+A.
For more precise control of focus exit photobooth mode and type Ctrl+L to display the live view window. Then use the <<<, <<, <, >, >>, >> buttons or the mouse wheel to manually adjust the focus.
If you found this post helpful please share it with others.
This is the first of a series of posts explaining how to setup your photo booth using the DSLR Remote Pro 3.7.3 Photobooth Setup Wizard.
Getting Started with DSLR Remote Pro (2) will explain how to customize your prints. Getting Started with DSLR Remote Pro (3) will explain how to customize your screens.
Downloading the program
First download DSLR Remote Pro from our website; and install the program on your computer. You can run the program as a free trial for up to two weeks from the day you download it.
Downloading DSLR Remote Pro 3.7.3 from http://breezesys.com/downloads.htm#dslr
Start the program. If you are running a trial version of the program you will see the registration window each time you start. Click on Evaluate.
DSLR Remote Pro 3.7.3 registration dialog
There are five buttons at the top of the main screen. They are shortcuts to the most used parts of the program.
DSLR Remote Pro 3.7.3 Photobooth Shortcut buttons
Printer Setup
Photobooth Setup Wizard
Print Layout
Advanced Settings
Start Photobooth
First connect your printer to the computer and switch it on. You can also connect and switch on your camera now; or use the ‘simulated camera’ at this stage.
Select Printer Setup to tell DSLR Remote Pro about about the printer you intend to use. Choose prints in Portrait or Landscape orientation.
Hint: Portrait is used for narrow strips of 3 or 4 photos, unless you have a DNP printer.
DSLR Remote Pro 3.7.3 Printer Setup screen showing Landscape oriented 6″ x 4″ print layout (non DNP printers)
Hint: For DNP printers using 6″ by 4″ media portrait and landscape orientation are swapped.
DSLR Remote Pro 3.7.3 Printer Setup screen showing Landscape oriented 6″ x 4″ print layout ( DNP printers only select ‘Portrait’ instead of ‘Landscape’)
Finish by clicking on OK.
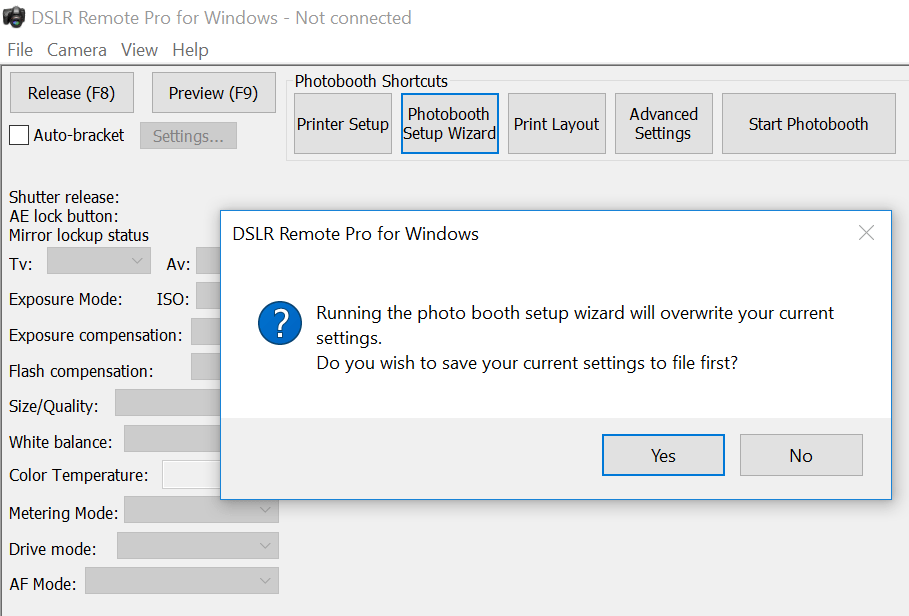
Now start the PhotoboothSetup Wizard. The program will prompt you to save any existing settings before the wizard overwrites them
DSLR Remote Pro 3.7.3 check at start of Photobooth Setup Wizard
At Step 1 you choose the photo layout you need. The wizard offers a choice of 8 popular layouts; if you want something different choose whichever is closest to your design (you will be able to change this later).
DSLR Remote Pro 3.7.3 Photobooth Setup wizard step 1. Landscape layout with 1 large and 3 small photos
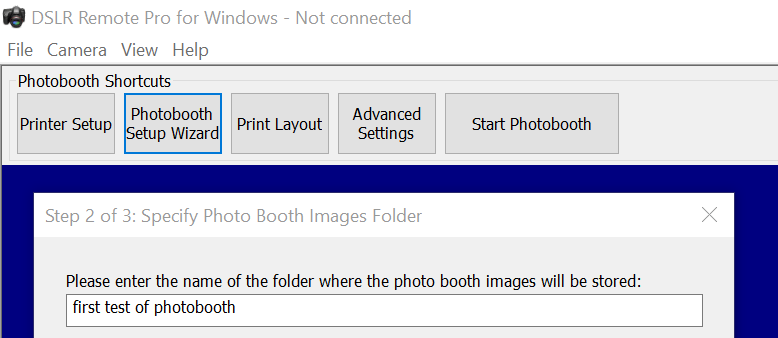
Next Step 2. Tell the program which folder to save the photo booth photos you are going to shoot.
DSLR Remote Pro 3.7.3 Photobooth Setup Wizard Step 2
Finally choose the options you want to offer your guests.
The first 5 check boxes tell the Wizard whether you are using a touchscreen, whether guests can choose between color and B&W prints, whether to display a preview of each photo after it is taken and the maximum number of prints allowed.
The next five check boxes tell the wizard whether a sharing screen (after the photos are taken) should offer uploads to guest’s Facebook and/or Twitter account, share photos by email or MMS/SMS, or offer optional printing. Hint: some operators prefer to offer browsing and sharing from a kiosk separate to the booth. You can use Breeze Kiosk for this. To share and print photos away from the booth leave these boxes unchecked.
Beginners should leave ‘Add a background.jpeg’ blank at this stage. Print layouts can be branded/customised later.
To offer ‘boomerang’ animated GIFs check ‘Enable videobooth..’ and ‘Capture Boomerang GIFs..’.
To offer video booth check ‘Enable videobooth..’
Click on <Finished> and you will see a final screen reminding you where the screen and print layouts created by the wizard have been stored; and where photos taken today will be stored.
DSLR Remote Pro 3.7.3 Photobooth Setup Wizard completed
Close this window, connect your camera and switch it on before selecting ‘Start Photobooth’. That’s it!
DSLR Remote Pro 3.7.3 default photo booth screen created by the Photobooth Setup Wizard


You must be logged in to post a comment.