We’ve had a lot of interest in adding time limits to events in DSLR Remote Pro 3.19, so I have added a tutorial to the website explaining how to use this new feature.
Did you know that there are several ways to add a simple consent screen or disclaimer to DLSR Remote Pro?
Data is usally collected using a survey. However there are simpler ways to ensure guests agree to disclaimers or terms and conditions at the start. This post runs through three alternatives:
Add a disclaimer to the Welcome/standby screen
Add a disclaimer to the Ready screen (with optional link to detailed T&C)
Use a profile menu screen for the disclaimer
Note: All three methods provide a gate guests pass by answering one question. In the worked examples I use But first.. May we share your photos online. Replace this with any question which suits your purpose.
When you need guests to answer several questions, record or analyze their responses, use a survey instead.
Use the welcome/standby screen
To query consent at the standby screen,:
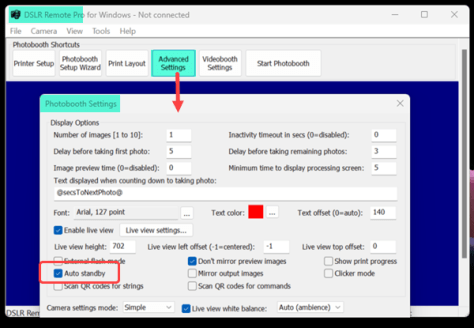
Check Auto standby in Advanced settings
Add a suitable graphic called welcome.jpg to the PhotoboothImages folder
Add the touchscreen action to switch from standby to your Ready screen
Check Auto standby
Auto standby returns the booth to the Welcome screen instead of the Ready screen at the end of each session.
Start DSLR Remote Pro and click on Advanced Settings. Check Auto standby and save your changes.
Checking Auto standby in Breeze DSLR Remote Pro
Add your welcome.jpg
Make your graphic a jpg image which is the same size as your screen (in pixels). Call the graphic requesting consent to use the photos welcome.jpg and add it to your PhotoboothImages folder.
You can ask the same question on the ready screen instead of the standby screen.
You can also link from the ready screen to Information pages providing detailed term and conditions.
Guests clicking Yes!starts the countdown. Guests choosing No are returned to the standby screen. Guests clicking Maybe are shown information screen(s).
In the example above, ready.jpg is white with Yes, No and Maybe buttons. (Maybe is optional and links to information screens.)
ready_overlay.png provides the question text on a transparent background so that it shows in front of the live view.
Make sure both ready.jpg and ready_overlay.jpg are the same size in pixels as the screen.
You may prefer to switch off live view in the ready screen by checking Disable live view in ready screen in Live View Settings.
Yes/accept to take the guest to the ready screen of a second profile.
No/reject returns the guest to standby using the Switch from ready to standby action
Maybe takes the guest to information screen(s) as above
Before you leave…
Check everything works and save your changes before you finish.
More about guest consent
Collecting data and recording consent
Create custom surveys to collect guest data and record consent.
Survey data can be analysed, displayed in prints, and used to separate images into different folders.
Information screens
To add a detailed GDPR compliant privacy statement, terms and conditions or any other information screen(s) to your booth use DSLR Remote Pro Information screens.
Coming soon
Watch out for DSLR Remote Pro 3.19, which will introduce a new way to create simple surveys.
Truth is you don’t need a special app to run a 360 booth. You need a great photo booth app with video capture, slow motion, video FX and a way to start the session ….. like Breeze.
We recommend using Breeze Booth (iPad+iPhone) for 360 booths with an iPhone running 2022 iPhone SE, iPhone 14 or iPhone 13.
Use the high quality rear camera to shoot your videos, and either share them directly from Breeze Booth, or from a Windows tablet running Breeze Kiosk.
Video FX & Built in AI background removal
Use Breeze Booth for iPad’s powerful AI background removal and video effects.
locally processed AI background removal or blurring, with live view
Auto Start detects when a 360 degree spinner starts spinning – automatically starts the countdown and captures the video.
Auto Start detects when a 360 degree spinner starts spinning, automatically starts the countdown and captures the video (Breeze Booth for iPad 3.3)
Sharing your videos
Videos can be shared directly from Booth (iPad+ iPhone), or a sharing station running Breeze Kiosk.
To share from the iPhone screen set up email and/or SMS sharing as standard for the app.
To share from Kiosk use a local network to wirelessly connect the iPhone to a Windows tablet running Breeze Kiosk.
Connecting the app with Kiosk
To connect the iPhone and Kiosk tablet together you need to set up a local network.
Switch on Personal Hotspot on the iPhone, and Allow Others to join. This creates a your network ( no wifi or mobile signal needed) Set a Wi-Fi password in the iPhone to prevent others accessing the network
Alternatively set up your network with a MiFi or 4G modem router. These can provide a local wi-fi network as well as connecting to a mobile data network
Breeze Kiosk is fully customizable Windows app for guests to display, print and share photos, videos and GIFs from your event.
Working with profiles? Remember to load the profile before you start, and save the updated profile when you finish.
Tell DSLR Remote Pro to share photos by email and/or text
Start DSLR Remote Pro and if necessary load your design or profile.
Before sending emails from Breeze you need to set up the email server settings. You only need to do this the first time you send emails from the booth. How to add your email account details.
Check email sharing on the Output screen
This tells the program that you want to offer guests the option to share by email.
Setting the flag which tells DSLR Remote Pro to offer sharing images by email
Create or update a sharing screen
Check whether you already have a sharing screen share.jpg in your PhotoboothImages folder.
Current PhotoboothImages folder (Breeze DSLR Remote Pro 3.15.5)
Screen graphic share.jpg
If there is no share.jpg in in the PhotoboothImages folder use an image editor to create one.
The new screen graphic should be the same size in pixels as the other screens. Include buttons for your sharing options and to exit the screen.
Sharing screen graphic share.jpg with email and exit buttons (Breeze DSLR Remote Pro 3.15.5)
If you already have a sharing screen,add an email button to share.jpg
NB: You can copy the sharing icons we provide for the setup wizard, or use your own png images
Icons used by the setup wizard can be found at C:\Users\…\Documents\Breeze Systems\DSLR Remote Pro\wizard. Copy these or use your own png image. (Image shows icons used by Tradewind White)
Add touch screen actions to the sharing screen
Open the touch screen editor
Opening the touch screen editor (DSLR Remote Pro 3.15.5)
Right click and select Share: share.jpg screen . This displays your share.jpg graphic, the area of the screen covered by the image, and any actions which have already been already set up.
Adding touch screen actions which match the sharing screen graphic (Breeze DSLR Remote Pro 3.15.5)
Right click on an unused part of the screen
Add the action Sharing: Email photos.
Drag and drop this action to cover your email button (1)
If you don’t already have a close action, add a second action Sharing: Close sharing screen
Drag and drop the Close action over your close button (2)
If these buttons overlay the image area, move/resize the image to separate them (3)
Right click once more to exit the touch screen editor, saving your changes.
Working with profiles: remember to save the updated profile before you leave. Troubleshooting profiles
More about sharing by email
Find out how to collect email addresses used to share images, customize email content, share GIFs and find the best balance between sharing images quickly and sending the highest quality imageshere
Sharing at large and busy events, touch free sharing and sharing statistics are covered here
Adding SMS/MMS text sharing to your design
Add text based sharing in the same way.
You will need a share.jpg screen in your PhotoboothImages folder, which includes text and exit buttons.
Sharing screen graphic share.jpg with text, email and exit buttons (Breeze DSLR Remote Pro 3.15.5)
Check MMS/SMS sharing on the Output Settings screen
Setting the flag which tells DSLR Remote Pro to offer sharing images by SMS/MMS
Add the MMS/SMS touch screen action to the sharing screen
Go bck to the touch screen editor and add the Sharing: Send MMS/SMS action to the sharing screen
Right click on an unused part of the screen
Add the action Sharing: Send MMS/SMS.
Drag and drop this action to cover your text button
If you don’t already have a close action,, add a second action Sharing: Close sharing screen
Drag and drop the Close action over your close button
If these buttons overlay each other or the image area, move/resize the actions to separate them
Right click once more to exit the touch screen editor, saving your changes.
Working with profiles: remember to save the updated profile before you leave. Troubleshooting profiles
Adding the Sharing: Send MMS/SMS action to the sharing screen graphic (Breeze DSLR Remote Pro 3.15.5)
More about sharing by MMS/SMS
Not sure whether to send SMS+Image, SMS or MMS texts? Find the answer and learn how to customize text messages, send texts via Breeze Hub or use touch free texting here
Find out how to view cell phone numbers used to share images and sharing statistics here
It’s important that guests cannot exit your photo booth screens, but you need a controlled way out.
When the booth has a keyboard attached just hit the Escape key from the Breeze Ready screen.
To exit using the touch screen, you need a hidden button. Ideally combine this with password protection.
Adding the secret button and password
This page explains how to add a hidden exit to both DSLR Remote Pro and Webcam Photobooth. Add the exit command to your touch screen settings.
Getting to the touchscreen settings in DSLR Remote Pro
Accessing touch screen settings (1) and adding your password (6) (DSLR Remote Pro 3.15.2)
Getting to the touchscreen settings in Webcam Photobooth
Accessing touch screen settings (1) and adding your password (6) (Webcam Photobooth)
(1) Start the program and go to the touch screen settings for your Ready screen. There will be a short pause before you see the next screen:
Adding an Exit button to the Ready screen (DSLR Remote Pro 3.15.2)
Right click anywhere on this screen to show the current screen and add new actions.
Actions make something happen when the screen is touched in a particular area. This screen already has actions to start the booth and switch between color and black & white. We are going to add a new action to exit the Ready screen.
(2) Select Add Action
(3) Choose the action Exit Full screen photobooth from the drop down list
(4) Drag and drop the action to a convenient location. Use an empty corner of your screen for hidden buttons. Guests won’t see them but you and your staff will find them easily.
(5) Right click again and choose Exit
6) Add a password in case a guest guesses the location of your button, or touches it by mistake.
Remember to save your changes as you leave each screen.
What this looks like in practice
Your Ready screen looks exactly the same, there is no clue that the button exists:
Ready screen with no sign of hidden exit (Breeze DSLR Remote Pro 3.15.2)The same screen showing the location of the hidden exit
Anyone finding the secret button the can’t exit the booth without knowing the exit password I added at (6) .
To exit the booth you also need to know the exit password (Breeze DSLR Remote Pro 3.15.2)
Adding other actions to your screens
Touch screen actions are powerful tools which give Breeze programs enormous flexibility. Use them to access the reprint selection screen, an information or T&C screen, add choices using profiles and much more.
Guests often ask for an extra print after their session has finished. DSLR Remote Pro includes options to display a reprint selection screen. Link to this screen using the Display Reprint Selection Screen action
Did you know Santa’s elves are enthusiastic users of Breeze Hotfolder? We know Santa’s especially busy, because they needed several more copies this year.
The latest Breeze tutorial takes you through adding seasonal overlays and backgrounds to your prints when you shoot tethered this holiday season. This tutorial explains how to
add overlay and/or background to the photos before printing
automatically switch between portrait and landscape print layouts
choose from automatic printing or saving print layouts to print later
Did you know that Breeze Multi-Camera v2.1 introduced an option for the Multi-Camera Animator to use Microsoft MediaWriter instead of ffmpeg to create MP4 videos?
Microsoft MediaWriter libraries are much faster
ffmpeg libraries are more flexible and still appropriate for some applications
Multi-Camera 2.1 is a free upgrade for all registered users who purchased Multi-Camera (previously called DSLR Remote Pro Multi-Camera) after 28th November 2017. Customers with older licenses need to buy an upgrade license to use this release.
New to Multi-Camera? Just download a copy of the program and try it for free. You can run the program with up to 4 cameras for 2 weeks on the fully functional evaluation license.
Several of you want to include guests names on DSLR Remote Pro prints. This post shows you how.
You can either start from an existing design, or run the setup wizard to create something completely new. You then need to
Create a keyboard where guests are prompted to type in their names
Choose whether to enter names before or after taking the photos
Add a caption to your print layout showing the name
Updates 21 August 2019
Reprint note: Fast reprint runs off a copy of the original print layout (with the data guests have already entered )
Post updated to correct error adding guest details after taking photos.
Create the keyboard where guests enter their names
Go to Advanced Settings and select the Touchscreen Settings screen
On this screen, click the Test Keyboard button, then choose Message keyboard from the dropdown menu
The Touchscreen Settings screen is accessed from Advanced Settings as here (DSLR Remote Pro 3.14.1)
Hold down the Shift and Ctrl keys and left click your mouse.
This will save five files to your photo booth images folder: message_keyboard.xml, message_keyboard_lowercase.tif, message_keyboard_lowercase_pressed.tif, message_keyboard_uppercase.tif, message_keyboard_uppercase_pressed.tif
PhotoboothImages folder highlighting the 4 tif files you need to delete and the xml file you need to rename
Go to your PhotoboothImages folder and
delete these 4 tif files
rename message_keyboard.xml as keyboard.xml
My PhotoboothImages folder then looks like this:
PhotoboothImages folder after deleting and renaming files
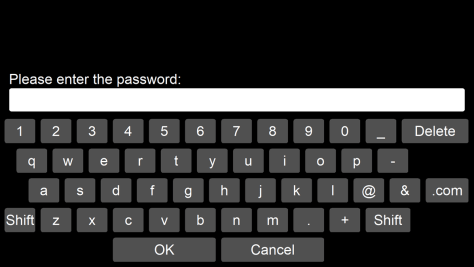
Now open keyboard.xml in a text editor such as Microsoft Notepad (which comes free with Windows 10) and change the wording of the prompt from Please enter your message to Please enter your name (or whatever text you prefer).
Original prompt text in keyboard.xml Revised prompt text in keyboard.xml
Save your changes and close the text editor.
The edited version of keyboard.xml will build a touchscreen keyboard looking like this:
Keyboard screen for guests to type in their name. (The new prompt has been highlighted)
Advanced users: may wish to make other changes to the xml to customize this screen. See Collecting both guest names and a message below for an example.
Choose whether guests enter their names before or after taking the photos
You can control whether guests type in their names before or after taking the photos. Just select Email input at start of sequence or Email input after taking photos on the Touchscreen settings screen as below
Use the drop down menu to choose whether guests type in their names before or after taking the photos (DSLR Remote Pro 3.14.1 Touchscreen settings screen)
Extra screen when collecting guest data after taking photos
If you choose to collect the information after the photos are taken, you need to add an extra screen to your PhotoboothImages folder called keyboard_input_ok.jpg. This will be displayed for a short time after guests enter their data and hit OK.
You can create this screen by taking a copy of a blank screen such as taking.jpg and renaming the copy.
Showing keyboard_input_ok.jpg screen in PhotoboothImages folder
So far we have created a screen for guests to enter their names. Now we need to adapt your print layout to add these names.
Add a caption to your print layout which displays these names on the print
Open the Print Layout Editor and right click anywhere on the print. Select Add caption
Right click anywhere on the print to add your caption ( DSLR Remote Pro 3.14.1 Print Layout Editor)
To display the guests names, your caption must include the token {user1_data}. Adjust the font, color, position and angle of the caption as usual:
Caption text including the token {user1_data}
When you run the booth the name(s) guests enter will replace {user1_data}
Guests can add also stamps, emoji &/or frames, as well as draw or sign on prints (DSLR Remote Pro 3.14.1)
Learn more
I have shown you how to add each guest’s name to prints. Taking this a bit further
Collecting both guest names and a message
Thanks to Caroline & Josh www.giggleandriot.com for allowing us to use these lovely examples
To collect more information such as a message make these changes to keyboard.xml:
Make room to collect a second data item
Add a second prompt and data field,
Change the background color of the screen.
To display the extra information on the print add a caption including {user2_data} to the print layout
Here I have edited keyboard.xml to (1) Make room to collect a second data item (2) Add a second prompt and data field, and (3) change the background color of the screen. To display the extra data on the print add a caption including {user2_data} to the print layout


You must be logged in to post a comment.