Several people have asked why they can’t copy their backgrounds, logos, print layouts etc into their PhotoboothImages folder recently – they see an error similar to this:
Error copying to C:|Program Files (x86)\Breezesys…
This error happens because Windows 10, 8 and 7 all protect the Program Files (x86) folders from accidental or malicious damage to applications.
Please do not try to use C:\Program Files (x86)\Breezesys\DSLR Remote Pro\PhotoboothImages\ or C:\Program Files (x86)\Breezesys\Webcam Photobooth\PhotoboothImages\ or C:\Program Files (x86)\Breezesys\Hotfolder Prints\PhotoboothImages\ for your PhotoBoothImages folder.
Instead place your PhotoboothImages folder in your Documents folder C:\Users\yourname\Documents\PhotoboothImages
Setting the locations of your PhotoBoothImages folder
DSLR Remote Pro
Location of PhotoBoothImages folder DSLR Remote Pro 3.13
Webcam Photobooth
Location of PhotoBoothImages folder Webcam Photobooth 2.4
Hotfolder Prints
Te equivalent to a PhotoBoothImages folder where you place print layouts and backgrounds etc in Hotfolder Prints is here:
Location of folder containing print layouts etc Hotfolder Prints 1.7
You can also use Kiosk with still (JPEG) and animated (GIF, MP4 or MOV) images captured by third party software.
What’s new in Kiosk 1.5.1?
Social sharing counters
Collect stats on emails, texts and tweets sent from each Kiosk as well as the number of prints.
Breeze Kiosk 1.5.1 includes new counters for the number of emails, texts, tweets and prints from the kiosk at an event
Flexible printing
Print up to 3 different print sizes
Control several printers
Print up to 3 different sizes of print on the same or different printers with Breeze Kiosk 1.5.1
Choose up to 3 different printer settings. In the screenshot above the default printer (1) is a Mitsubishi CP70D printing 4″ x 6″ layouts. Prints prefixed square (2) are printed square on the same CP70D printer. Single 2″x 6″ strips are displayed in Kiosk as single strips, but printed (3) as double strips on 4″x6″media.
This feature can also be used to print to 3 different printers.
Slideshow plays full video before advancing
New option to play videos at least once when running a slideshow i.e. don’t advance the slideshow until the video has played from start to finish at least once.
Performance improvements
Performance improvements for swiping images when running on Microsoft Surface Go
Fixes
Fixed glitch with the selected thumbnail changing when new images are added with the “Display newest images first” option selected
Fixed issue which caused the wrong photo to being printed if a new photo was added while the print confirmation screen was displayed
Fixed issue setting the initial values of check boxes in keyboards
This release is a free upgrade for all registered users who bought a Kiosk license on or after 30th May, 2018.
Customers with older Kiosk licenses need to buy an upgrade to use this release.
Downloader Pro 2.6 adds support for downloading directly from the Canon EOS RP, Canon EOS 250D/Rebel SL3 and Canon PowerShot SX70HS. This release adds support for Canon CR3 format raw files in the Adobe DNG converter plug-in and fixes an issue with registering for Windows AutoPlay when installing Downloader Pro.
Downloader Pro minimises the time spent downloading and organising images on your PC, and is often partnered with BreezeBrowser Pro.
Downloader Pro runs on PCs running Windows 10, 8 or 7, and will run as a free trial for up to 30 days.
Download, Try, Buy
You can find details, download and purchase links on the Breeze website here
This release is a free upgrade for all registered users who purchased a license within the last 18 months. Users with older licenses need to buy an upgrade license to use this release.
Breeze Booth features the most flexible and powerful interface designer of any iPad software on the market. Use the unique drag and drop Event Editor to create totally custom experiences, complex multi menu systems and engaging data surveys.
Note:Event Editor 1.3 was released on 17th July, and can be downloaded here
Sounds fantastic! Where do I start?
Start by running the new Event Creator in Event Editor 1.2. You can create custom working designs in just three simple steps.
This post runs through
downloading and installing Event Editor 1.2
creating events from scratch with the Creator
cloning existing events
transferring events to iOS 12 devices (iPads and iPhones)
Downloading and installing Event Editor 1.2
Create and edit events using Breeze Booth’s powerful Event Editor on any Windows PC running Windows 10, 8, or 7
When you download Event Editor 1.2, you will also download the latest release of Breeze Hub and the five sample events provided with Breeze Booth. That’s great for beginners.
If you already have event designs you want to keep, we suggest unchecking the box Copy sample events to your Documents folder so that no changes are made to your events folder.
Uncheck Copy sample events … if you don’t want your existing events folder changed
Create your first event
Open the Event Editor and select Create event..
Three step Event creator creates working events for any iPad or iPhone * using the new Chameleon theme designed by Wilkes Booth Co:
This slideshow requires JavaScript.
Once the Creator has built a new event you can transfer it to your devices or use the Event Editor to make further changes.
Cloning existing events
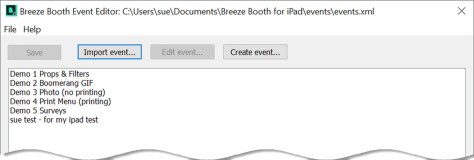
You don’t need to build all your events from scratch. Save yourself time and effort by right clicking on an existing event to clone it:
You can also import complete Breeze Booth events created elsewhere using the Import Event… button.
Right click on any event to clone it (Breeze Booth Event Editor 1.2)
Cloning the sample events
You are welcome to use the sample events we provide with Breeze Booth at live events. To make these events your own, clone them and edit the cloned copy of the event. (You will then have an easy way to start again from the original event.)
Transferring your new event to your iPads and iPhones
Once your design is complete you need to transfer it to your iPads and iPhones.
This post scratches the surface of what you can achieve with Breeze Booth. Take a look at the Props and Filters and Surveyssample events for more ideas.
Go ahead – make it yours, make it your clients. Breeze Booth can be re-skinned to make it look like your very own photo booth software. Deploy remote and unattended iPads without fear of clients knowing what software you use. Learn more in the Breeze Booth help files
Summary
We have learned how to use the Creator to build events from scratch, and how to clone these and other events. I have linked to a separate post Syncing Events with Dropbox which demonstrates the simplest way to transfer your events to iPads or iPhones.
Is there a free trial?
You don’t need to buy a license to create events for Breeze Booth . Just download and install Breeze Booth Event Editor 1.2 onto a Windows PC. You can try out Breeze Booth and companion Apps Event Editor and Breeze Hub free of charge.
* Devices must run iOS 12. At time of writing (May 2019) Breeze Booth supports iPad Pro 11 and iPhone X series and well as iPads with 4:3 screens and iPhones with 16:9 screens
Thank you for taking the time to read this post. Please share it with others who may find it useful.
There is a whole collection of goodies in the latest update to Breeze Booth & companion apps released today, including a new Event Creator, Bluetooth control of LEDs and other devices from the iPad, and passcode controlled updates to events.
What’s new?
Three step Event Creator builds working events from scratch
Link lighting effects to countdown and other screens*
Save power : switch off or dim lights during idle time*
Control Breeze Booth from other devices including payment systems, remote triggers and proximity sensors*
Passcode controlled update of events
Add audio to screens
Choice of print sizeand printer from the App
*requires compatible Bluetooth devices
Creating and customizing your own events
You love the Breeze Booth App and the power and flexibility of the Editor, but found it difficult to get started. We have simplified the Editor’s interface, added an easy to use event creator and buttons taking you straight to detailed help.
Easier editing
Simple Event Creator helps you build new events from scratch
Existing events are loaded automatically when you open the Editor
Free professional Chameleon theme as standard (use Chameleon with the Creator)
Screens folder is clearly named
Buttons link to detailed help for the current screen
Advanced options (including profiles) have been moved to a separate screen
Create working events in three steps
Three step Event creator builds working events for any iPad or iPhone ** using the new Chameleon theme:
This slideshow requires JavaScript.
When you have built an event either transfer it straight to your booths, or add extra features such as virtual props, html emails and engaging surveys.
Give users a unique 6 digit passcode which will automatically download the latest version of the event to their device, and run it. More details …
This slideshow requires JavaScript.
Where to find the latest releases
Breeze Booth 1.0.2 is a free upgrade which you can download from the App Store
Download Breeze Booth Event Editor 1.2 and Breeze Hub here
Can I try this for free?
You don’t need to buy a license to create events for Breeze Booth . Just download and install Breeze Booth Event Editor 1.2 onto a Windows PC. You can try out Breeze Booth and companion Apps Event Editor and Breeze Hub free of charge.
* Devices must run iOS 12. At time of writing (May 2019) Breeze Booth supports iPad Pro 11 and iPhone X series and well as iPads with 4:3 screens and iPhones with 16:9 screens
Thank you for taking the time to read this post. Please share it with others
Breeze Booth comes with five sample events as standard, professionally designed to run on iPads. Run these events out of the box to get a feel for what you can achieve with the App, then tweak or customize them to use at your own events.
This post covers
a brief guide to each event
general information about the sample events
how to download and run the sample events on your iPad
Getting started
You can run Breeze Booth on any iPadOS, iOS13, iOS 14 device without having or signing in to an account but it will be limited to ten photos or GIFs per day before a watermark is added to the output. There is no charge to open the account. Use it to buy subscriptions and redeem vouchers to sign in your iPads.
You will need an account with at least one active subscription or voucher to use Breeze Booth for iPad for unlimited photos. Please see Creating an Account and Logging into the Web App for more information.
Downloading the App and sample events to your iPad
There is no charge to download and run Breeze Booth on an iPad or iPhone.
Breeze Booth runs on all iPads and iPhones running iPadOS, iOS13, or iOS 14. Once you have downloaded the App, you will be prompted to download the sample events onto your iPad. This may take a little time as two of the events are quite large. Once they are successfully downloaded, you can run any of the five events.
Each sample event includes a Welcome screen with information about the event. Tap anywhere on this screen to start the event.
Sample welcome screen for the Props & Filters demo. An overlay called ready_overlay.png is displayed over over a plain background called ready.jpg
You can replace this screen with one suited to your own events, perhaps including instructions for your operator, or support information for unattended booths.
If you don’t want to use welcome screens you can hide them.
The welcome screens include a reminder that there is a secret button in the top right hand corner of each event ready screen to access the admin menu. You can password protect the settings screen if required.
Admin menu
The sample admin menus are the same for all the sample events, and include five options
return to the admin screen
switch between front and rear cameras
adjust the camera settings
sync (download the most recent version of) the event
back – go to the previous screen
Privacy/information button
There is a privacy/information button in the top left or lower right corner of all the sample events. This takes guests to one or more screens with extra information. These screens are a great place to put your business details, terms and conditions, privacy statement, or even troubleshooting advice. The sample events all include two pages of information; you can change both the content and number of information screens.
Printing and emailing from the iPad
Breeze Booth can run as a standalone App where guests email images and/or print them using AirPrint. You can also link the booth to a Windows PC running Breeze Hub for Windows based printing.
The five sample events all print and email directly from the iPad, so you do not need a Windows PC to run them.
Booth orientation
You can run Breeze Booth in both portrait and landscape, and set it up to automatically switch between the two when the iPad is rotated. Most iPad booths run in portrait orientation, so the sample events are designed for this. We have included a simple screen prompting operators to rotate the iPad back to portrait if they try to run it in landscape.
Sample landscape ready screen directing users to rotate the iPad back to portrait orientation (Breeze Booth)
You can change the design of this screen or remove it.
Five sample events
Props and filters
Boomerang GIF
Photo (no printing)
Print Menu (Printing)
Surveys
To make the most of these demos (1) run them, (2) read these notes, and (3) look at how the event is set up in the Event Editor app.
Choosing the Smiling Fowers prop Breeze Botoh for iPad
Color Filters
Breeze Booth comes with monochrome, sepia and comic style filters as standard. You can add six more custom filters.
The color and BW filter in this demo were custom made in Lightroom. To learn more about how to create your own filters, see the online manual.
Mirror Effects
Breeze Booth includes a range of mirror effects; from a simple vertical split screen mirror, to a quad screen of vertical and horizontal. Mirror effects can be applied to still images, slideshow GIFs and burst/boomerang GIFs.
Sub Menus
Breeze Booth lets you create your own sub menus. Props and filters demo uses one menu to display the choice of special effects. A second menu is used for Admin options, giving simple access to functions including Sync, camera settings and exit to the main settings. Tap the right hand corner to check this out.
Sharing by email and text
The sample events share photos by email using the inbuilt iOS Mail App. For more control over email style and content use SMTP emails.
You can also share by text using a third party service called Twilio. The sample events do not include this option.
Info Screens
Info screens are a way of presenting information to people using the photo booth. In this demo, the Info Screen is being used to display a Privacy Statement. Unattended booths might use info screens for a guide on how to use the photo booth. Corporate events might have info screens displaying their terms and conditions.
Initial Profile
Initial Profiles are a great tool to force guests or your operator to view particular information before running the booth. The sample events use the initial profile to educate people about these demos.
Demo 2 Boomerang GIF
This demo features:
Boomerang / Burst GIF
BW color filter
Animated overlay
Color filters
Breeze Booth comes with monochrome, sepia and comic style filters as standard. You can add six more custom filters.
The color and BW filter in this demo were custom made in Lightroom. To learn more about how to create your own filters, see the online manual.
Animated Overlays
GIFs can also have animated overlays applied as a series of transparent PNG files. For more information about setting up animated overlays, see the online manual.
Demo 3 Photo
This simple demonstation takes 3 photos and makes a slideshow GIF from them.
Demo 4 Print Menu
This demo features
multiple profiles
print layouts
printing
Multiple Profiles
Profiles can be used to build a custom menu system, offerings guests choices. In this demo, the menu allows a user to choose which print layout they want.
Print Layouts
The demo shows three different layouts; 6×2 strip, a single image 6×4 and a 6×4 with 4 photos.
Printing
Photos can be printed directly from the iPad with an AirPrint printer, or use our free App Breeze Hub for Windows based printing.
Windows driven printing lets you use a huge range of printers including almost all dye sublimation printers. More about printing.
Demo 5 Surveys
To make the most of this demo, have a read of these notes, and be sure to try out all the surveys. Then check out where and how the images have been saved, and have a look at how the event is set up in the Event Editor.
Note: The sureys demo has been designed to show creative ways you can customize Breeze Booth to collect and use guest data. It is not intended for use at live events.
This demo features 5 different surveys
Opt In/Out (with multiple options)
Simple Accept/Decline
Age gate
Simple Graphical Options
Advanced Graphical Options
Also demonstrated, is how data can be affected by the choices users make. As an example, the choices users make can determine:
Where images get saved
The file names of images
What text gets added to print layouts
What text gets added to emails
Where/how the images are saved
To see how survey data can affect where and how images are saved, run the demo on your iPad and check out what has happened to the images from your session.
On the iPad, open the Files App and then tap On my iPad, then Breeze Booth, then Photos. Take special note of the folder names, specifically paying attention to the Demo 5 folders, and then take a look at the files in each, and see how the file names are effected by the survey choices.
Using Survey Data in emails
Data from the survey can be used in emails like the one sent by this event.
Using the Survey Data in prints
Have a look at the print attached to the email. See how Steve creatively used the data you entered for emotion, age and Toblerone price on the print.
Slideshow GIF with the new top/bottom mirror effect
Save logos with Photo Booth Print Layouts
Logos provide a quick and easy way to add graphics to prints without using an image editor such as Photoshop.
DSLR Remote Pro 3.12 introduced the ability to add up to five JPEG and/or PNG logos to your prints. Many of you want to save these logos with your photo booth print layouts, so we have added this feature to v3.13.
Add up to 5 logos to each print and export them with the Print Layout (Breeze DSLR Remote Pro 3.13)
Total number of prints counter
Keeps count of the number of prints made (Breeze DSLR Remote Pro 3.13)
The new Total number of prints counter is shared with other Breeze apps running on the PC such as Kiosk, and incremented each time any of these apps prints. Learn more
Note to advanced users: The token for this counter {eventPrintTotal} can be used in filenames, caption text in print layouts and message text.
Try DSLR Remote Pro 3.13 for yourself
DSLR Remote Pro 3.13 is a free upgrade for all registered users who purchased DSLR Remote Pro after 14th April 2018. Customers with older licenses need to buy an upgrade license to use this release.
Pop Art and mirror effects are a doddle in DSLR Remote Pro. Set up your booth as usual, copy PhotoboothcreativeFilter.dll into your PhotoboothImages folder, then select the filter you want to use. That’s it!
DSLR Remote Pro 3.13 ships with ten creative filters and six Instagram style filters as standard. This post explains how to use mirror, Pop Art and other filters in still photos, slideshow and boomerang (burst) GIFs.
This post was updated on 2 September 2021 to add a link to the profile tutorial which explains how to build a menu. Use menus to offer guests a choice of filters.
Copy PhotoboothcreativeFilter.dll into your PhotoboothImages folder
Copy PhotoboothcreativeFilter.dll from your installation folder (usually C:\Program Files (x86)\BreezeSys\DSLR Remote Pro) into your PhotoboothImages folder
Copying PhotoboothcreativeFilter.dll from C:\Program Files (x86)\BreezeSys\DSLR Remote Pro
Just paste PhotoboothcreativeFilter.dll into your PhotoboothImages folder
Connect your camera and choose a filter
Start the booth and DSLR Remote Pro will display the default filter (color negative).
Color negative filter (Breeze DSLR Remote Pro 3.13)
Type Ctrl+Shift+C to display the setup page and choose one of the mirror filters:
Drop down list of creative filters. DSLR Remote Pro 3.13 introduces mirroring and an ‘off’ setting.
Selecting one of the creative filters in DSLR Remote Pro
You are away! Here are a few examples of mirroring, Pop Art and Posterized effects:
Left/right mirroring
Left/right mirroring GIF in DSLR Remote Pro (new in Breeze DSLR Remote Pro 3.13)
Top/bottom mirroring
Square images on a square print with top/bottom mirroring (new in Breeze DSLR Remote Pro 3.13)
Two by two mosaic
Create multiple reflections with the two by two mosaic filter (DSLR Remote Pro 3.13)
Pop Art
Breeze gives total control over Pop Art effect colors. This print layout fills a square 6 x 6 print with 4 square images
Pop art effect slideshow GIF (Breeze DSLR Remote Pro 3.13)
Posterize
Posterize effect in slideshow GIF (Breeze DSLR Remote Pro)
Switch between filters or turn them off
Type Ctrl+Shift+C on the Ready screen to switch to a different filter or turn them off completely.
Set up filters for boomerang GIFs in exactly the same way as for still photos/slideshow GIFs. Guests see the effect of each filter as they pose, not just on their prints and GIFs:
Creative filters work with both photos and boomerang GIFs
Save the current filter for future use
The current filter is automatically saved* for the Photobooth Images folder you are using. When you next load this Photobooth Images folder into DSLR Remote Pro, it will automatically run the same filter.
*Filter settings are saved in the program registry for each Photobooth Images folder.
Where the outputs are stored
Screenshot of subfolders containing outputs from the booth
DSLR Remote Pro gives you a lot of control over where your images are stored. This can be really useful when you want to use a watch folder to share, display or upload images from the booth. This post explains where DSLR Remote Pro usually places different types of images.
Mirroring filters in portrait
If you shoot in portrait the top/bottom and left/right filters are swapped. The two by two mosaic works but ‘swap top halves’ is not designed for portrait orientation.
DSLR Remote Pro 3.13 is a free upgrade for all registered users who purchased DSLR Remote Pro after 14th April 2018. Customers with older licenses need to buy an upgrade license to use this release.
Mirror booths usually do not display the camera’s live view because guests see themselves pose in the mirror.
Breeze DSLR Remote Pro’s support for bespoke interfaces and custom menus makes it a great choice for magic mirrors and photo booths. You can hide the live view whether you are offering still photos, GIFs, slow mo or video booth:
Fusion Booth running DSLR Remote Pro with choice of boomerang GIF, slow motion or photos (Image courtesy of Incredible Booth)
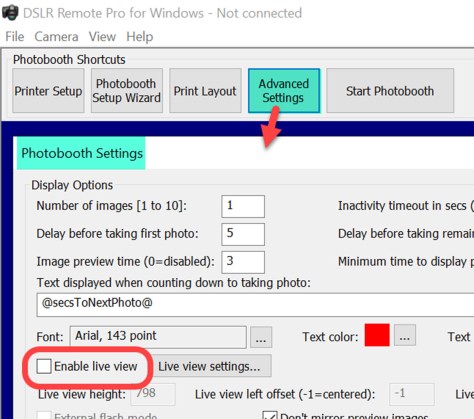
To capture still photos without displaying the live view simply switch it off in Advanced Settings.
Live view unchecked to hide the live view when capturing still images (Breeze DSLR Remote Pro 3.12)
This is great when you want to make slideshow GIFs from a set of still photos.
Breeze boomerang GIFs are captured from the camera’s live view, so when live view is switched off you cannot shoot boomerang GIFs.
Hide the live view
Mirror booth users and others who want to shoot boomerang GIFs without showing the live view need to hide it. There is a simple trick to this – move the live view so that it is no longer displayed on screen. If your screen is 1080 x 1920 pixels, offset the live view by more than this (In this example I have offset by 2000 pixels in both directions):
This slideshow requires JavaScript.
Guests will still see the countdown but not the live view. Magic!
Breeze DSLR Remote Pro powers photo booths and mirror booths worldwide. Licenses cost just US $275* each and include one year’s free upgrades. This post shows screenshots from Breeze DSLR Remote Pro 3.12
This Windows based App runs as a fully functional trial for up to 14 days supporting most Canon DSLR cameras and Canon’s mirrorless M50.
I’m pleased to be able to say that we released Breeze Booth 1.0.1 today, adding iPhone support and scheduled updates for fixed installations to our innovative iPad App.
Breeze Booth supports all iPads and iPhones running iOS 12.1, and can be downloaded from the App Store here
New in Breeze Booth 1.0.1
Support for Apple iPhones
Scheduled syncing (updating) events and purging old images for fixed installations
Custom background images for start screen can be different when device is signed in and out
Switch between simple and advanced display options on settings screen
Simpler initial download of sample events
Simpler switching between events
Fixed issue with AirPrint
Fixed issue with text number verification
Smaller roving devices
Breeze Booth is ideal for the growing roving market, and offers new opportunities for smaller, light weight devices powered by iPhones and the new iPad Mini 5. Share and print images using Breeze Hub from both iPhones and iPads. Create bespoke interfaces for small and large screens with the powerful Event Editor.
How much does it cost?
Breeze Booth is available at an introductory price of just $49/month or $440/year for each device. To buy subscriptions open a Breeze Booth account.
Prices exclude any tax due
I’ve just bought a license! How do I upgrade?
Thanks for being an early adopter. Breeze Booth 1.0.1 is a free upgrade – just upgrade your copies of the App from the App Store.


You must be logged in to post a comment.