Articial Intelligence (AI) based background removal is a fantastic alternative to green screen. The quality is awesome, there’s no cumbersome backdrop, and lighting is much simpler. It doesn’t even matter when your guests wear green.
Use background removal with both DSLR Remote Pro and Booth (iPad + iPhone) slideshow GIFs and prints
Who hasn’t wanted to escape to a different place recently?
Transport guests to the location of their dreams
Replace less than perfect backgrounds
Make the most of small spaces and dispense with backdrops
Attract visitors by facing your booth towards them
Three background removal services to choose from
At present Breeze supports background removal services from AI Background Remove, Gadbooth, and removebg . These are paid services offered by third parties. More
Please see Partner Information below for important information on 3rd party programs and services.
Reliable Internet: AI based background removal is a web based service, so you need a reliable internet connection at the event.
More about background removal with DLSR Remote Pro and Booth (iPad + iPhone)
The ability to upload to and download from third party applications such as AI Background Remove, Gadbooth, and removebg is subject to each third party concerned continuing to allow such interactions.
These features are tested before they are released but may cease to function or be removed without notice if the third party concerned no longer allows such interaction, or changes the method/protocol required.
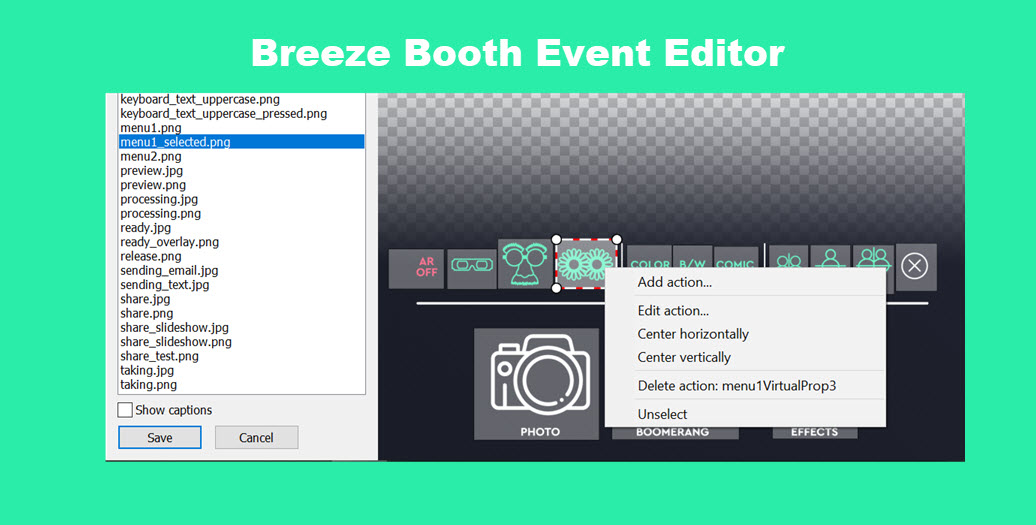
This post explains how to create and edit your own events for Breeze Booth for iPad using the Breeze Booth Event Editor 1.1 on a Windows PC, and covers
what’s new in this release
first steps : how to download, install and run the Event Editor on your PC
loading events into the event editor
cloning an event as a start point for a custom design
Easier editing – you will find it much simpler to load events into the Editor, copy them and save your work.
Simpler cloning of events
Ability to import events from elsewhere
Improved event format
Simpler manifest regeneration
Chris has also added the ability to set up both initial and default profiles for an event, & load profiles from menu 1 or menu 2
Download and install Breeze Booth Event Editor & sample events
Event Editor runs on a Windows 10, 8 or 7 computer. Download it from here.
You will also automatically download Breeze Hub and the designs for nine sample events. When you install the event editor, these events will automatically be saved in your Documents folder C:\Users\…\Documents\Breeze Booth for iPad\events
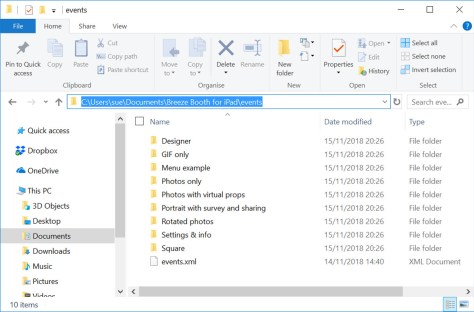
The Breeze Booth Event Editor installer has created this folder of sample events. C:\Users\sue\Documents\Breeze Booth for iPad\events
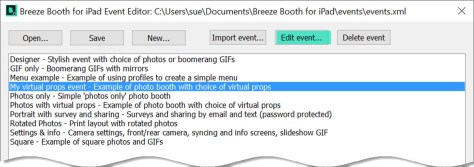
There is a sub-folder for each sample event, and a file called events.xml which you need to open in the Event Editor:
Run Breeze Booth Event Editor
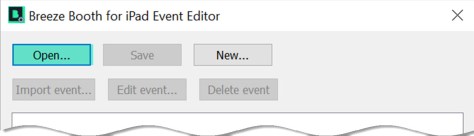
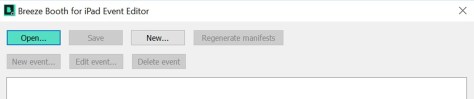
Start the Event Editor, and select Open.
Starting Breeze Booth Event Editor 1.1 for the first time
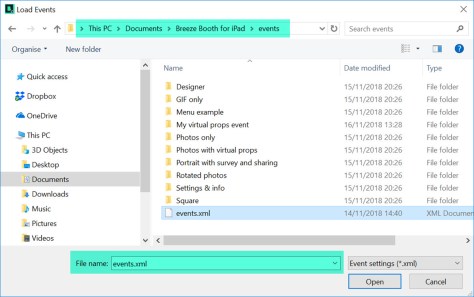
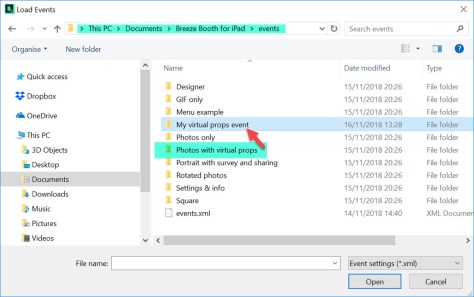
Load the list of existing events by selecting events.xml in C:\Users\…\Documents\Breeze Booth for iPad\events
Select events.xml to load the list of events into Breeze Booth Event Editor
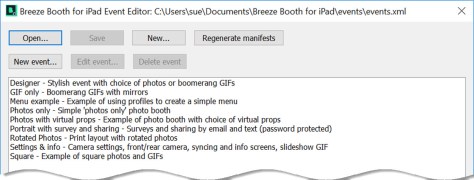
Initial list of sample events displayed in BBEE
List of sample events loaded into Breeze Booth Event Editor 1.1(This list was created from the events.xml file we opened)
The first event is called Designer and showcases many of the features included with Breeze Booth for iPad. You are welcome to use this design (or parts of it) with Breeze Booth for iPad at your own events.
The remaining 8 events are much simpler. They are intended to help you create your own designs.
This post will show you how to copy one of these simple events (Photos with virtual props) and edit it for your own use.
Photos with virtual props takes one photo and shares it on a custom background. Guests choose between 3 virtual props. They can also choose whether to shoot in color, B&W, sepia, comic effect or using a filter. The photo can be shared by email .
Cloning ‘Photos with virtual props’
Right click on Photos with virtual props and select Clone Event…
Right click on an event to clone it
You can change the name, description and folder name of the new event:
This slideshow requires JavaScript.
Editing an event
Portrait, landscape or both?
Breeze Booth for iPad lets guests switch between portrait and landscape orientation on the fly (great for roaming booths like the Ring Roamer). My virtual props event can be used in both portrait and landscape orientation, so has designs for both.
If you will always run an event in the same orientation, you don’t need to create both designs.
Open My virtual props
Select My virtual props… and check Edit event…
We will just edit the portrait version of My virtual props event today. Click on the portrait Edit button:
This brings us to the Photo Booth Settings screen, where you can start to customize your design
Tabs on Photo Booth Settings screen (Breeze Both for iPad build 20)
The original Photos with virtual props takes one photo and shares it on a colored background with a custom logo. Guests choose between 3 virtual props. They can also choose whether to shoot in color, B&W, sepia, comic effect or using a filter. The photo can be shared by email .
We are going to change My virtual props event to
take 2 square photos
remove the branded background print layout
add a new background color, 2 logos* and a caption to the print layout
create a slideshow GIF from the 2 photos
customize the wording of the email
share the slideshow GIF instead of the print layout
*You can add up to 5 different png or jpg logos to each print layout in addition to the background and overlay. This is a simple way of branding a design for a particular event, and can also be used as a quick way to add an image of the bride and groom (taken earlier in the day) to wedding photo booths.
Photo Booth Settings Screen
The Photo Booth Settings Screen is displayed for the profile you selected. It has 5 tabs : General, Photos, Slideshow GIFs, Burst GIFs, and Share. You can access powerful editors to design your screens, prints and GIFs from these settings.
Photo Booth Settings – General tab
11) Change the aspect ratio of the photos to square
Changing the photo aspect ratio to square (Breeze booth Event Editor)
You can find a full list of Breeze Booth for iPad screens here
Photo Booth Settings – Photos tab
12) Change the number of photos to 2
13) Change the countdown text color to black
14) Open the Print Layout Editor
Changing the number of photos, color of countdown text and opening the Print Layout editor in Breeze Booth Event Editor
Print Layout Editor
Use the Print layout editor to customize your prints. In the slideshow below I will:
15) Remove the branded background
16) Add a new background color to the print
17) Change the printed photo to a square
18) Right click on the background to add the second photo
19) Resize and reposition the two photos
20) Add the two logos
21) Right click on the background to add a caption, then right click again to edit it
22) Save my changes
Note: You can add up to 5 different JPG or PNG logos to a print
This slideshow requires JavaScript.
Photo Booth Settings – Slideshow GIFs tab
Check Create animated GIF,... to create an animated GIF from the two photos
Creating a slideshow GIF from the photos
Photo Booth Settings – Share tab
23) Check Share slideshow first to share the GIF instead of a print layout
24) Open the slideshow email editor to customize the message
Telling Breeze Booth for iPad to share the slideshow GIF
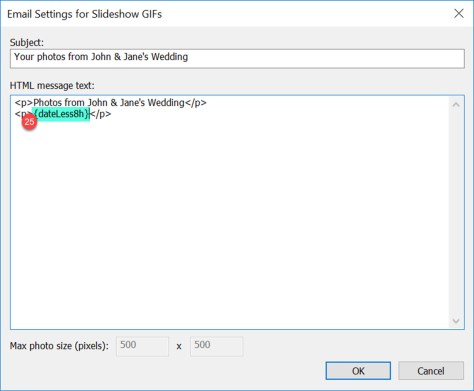
Breeze Booth Event Editor email editor for slideshow GIFs
Change the subject and email text. You can use Breeze tokens (25) in emails
Before you leave the event editor….
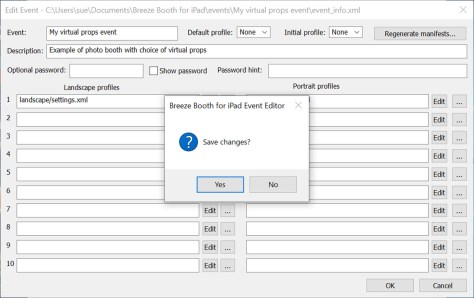
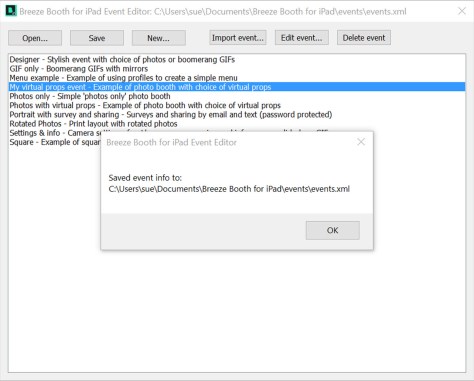
When you have finished editing the event, check OK to save all your changes.
Add an extra countdown GIF and sharing screen to the asset folder
The new event includes has two photos instead of one so we need a second countdown GIF 2.gif . We also need a screen called share_slideshow.jpg to share the new slideshow GIF.
I have copied the existing 1.gif and share.jpg screens to 2.gif and share_slideshow.jpg in C:\Users\sue\Documents\Breeze Booth for iPad\events\My virtual props event\portrait
C:\Users\sue\Documents\Breeze Booth for iPad\events\My virtual props event\portrait showing 2.gif and share_slideshow.jpg
When you make any changes to this folder you must also go back to the Breeze Booth Event Editor, open the event and regenerate the manifests
Closing the Event Editor
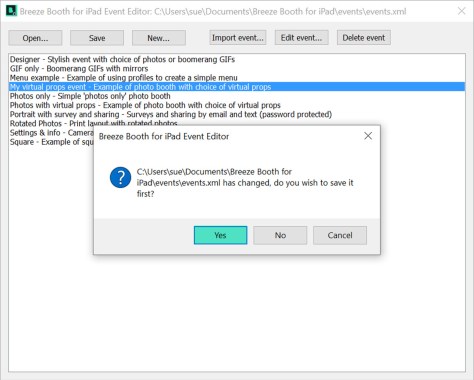
If you make any changes to your events, the Event Editor will prompt you to save changes to your events.xml folder. It is important that you select Yes to save the changes you have made and update the manifest.
Copying events from a PC to your iPads
There are currently 3 ways to copy events from your PC to an iPad:
Upload the events folder to a folder on a web server, then go the to the settings screen in Breeze Booth for Ipad and edit the URL for the sync server to point to this folder. Then use the events screen in Breeze Booth for iPad to sync the events. Important: This method can only be used with secure servers that have https e.g. https://breezesys.com. It will not work with http URLs. Sample events are available by setting the sync server to https://bb4ipad.com/sync in the iPad’s app settings.
Method 3: Copy the files via iCloud
Copy the event folder to a folder on iCloud that is visible on the iPad. Then use the Files app to copy the files to Breeze Booth for iPad’s assets folder.
Using AirPrint to print directly from Breeze Booth for iPad
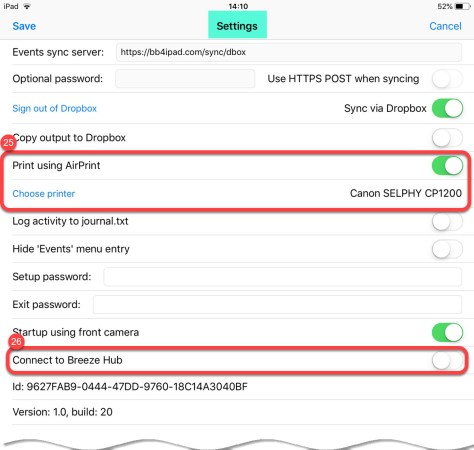
25) To print directly from the iPad connect up your printer ( which must support AirPrint) and choose Print using Airprint on the Breeze Booth for iPad Settings screen
26) To print using a Windows PC you need Breeze Hub. Choose Connect to Breeze Hub on the Breeze Booth or iPad Settings screen
Summary
This post has taken you through downloading and installing both the Breeze Booth Event Editor and a set of sample events onto a Windows PC. I have also shown how to create your own event based on one of the samples provided by Breeze, and outlined ways to transfer new and updated events to your iPads. Finally there are short notes about printing using Airprint and a Windows PC.
If you found this post useful please share it with others.
Breeze Booth for iPad is a powerful photo booth app that has been designed with flexibility, redundancy and creativity in mind. Design unique, custom interfaces/user experiences and quickly deploy them to a fleet of iPads using trusted cloud services (Dropbox, iCloud etc) or via your own private and secure web servers.
Click video above to see Breeze Booth for iPad in action
Key Features
Centralised set up of events, interfaces and image branding via a Windows-based app
The industry’s most flexible interface designer
Make digital photos, prints and GIFs and use digital A/R props
White label the app interface and sharing features (as a standard inclusion)
Standalone capability and redundancy (events can run offline, deploy your own private and securesync and image sharing servers)
Advanced features for power users (profiles, tokens, unique ID’s, keyboard shortcuts, access to XML information etc)
Breeze Booth Standalone Operation
Breee Booth can run as a simple photo booth app, with loads of features available out of the box.
Shoot still images, slideshow and boomerang/burst GIFs
Virtual props
Standard image filters and effects: Color, B&W, sepia, comic and mirror effects
Create and import your own custom photo filters
Control camera settings (digital zoom, ISO, shutter speed, white balance, tint)
Switch between front and rear cameras
Printing of images (including AirPrint printers)
Email images directly from the iPad
Local storage of photos, prints and GIFs on the iPad
Sync images & XML data to Windows PC for sharing, printing and export to other Apps
Sync images to Dropbox
Log email addresses and cell phone numbers
Collect guest survey and consent data
Display privacy statements, terms & conditions, and other information screens
Sync events from Dropbox or your own private and secure web server
Transfer events to your iPad via AirDrop (no internet required)
Password protect events and App settings
Run events without an Internet connection
Retain complete control of images and guest data
Breeze Booth + Breeze Hub at your event
Extend the power of Breeze Booth and add Breeze Hub to the mix. Breeze Hub is a small but powerful Windows companion app that can be run at your event, to allow for single or multiple Breeze Booth iPads to print to any Windows printer. In addition, it can also share images via email and SMS without having to use external cloud services. All done locally at your event.
Print to any Windows printer (including professional dye sub printers)
Offline sharing of photos, animated GIFs, and MP4 files
Support sharing from multiple iPads, DLSR based booths and Kiosks with a single Internet connection at your event
Monitor local iPads & display current status and images taken
Share event name and other event data with local iPads
Breeze Booth + Breeze Hub + Event Editor at your office
For power users, centrally manage the syncing of multiple events, and sharing of images from your office, home or secure web server. With Breeze Hub and Event Editor, you can completely control how data is shared to your iPads and how images are sent to your guests; allowing you to create a redundant, secure and private system.
Create, adapt and update events for use worldwide from your PC
Design screens, prints, GIFs and email content for multiple events
Sync new & updated events through your own private and secure webserver
Sync new & updated events with iPads via Dropbox
Centrally share images from multiple events, iPad and DLSR based booths and kiosks from your own office or server.
Run external commands on images as they are received
Creative Outputs
Prints with custom background, overlay, captions graphics and logos
Change text on prints locally/on the iPad
Slideshow GIFs ( with animated overlays, backgrounds and titles)
Boomerang/burst GIFs (also with animated overlays, backgrounds and titles)
Share images by email and text (sharing by text requires microsite)
Industry standard image formats are suitable for sharing with other devices and programs, and uploading to the cloud
Applications
Social events
Corporate activations
360 degree rotating and slider systems
Slider systems
Fixed installations
Trade shows and conventions
Unattended booth in a box rental
Large multi-location events with unlimited number of iPads
White label events
Additional features include
Screens
animate screens and count down with animated GIFs
create menu driven interfaces
design for 4:3 and iPad Pro 11
drag and drop screen editor
pre-designed interfaces
interface and captions in any language
configurable optional and mandatory surveys
design for both landscape and portrait-oriented iPads
Print Layout Editor
drag and drop layout editor
add custom background, overlay, captions and logos
add jpg or png logos to prints
multiple captions
Captions can include date, event and other tokens
Design for multiple print sizes and dpi
Prints
Print strips, landscape, portrait, square, panorama and other designs
supports high speed professional printers
Supports any printer with full Windows drivers for Windows 10, 8 or 7 (using Hub)
AirPrint directly from iPad
Animated GIFs
create simple multi photo gifs from your photo session
print high quality images from your gif
make short boomerang / burst gifs
apply animated overlays and backgrounds
optional sharing as MP4 movie
Sharing by email and text
Online and offline sharing of photos, animated GIFs and MP4s
Email address and cell phone logging
Email directly from iPad
Share via Breeze Hub
White label html emails
Customise email ‘From’ address, subject and content
Automate customisation using event, date, media type and other Breeze tokens
SMS texting to both Apple and Android cell phones
User Privacy
Custom consent and privacy notice support
Rejected images deleted automatically
Photos saved to different folders by privacy options/answers to survey questions
Breeze Booth Event Editor runs on a Windows 10, 8 or 7 computer. Download it from here.
You will also automatically download the designs for nine sample events we provide for Breeze Booth for iPad. When you install the event editor, these files will automatically be saved in your Documents folder as shown here
C:\Users\sue\Documents\Breeze Booth for iPad\events
The Breeze Booth Event Editor installer will create this folder of sample events. C:\Users\sue\Documents\Breeze Booth for iPad\events
The first event is called Designer and showcases many of the features included with Breeze Booth for iPad. You are welcome to use this design (or parts of it) with Breeze Booth for iPad at your own events.
The remaining 8 events are much simpler. They are intended to help you create your own designs.
This post will show you how to copy one of these simple events (Photos with virtual props) and edit it for your own use.
Photos with virtual props takes one photo and shares it on a custom background. Guests choose between 3 virtual props. They can also choose whether to shoot in color, B&W, sepia, comic effect or using a filter. The photo can be shared by email .
Copy the asset folders from Photos with virtual props
Start by copying the Photos with virtual props folder to a new folder called My virtual props event
Creating a new assets folder for a new event
Run Breeze Booth Event Editor
Start the Event Editor, and select Open.
Open the Breeze Booth Event Editor
Load the list of existing events by selecting events.xml
Select events.xml to load the list of events into Breeze Booth Event Editor
Initial list of sample events displayed in BBEE
Initial sample events folder (Breeze Booth Event Editor) Note: this list of events was created from the events.xml file we opened
Create a new event ‘My virtual props event‘
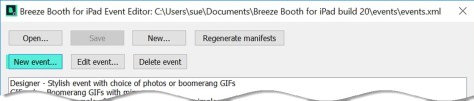
Select New event to create your new event..
This slideshow requires JavaScript.
1) Give the new event a name
2) Add a description
3) Select the landscape version of ‘My virtual props event‘, by
4) finding the correct folder, opening it and
5) selecting settings.xml
6, 7, 8, ) Repeat for the portrait version of My virtual props event
9) Save your new event
Portrait, landscape or both?
Breeze Booth for iPad lets guests switch between portrait and landscape orientation on the fly (great for roaming booths like the Ring Roamer). My virtual props event can be used in both portrait and landscape orientation, so has designs for both.
If you will always run an event in the same orientation, you don’t need to create both designs.
Editing an event
Select an event and choose Edit event..
We will just edit the portrait version of My virtual props event(10) today. Click on the portrait Edit button:
Editing the portrait version of My virtual props event
This brings us to the Photo Booth Settings screen, where you can start to customize your design
Tabs on Photo Booth Settings screen (Breeze Both for iPad build 20)
The original Photos with virtual props takes one photo and shares it on a colored background with a custom logo. Guests choose between 3 virtual props. They can also choose whether to shoot in color, B&W, sepia, comic effect or using a filter. The photo can be shared by email .
We are going to change My virtual props event to
take 2 square photos
remove the branded background print layout
add a new background color, 2 logos* and a caption to the print layout
create a slideshow GIF from the 2 photos
customize the wording of the email
share the slideshow GIF instead of the print layout
*You can add up to 5 different png or jpg logos to each print layout in addition to the background and overlay. This is a simple way of branding a design for a particular event, and can also be used as a quick way to add an image of the bride and groom (taken earlier in the day) to wedding photo booths.
Photo Booth Settings Screen
The Photo Booth Settings Screen is displayed for the profile you selected. It has 5 tabs : General, Photos, Slideshow GIFs, Burst GIFs, and Share. You can access powerful editors to design your screens, prints and GIFs from these settings.
Photo Booth Settings – General tab
11) Change the aspect ratio of the photos to square
Changing the photo aspect ratio to square (Breeze booth Event Editor)
You can find a full list of Breeze Booth for iPad screens here
Photo Booth Settings – Photos tab
12) Change the number of photos to 2
13) Change the countdown text color to black
14) Open the Print Layout Editor
Changing the number of photos, color of countdown text and opening the Print Layout editor in Breeze Booth Event Editor
Print Layout Editor
Use the Print layout editor to customize your prints. In the slideshow below I will:
15) Remove the branded background
16) Add a new background color to the print
17) Change the printed photo to a square
18) Right click on the background to add the second photo
19) Resize and reposition the two photos
20) Add the two logos
21) Right click on the background to add a caption, then right click again to edit it
22) Save my changes
Note: You can add up to 5 different JPG or PNG logos to a print
This slideshow requires JavaScript.
Photo Booth Settings – Slideshow GIFs tab
Check Create animated GIF,... to create an animated GIF from the two photos
Creating a slideshow GIF from the photos
Photo Booth Settings – Share tab
23) Check Share slideshow first to share the GIF instead of a print layout
24) Open the slideshow email editor to customize the message
Telling Breeze Booth for iPad to share the slideshow GIF
Breeze Booth Event Editor email editor for slideshow GIFs
Change the subject and email text. You can use Breeze tokens (25) in emails
Before you leave the event editor….
When you have finished editing the event, check OK to save all your changes. You will need to update the list of events (events.xml), the manifest for My virtual props event (manifest.xml) , and the settings file for the event (settings.xml)
This slideshow requires JavaScript.
Add an extra countdown GIF and sharing screen to the asset folder
The new event includes has two photos instead of one so we need a second countdown GIF 2.gif . We also need a screen called share_slideshow.jpg to share the new slideshow GIF.
I have copied the existing 1.gif and share.jpg screens to 2.gif and share_slideshow.jpg in C:\Users\sue\Documents\Breeze Booth for iPad\events\My virtual props event\portrait
C:\Users\sue\Documents\Breeze Booth for iPad\events\My virtual props event\portrait showing 2.gif and share_slideshow.jpg
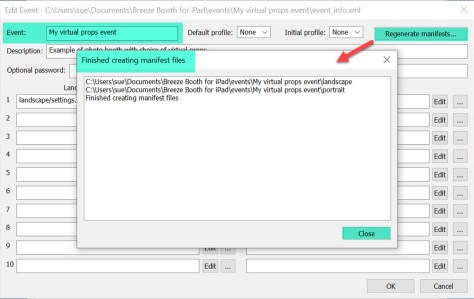
When you make any changes to this folder you must also go back to the Breeze Booth Event Editor and regenerate the manifests
Regenerating the manifests in Breeze Booth Event Editor
Copying events from a PC to your iPads
There are currently 3 ways to copy events from your PC to an iPad:
Method 1: Sync via Dropbox
Install the official DropBox app on your iPad (this can be downloaded from the Apple App Store).
Select Sign in to Dropbox in Breeze Booth for iPad’s app settings and authorize the app. This will create a “Breeze Booth for iPad” folder in your DropBox “Apps” folder.
This slideshow requires JavaScript.
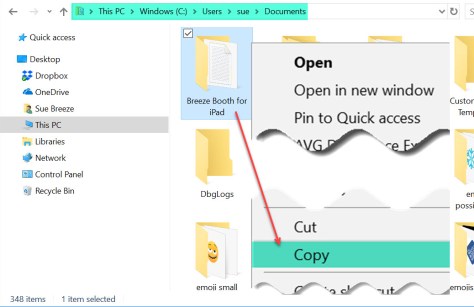
Now on your PCcopy the whole Breeze Booth for iPad folder
fromC:\Users\yourname\Documents\Breeze Booth for iPad
Copying the whole Breeze Booth for iPad folder
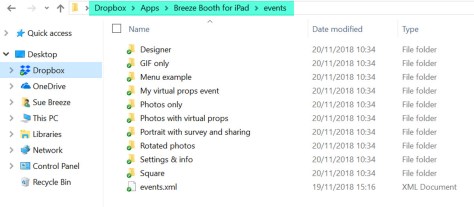
toC:\Users\yourname\Dropbox\Apps
Dropbox folder structure for events
Note: When you sync the events using Dropbox on your iPad, the program will look for this folder. You must name it correctly, or the App will not find your events.
As there are several ways to sync events, you need to tell your iPad which to choose. In Breeze Booth for iPad go to Settings and select the Sync via Dropbox.
This slideshow requires JavaScript.
Method 2: Sync via a secure https web server
Upload the events folder to a folder on a web server, then go the to the settings screen in Breeze Booth for Ipad and edit the URL for the sync server to point to this folder. Then use the events screen in Breeze Booth for iPad to sync the events. Important: This method can only be used with secure servers that have https e.g. https://breezesys.com. It will not work with http URLs.
Sample events are available by setting the sync server to https://bb4ipad.com/sync in the iPad’s app settings.
Method 3: Copy the files via iCloud
Copy the event folder to a folder on iCloud that is visible on the iPad. Then use the Files app to copy the files to Breeze Booth for iPad’s assets folder.
Update Breeze Booth for iPad to use the new event
Before you can run a new event on an iPad, Breeze Booth for iPad needs to update it’s list of events. Once My virtual props event has been added to this list, sync the event to download the new assets and xml files
Using AirPrint to print directly from Breeze Booth for iPad
25) To print directly from the iPad connect up your printer ( which must support AirPrint) and choose Print using Airprint on the Breeze Booth for iPad Settings screen
26) To print using a Windows PC you need Breeze Hub. Choose Connect to Breeze Hub on the Breeze Booth or iPad Settings screen
Summary
This has been quite a marathon post. I have outlined the new features in Breeze Booth Event Editor, how to download and install this program on your PC, how to create your own event based on one of the samples provided by Breeze, and how to download the new event to use on your iPads.
If you found this post useful please share it with others.
Guests can email photos, animated GIFs and Canon M50 slowmo videos and other videos* they create in DSLR Remote Pro 3.11.3. If Internet access during the event is poor, you can send the emails later.
Update March 2021: This post has been replaced by a new tutorial
This post explains how to email images from a touchscreen photo booth running DSLR Remote Pro. You will also learn how to tell the program about your email server settings, brand and customize the emails you send.
Let’s run through this in more detail, starting with the setup wizard:
Run the Photobooth Setup Wizard
Start DSLR Remote Pro and run the Photobooth Setup Wizard (1). Choose which options to offer guests at Step 2 (2). In this example guests can choose between still photos and boomerang (aka burst) GIFs (3). You can offer video (or photos and video) instead at this point.
Check the option Email photos (4) .
Checking the box Email photos at Step 2 of the setup wizard ( DSLR Remote Pro 3.11.3)
Select any other options you need before clicking on <Next> and completing Step 3 of the wizard.
You can set up your own booth with this sharing screen using just the 3 step wizard:
Email sharing screen created by the Photobooth Setup Wizard (DSLR Remote Pro 3.11.3)
Setup the email server settings
The first time you email from DSLR Remote Pro you need to set up the email server settings:
Select File (5) then Photobooth Settings(6) to access these settings
This will display the Photobooth Settings screen.
Go to the Output Settings(8) and check Email (9). You can then select Email Server Settings screen at (10)
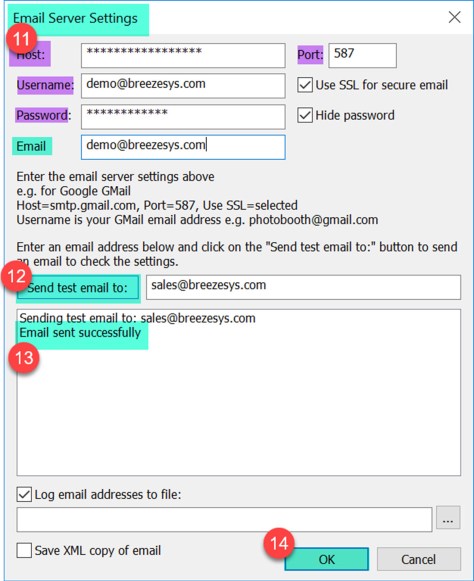
To send an email you need to specify the host name and port number of your email server. Most email servers also require a username and a password. For additional security check Use SSL for secure email.
The values of Host, Username, Password, Email and Port(11) you enter on the Email Server Settings screen are specific to the email provider you are using.
Before you move on, check everything works by sending a test email to your own email address(12). DSLR Remote Pro displays Email sent successfully(13) when this message has been sent. Check that you receive the test email.
Remember to click OK(14) to save your settings as you leave this screen.
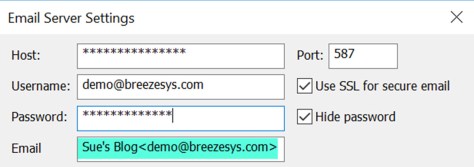
Including your name with the email address
To include the name of the sender with the email address enter the name followed by the email address enclosed in angle brackets e.g. Sue’s Blog <demo@breezesys.com>.
Here the sender name is ‘Sue’s Blog’ and the email address demo@breezesys.com (DSLR Remote Pro 3.11.3)
Logging guest email addresses & sending them after the event
You can keep a log of email addresses used by guests, providing valuable data for your own or corporate client’s use.
If an event Internet connection is flaky or non-existent you can save the email details and send them later.
The port number is usually 587 when using SSL secure email or 25 otherwise (but check the port numbers used by your ISP).
Emails look more professional when sent from your own domain.
Most free email services require the sender’s email address to the be the same as the email account specified by the username and password.
Gmail users should set access for less secure apps to Turn on in your Google account settings otherwise GMail will refuse to send the email.
Customize and brand your email messages
Use the standard email message
You do not have to customize the message sent with your photos and animated GIFS. If you use the standard settings in DSLR Remote Pro all emails will include the image(s) captured in the booth and the text Your photo booth photos taken on 14 August 2018 (or whatever date the images were taken).
Customizing the email subject and message
The emails guests send can be a powerful marketing tool for your business. Make them work for you by customizing the message sent with your image(s). Use Breeze tokens, your own text, images and html in the Email Settingsscreen.
Select File, then Output Settings, then Email settings to reach this screen:
Select File, then Output Settings, then Email settings to customize emails sent from DSLR Remote Pro
The first time you see the email settings screen it contains the default message DSLR Remote Pro sends with your emails. Edit this to meet your needs.
Default Email Settings screen in Breeze DSLR Remote Pro 3.11.3
You can change the both the subject and content of the emails sent with guest images.
Reduce the time and bandwidth taken to send and receive emails by choosing a suitable maximum image size.
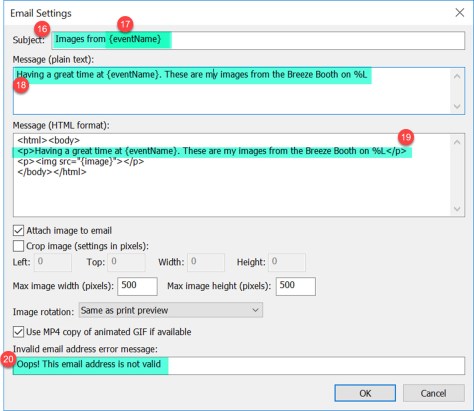
Creating a standard email template using the {eventName} token
{eventName} is a special Breeze token which can be shared between Breeze programs. You can use {eventName} in your emails and print layouts to save time customizing your booth for each event.
Here I have both changed the text and used {eventName} to customize the email subject (17), plain text (18) and html (19) versions of the content. I also changed the message seen by guests if they type an invalid email address (20).
When the email is sent Images from {eventName} will be replaced by Images from Sue & Chris’s Big Party. The text sent with the email will also say Having a great time at Sue & Chris’s Big Party. These are my images from the Breeze Booth on 14 August 2018.
{eventName} can also be used in print captions, and as part of folder and file names. For my next event I just need to change {eventName} to John & Jane’s Wedding ….
Note: %L is another Breeze token, which will be replaced by the date the images were taken.
How do I enter and change {eventName} for each event?
Start DSLR Remote Pro, click on File then Photobooth event info… to reach the Photo Booth Event Info screen
Photo Booth Event Info screen with {eventname} set to Sue & Chris’s big Party (DSLR Remote Pro 3.11.3)
You may have spotted Event Strings on this screen. You can use {eventString1} to {eventString5} in the same way as {eventName} .
Why do I need to send both plain text and html?
The emails DSLR Remote Pro sends from your booth may be viewed on lots of different devices including Apple and Android smart phones, tablets and PCs. Most modern devices can read html emails; we also send a plain text version in case the html version cannot be read.
Thank you for reading this post. I have covered how to send emails from DSLR Remote Pro, outlined how to brand and customize the emails, create your own standard template which is automatically updated for different events, and tell the program about your email service provider.
If you are ready for more, Steve’s video is a great introduction to using tokens. You can also learn more about customizing emails in the program help files.
If this post is helpful to you, please share it with others in our industry.
* DSLR Remote Pro 3.11.3 was released today 15 August 2018, and is a free upgrade for anyone whose license was issued in the last year. This release introduces the ability to share videos captured in video booth mode, including Canon M50 slow mo videos. Please note that emailing large attachments during events will slow the booth down.
Update 16 August: You can run this new script alongside DSLR Remote Pro 3.11.3to rotate and resize videos and add an optional overlay and soundtrack before videos are shared. We expect to include these features into DSLR Remote Pro in a future release.
February 2022:The information in this post has been replaced by a website page here
November 2021: Updated post to confirm support for Windows 11 as well as Windows 10 and Windows 8.
Breeze software is veryefficient. DSLR Remote Pro aka Breeze Booth ( Windows+DSLR) and Webcam Photobooth both run on low powered Windows computers running Windows 11, 10 and 8. The programs may run more quickly and print faster on a more powerful machine.
Breeze software is incredibly flexible. You can use it in many ways to produce and share photos, animated GIFs, slow motion and other videos. Some operators demand lightening fast results, others offer a more leisurely service. This short post is intended to help you choose the right computer to power your photo booth.
A budget laptop with an i3 processor and at least 4GB RAM should be fine for still photos. If you are planning to capture and playback boomerang GIFs, HD video, use AI background removal or green screen you may need a more powerful computer.
Touchscreens are flexible and an easy way to offer guests choices, share images and collect data. Laptops with built in touchscreens are popular, but not essential. Other ways to control the booth include contactless operation, buttons, coin operation, a wireless presenter and remote sensors.
Most photo booths need two USB 2.0 or 3.0 ports to connect the camera and printer. You can use a USB hub to increase the number of ports.
Background Removal, Green screen and burst GIFS
A more powerful PC will process background removal, green screen images and animated GIFs more quickly. A low powered PC is likely to take longer to produce the same result. Processing speed is affected by many other factors including the size of the image, background, overlay and print. Individual operators have different views about how fast their booth needs to work.
Try before you buy
If possible try the software either on the computer you plan to use, or a machine with a similar spec. You can download and try out DSLR Remote Pro and Webcam Photobooth for up to two weeks before buying the licenses.
This post explains how to set up your booth with the Photobooth Setup Wizard in DSLR Remote Pro.
Note: This post was updated in November 2018 and shows DSLR Remote Pro 3.12
We recommend everyone from beginner to expert uses the Photobooth Setup Wizard as a start point for setting up a booth. The wizard also helps generate profiles quickly. This is a simple, speedy and safe way to generate a working system.
This video shows how easy it is to prepare your system using the default settings:
Create a GIF/Photo booth in less than a minute
Now let’s run through how to customize your own booth using just the wizard.
The 3 Step Wizard in more detail
Select Photobooth Setup Wizard (1). First you will be prompted to save your current settings
Saving your current settings before running the Photobooth Setup Wizard DSLR Remote Pro 3.12
Step 1
Step 1 simply asks you to name the folder (2) where your photo booth images will be stored. These ‘images’ are the set of screen designs and layout images you will use. (This is usually a subfolder for your PhotoBoothImages folder.) Press Next (3) to move on to Step 1.
Step 1 of the Photobooth Setup Wizard DSLR Remote Pro 3.12
Step 2
The second step is to define the screens used by guests to interact with the booth. Adjust the default settings to meet your needs.
Dropdown list to give guests choices (Photos/Boomerang GIF, Photos only, Boomerang GIFs only, Photo or video, Video only)
This drop down list is a super-fast way to set up the booth to offer guests choice (DSLR Remote Pro 3.12 Photobooth Setup Wizard Step 2)
Single ready screen to choose from Photos or Animated GIFs
Check this box for single ready screen (DSLR Remote Pro 3.12 Photobooth Setup Wizard Step 2)
Choose Photos or Boomerang GIFs and check Single ready screen so that guests start the booth and choose between still photos and boomerang GIFs from a single screen (as in the video above)
Dropdown list to choose a predefined theme
Selecting a predefined theme to use with DLSR Remote Pro 3.12 at Step 2 of the Photobooth Setup Wizard
You can create, load and save DSLR Remote Pro themes containing screen background, touchscreen button, and caption sets, or buy them from third parties.
Your themes may include localized sets of captions in a variety of languages. DSLR Remote Pro 3.12 is shipped with English, German, Polish, Italian and Romanian captions.
Button placement
Buttons can be placed down the side or across the bottom of the screen by the wizard. (DSLR Remote Pro 3.12 Wizard Step 2)
Dropdown list to adjust live view
Live view drop down list – choose from normal, square, full screen, 4:3 and disabled (DSLR Remote Pro 3.12 Photobooth Setup Wizard Step 2)
Changing the live view in the Wizard will automatically adjust the shape of images in both animated GIFs and prints created by DSLR Remote Pro 3.12.
Color of the background screens and text
Defining colors of the background screens and fonts (including custom colors) with the Photobooth Setup Wizard in DSLR Remote Pro 3.12
Editing individual captions
Import complete captions sets using themes as above. Change (or remove) the text for individual captions using Edit captions:
Editing individual captions in the Photobooth Setup Wizard DSLR Remote Pro 3.12
Additional checkboxes
Checkboxes in the Photobooth Setup Wizard Step 2 DSLR Remote Pro 3.12
The first 5 check boxes highlighted in green tell the Wizard whether you are using a touchscreen, whether guests can choose between color and B&W prints, whether to display a preview of each photo after it is taken and the maximum number of prints allowed.
Sharing checkboxes in the Photobooth Setup Wizard Step 2 DSLR Remote Pro 3.12
The next five check boxes tell the wizard whether a sharing screen (after the photos are taken) should offer uploads to guests Twitter* accounts, share photos by email or MMS/SMS, or offer optional printing.
Hint: some operators prefer to offer browsing and sharing from a kiosk separate to the booth. You can use Breeze Kiosk for this. To share and print photos away from the booth leave these boxes unchecked.
*Facebook No Longer Available
Please note: On 1st August 2018 Facebook withdrew the permissions required to upload photos from a desktop app in response to the Cambridge Analytica scandal. This means that it is no longer be possible to upload photos to Facebook directly from DSLR Remote Pro. Photos can be shared on Facebook by emailing or texting them to users where they will be able to share them using the Facebook app running on their own device. Alternatively upload the photos to a website or microsite and provide sharing links to allow users to share the photos on Facebook when they view the page on their device.
Inactivity timeout & use default settings
Inactivity timeout and ‘Use default setting’ button DSLR Remote Pro 3.12 wizard
The inactivity timeout is useful if the photo booth is not in continuous use because it disables the live view display and puts the booth into standby mode. Disabling live view will allow the camera’s sensor to cool down to avoid possible overheating problems. The booth can be reactivated by touching the screen. To use the inactivity timeout, just set the number of seconds after which you want to put the booth into standby.
Select Use Default Settings to restore the default settings for the photo booth.
Next takes you to the third and final step (unless you chose only GIFs or video, in which case you skip Step 3).
Step 3
At Step 3 you choose the print layout and adjust your printer settings if necessary( DSLR Remote Pro 3.12 Photobooth Setup Wizard)
The wizard offers a choice of 8 popular layouts; if you want something different choose whichever is closest to your design (you will be able to change this using the Print Layout Editor later).
Running a GIF booth with animated GIFs and no printing is increasingly popular. The DSLR Remote Pro Wizard no longer asks you to select a printer when you offer only Boomerang GIFs or Video.


You must be logged in to post a comment.