Tag Archives: Localization

7 Steps to Simple Booth Operation

How to make life easier for your booth attendants, and protect the  settings you don’t want changed in 7 simple steps.

  1. Start the booth as soon as DSLR Remote Pro is started
  2. Hide the camera controls on the main screen
  3. Hide or reveal the large Photobooth Shortcut buttons
  4. Choose which Photobooth Shortcut buttons are shown on the main screen
  5. Change the wording of the Photobooth shortcut buttons
  6. Password protect or lockdown the Advanced Settings and Photobooth Setup Wizard
  7. Create your own shortcut buttons to run specific profiles

This post has been written for DSLR Remote Pro 3.8.1.

Start the booth when DSLR Remote Pro is started and the camera connected

To start the Photobooth running as soon as DSLR Remote Pro is started and the camera connected and switched on, select Advanced Settings then check the box Start full screen photobooth automatically ….

Advanced settings screen showing how to start the booth automatically DSLR Remote Pro 3.8.1
Starting the photobooth when the camera is connected DSLR Remote Pro 3.8.1

Hide the camera controls on the main screen

DSLR Remote Pro allows you to control the camera from your PC. You can find these settings on the left of the main screen (highlighted in green below).

Shows DSLR Remote Pro 3.8.1 main screen with camera settings highlighted
DSLR Remote Pro 3.8.1 main screen with camera settings highlighted

To hide these settings select View then uncheck Show Camera Controls:

How to hide the camera controls in DSLR Remote Pro 3.8.1
To hide the camera controls at the left of the screen select View then uncheck Show Camera Controls (DSLR Remote Pro 3.8.1)

The main screen will no longer show the camera settings:

Shows main screen of DSLR Remote Pro 3.8.1 with camera controls hidden
Main screen DSLR Remote Pro 3.8.1 with camera controls hidden

Hide or reveal the large Photobooth Shortcut buttons

The large buttons at the top of the main screen (highlighted in green below) are called Photobooth Shortcut buttons. They are quick ways to control your booth.

Showing Photobooth Shortcut buttons DSLR Remote Pro 3.8.1 main screen
Default Photobooth Shortcut buttons DSLR Remote Pro 3.8.1

To hide or reveal these buttons select View then check or uncheck Photobooth Shortcuts

Shows how to hide or reveal Photobooth Shortcut buttons DSLR Remote Pro 3.8.1
To hide or show the Photobooth Shortcut buttons at the top of the screen select View then (un)check Photobooth Shortcuts (DSLR Remote Pro 3.8.1)
Shows DSLR Remote Pro 3.8.1 main screen with Photobooth Shortcut buttons and camera controls hidden
Main screen with both Photobooth Shortcut buttons and camera controls hidden DSLR Remote Pro 3.8.1

Choose which Photobooth Shortcut buttons are shown on the main screen

If necessary show the Photobooth Shortcut buttons as above.

Select View then Photobooth Shortcuts Settings to see the Photobooth Shortcut Setp Screen

Shows the Photobooth Shortcut Setting window DSLR Remote Pro 3.8.1
Photobooth Shortcut Setting window DSLR Remote Pro 3.8.1

The standard buttons are highlighted in green above. Check or uncheck any of these buttons to change the Shortcut buttons on the main screen. In this example the operator will only see buttons to start the booth and access the Print Layout Editor (which lets them make changes to the Print Layout)

Shows DSLR Remote Pro 3.8.1 main screen with 2 Photobooth Shortcut buttons
Photobooth Shortcut buttons limited to 2 choices DSLR Remote Pro 3.8.1

You can display any combination of the following standard Shortcut buttons in DSLR Remote Pro 3.8.1

  • Printer Setup
  • Edit QR code
  • Photobooth Setup Wizard
  • Print Layout
  • Advanced Settings
  • Event Info
  • Videobooth Settings
  • Reprint Photobooth Photo
  • Start Photobooth
  • Take Test Photo
  • Camera Settings

The default set of five buttons are shown in red in this list.

Change the wording of the Photobooth Shortcut buttons (great for localization)

Select View then Photobooth Shortcuts Settings to see the Photobooth Shortcut Setp Screen.

Shows the DSLR Remote Pro 3.8.1 Photobooth Shortcut Buttons scree
Photobooth Shortcut Buttons screen DSLR Remote Pro 3.8.1. Shows where to change the text and size of buttons.

1. Edit the text of any button; here Start Photobooth has been changed to Go!

2. You can also change the size of the buttons

3. Press OK to save the new settings before leaving this screen.

DLSR Remote Pro 3.8.1 main screen with customized Shortcut Buttons.
Main screen with customized Shortcut Buttons. Start Photobooth has been changed to Go! DLSR Remote Pro 3.8.1

Password protect or lockdown the settings

You can prevent unauthorized access to the Advanced Settings and Photobooth Setup Wizard using Lockdown.

Select view then Lockdown mode..

Shows how to access Lockdown mode in DSLR Remote Pro 3.8.1
Setting Lockdown mode in DSLR Remote Pro 3.8.1

Enter a password and press OK to save it.

Entering password to protect Lockdown mode DSLR Remote Pro 3.8.1
Lockdown mode is protected with a password

Lockdown prevents unauthorised access to the Advanced Settings and Photobooth Setup Wizard. Operators will still be able to alter the print layout if necessary during an event.

Note: The lockdown password can be reset if necessary. Contact support@breezesys.com for details.

Create your own Shortcut buttons to run specific profiles

Profiles are a powerful tool in Breeze software; they are often used to offer guests choices. You can also use profiles to give the operator a menu of common ways to set the booth up, which are tailored to your business model. Profile 1 might be a basic booth with simple prints; Profile 2 a choice of prints or animated GIFs, Profile 3 prints and GIFs with social sharing. See this post for an introduction to profiles

This section explains how to link profiles you have already created to Shortcut buttons. It does not explain how to create profiles.

Select View then Photobooth Shortcuts Settings to return to the Photobooth Shortcut Setup Screen

Shows DSLR Remote Pro 3.8.1 Photobooth Shortcut Buttons Setup screen showing profiles with profiles highlighted
Photobooth Shortcut Buttons Setup screen showing profiles. DSLR Remote Pro 3.8.1

Check the buttons for each profile you want to use (1), and customise the text for each button (2).

When you have finished, press OK (3) to return to the main screen.

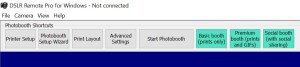
The new buttons for each profile are shown highlighted in green.

Download DSLR Remote Pro to try for yourself.

Thank you for taking the time to read this post. If you found it helpful; please share the post with others.

Copyright Breeze Systems Ltd 2018.


New Breeze DSLR Remote Pro 3.8: simple, powerful branding

Breeze Systems is proud to announce the release of DSLR Remote Pro 3.8. Easier to use and more powerful than ever before, DSLR Remote Pro 3.8 includes two free button sets designed by Wilkes Booth Co.

Highlights of the new release

  • Fast simple branding for photo booth screens
  • Create and save new photo booth screen themes
  • Transfer themes between PCs
  • Free sets of touchscreen buttons
  • Create custom caption sets in any almost language
  • Photobooth Setup Wizard now simplifies screen customization
  • Animated backgrounds for green screen boomerang GIFs
  • Support for Canon’s EOS  6D Mark II

Fast, powerful branding for photobooth screens

Brand screens quickly and easily with new DSLR Remote Pro themes

Create themed photobooth screen sets

Create, load and save DSLR Remote Pro themes containing screen background, touchscreen button, and caption sets

DSLR Remote Pro 3.8 theme including (A) screens, (B) buttons & (C) captions

A. Complete sets of custom photo booth screen backgrounds  can now be generated from a single image. The same background image can be tiled, stretched or cropped to fit any screen with new themes

DSLR Remote Pro 3.8 single background_tiled.jpeg image used to create themed set of background screens

B. Create your own buttons or choose from those shipped with DSLR Remote Pro 3.8. Touchscreen buttons can be placed below the image or to one side using the Setup Wizard. 

C. Customize captions in almost any language. Adjust the color of your text.

Transfer themes between PCs

To generate themed screens on PCs with different screen size/aspect ratio by just copy the theme to the new PC and run the Photobooth Setup Wizard.

Free touchscreen button sets

Breeze DSLR Remote Pro 3.8 includes 2 new free button sets created by  Wilkes Booth Co

DSLR Remote Pro 3.8 Welcome screen: Wilkes Booth Co Tradewind White buttons
DSLR Remote Pro 3.8 Sharing screen Wilkes Booth Co Tradewinds Blue buttons
DSLR Remote Pro 3.8 Sharing screen: Wilkes Booth Co Tradewind Blue buttons

Buy Breeze Wizard themes or complete interface designs for DSLR Remote Pro 3.8 from Wilkes Booth Co

Choose whether to run buttons across the screen or to the side using the Photobooth Setup Wizard.

Create custom caption sets

Breeze software is used in over 80 countries world wide. DSLR Remote Pro already supports Unicode and handles characters in most languages. Use the Photoboth Setup Wizard to create reusable caption sets, and apply them to different themes.

DSLR Remote Pro 3.8 is shipped with English, German, Polish, Italian and Romanian captions.

Thanks to Jürgen Mayr (Photobooth-deluxe), Tomasz Klusczyk (Smove), John Bonardo (Babooth), and Dan Neamtu (Mirror Magic), for providing the German, Polish, Italian and Romanian caption sets shipped with DSLR Remote Pro 3.8

Brand and customize screens with the Setup Wizard

  • Change screen and keyboard background color at the touch of a button
  • Generate complete screen sets from a single background image
  • Automatically  tile, stretch or crop images to fit any size of screen
  • Create and save customized caption sets
  • Save touch screen button sets
  • Choose buttons running down the side or across the bottom of the screen

Improved animated GIF support

  • New Animated backgrounds for green screen boomerang GIFs
  • New support for animated GIFs in sharing screens (email, text, Facebook and Twitter)

More new features

  • Useful shared print counter for events
  • Send emails with or without image attachment
  • Enhanced ability to pass information to microsites
  • Tap for speedy countdown
  • Default delay before taking first photo reduced to 5 seconds

DSLR Remote Pro 3.8 is a free upgrade for all registered users who purchased a license on or after 29th November 2016.

Download  DSLR Remote Pro 3.8       Buy your own license


Auto focus blues & how to cure them

Canon’s DSLR cameras can be set to auto focus (AF)  or manual focus (MF). The auto focus setting is very convenient for photo booth operators, but when the camera cannot find anything to focus on it will not take a photo.

This post was originally written for DLSR Remote Pro 3.7.3 and last updated to include more recent camera models  in October 2022

What can go wrong using auto focus?

You may notice a long pause before the camera takes  a photo. The focus motor whirrs and the camera lens moves as the camera tries to focus. Two different error messages may be displayed: ‘Unable to release shutter’ or ‘Unable to focus’.

Unable to release shutter

When setting up the booth the operator presses Release(F8)  or Preview (F9) to check camera operation. No photo is taken and this error message is displayed:

Error message for DSLR Remote Pro 3.7.3 displayed: Unable to release shutter. This may be because the AF was unable to lock
DSLR Remote Pro 3.7.3 ‘Unable to release shutter’ error message

Unable to focus

After the countdown there is a long pause before the camera takes  the first photo. The focus motor whirrs and the camera lens moves as the camera tries to focus. Eventually this message* is displayed:

DSLR Remote Pro 3.7.3 error message 'Unable to focus! If you are standing close to the camera please try moving back a bit. The booth will retake the photo in ... seconds...
DSLR Remote Pro 3.7.3 ‘Unable to focus!’ error message *

*Hint (localization) You can translate this message into your local language using the PhotoboothAfErrorMsg message in the configuration files

Why does this happen?

Usually the camera cannot focus because

  • there is not enough light
  • the booth is empty and has a plain background
  • guests are too close to the camera
  • the lens cap has not been removed

Autofocus works best with good lighting and guests positioned at the right distance from the camera. It may be improved by changing from a plain background. The most reliable solution is to switch the camera to manual focus.

How to make sure the camera will fire: Set the camera to manual focus

Exception : cameras with dual pixel AF. If your camera has dual pixel AF please see the Camera Settings section of the program help files.

At present (October 2022) the Canon EOS  cameras with dual pixel AF we support are:

  • R Series : EOS R, RP, R5, R6, R7, R10
  • M series: M6 Mark II, M50 Mark II/EOS M50M2/Kiss M2, M50, M200
  • DSLR models: EOS 800D/Rebel T7i, 200D/Rebel SL2, 90D, 70D,  77D, 80D, 7D Mark II, 5D Mark IV and 6D Mark II.)

Simplest way to set the camera to manual focus

  1. Set the AF/MF switch on the camera lens to the MF (manual focus) position.
  2. Each time you set up the booth turn the focus ring on the camera lens until you see a sharp image on the PC live view display.
Photo of Canon REBEL T5 camera how how to switch between auto and manual focus
Canon REBEL T5 (1200D) showing AF/MF switch
Photo by Kārlis Dambrāns (edited to highlight AF MF switch)

Photo sourced from Flickr

Use the camera controls to set manual focus

Use the screen on the back of the camera to set the custom function “C.Fn IV: Operations/Others – Shutter/AE lock button” to “1:AE lock/AF” (refer to your camera manual if necessary).

Canon 200D camera display showing Customer Function IV
Customer function IV screen on Canon EOS 200D camera

This setting has the advantage that focus can still be adjusted remotely from the PC but auto focus won’t be used when taking a photo. The lens can be focused in fullscreen photobooth mode by typing Ctrl+A.

For more precise control of focus exit photobooth mode and type Ctrl+L to display the live view window. Then use the <<<, <<, <, >, >>, >> buttons or the mouse wheel to manually adjust the focus.

If you found this post helpful please share it with others.

Try out DSLR Remote Pro                         Breeze Systems website

Copyright Breeze Systems 2022