Start the booth when DSLR Remote Pro is started and the camera connected
To start the Photobooth running as soon as DSLR Remote Pro is started and the camera connected and switched on, select Advanced Settings then check the box Start full screen photobooth automatically ….
Starting the photobooth when the camera is connected DSLR Remote Pro 3.8.1
Hide the camera controls on the main screen
DSLR Remote Pro allows you to control the camera from your PC. You can find these settings on the left of the main screen (highlighted in green below).
DSLR Remote Pro 3.8.1 main screen with camera settings highlighted
To hide these settings select View then uncheck Show Camera Controls:
To hide the camera controls at the left of the screen select View then uncheck Show Camera Controls (DSLR Remote Pro 3.8.1)
The main screen will no longer show the camera settings:
Main screen DSLR Remote Pro 3.8.1 with camera controls hidden
Hide or reveal the large Photobooth Shortcut buttons
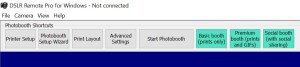
The large buttons at the top of the main screen (highlighted in green below) are called Photobooth Shortcut buttons. They are quick ways to control your booth.
Default Photobooth Shortcut buttons DSLR Remote Pro 3.8.1
To hide or reveal these buttons select View then check or uncheck Photobooth Shortcuts
To hide or show the Photobooth Shortcut buttons at the top of the screen select View then (un)check Photobooth Shortcuts (DSLR Remote Pro 3.8.1)Main screen with both Photobooth Shortcut buttons and camera controls hidden DSLR Remote Pro 3.8.1
Choose which Photobooth Shortcut buttons are shown on the main screen
If necessary show the Photobooth Shortcut buttons as above.
Select View then Photobooth Shortcuts Settings to see the Photobooth Shortcut Setp Screen
Photobooth Shortcut Setting window DSLR Remote Pro 3.8.1
The standard buttons are highlighted in green above. Check or uncheck any of these buttons to change the Shortcut buttons on the main screen. In this example the operator will only see buttons to start the booth and access the Print Layout Editor (which lets them make changes to the Print Layout)
Photobooth Shortcut buttons limited to 2 choices DSLR Remote Pro 3.8.1
You can display any combination of the following standard Shortcut buttons in DSLR Remote Pro 3.8.1
Printer Setup
Edit QR code
Photobooth Setup Wizard
Print Layout
Advanced Settings
Event Info
Videobooth Settings
Reprint Photobooth Photo
Start Photobooth
Take Test Photo
Camera Settings
The default set of five buttons are shown in red in this list.
Change the wording of the Photobooth Shortcut buttons (great for localization)
Select View then Photobooth Shortcuts Settings to see the Photobooth Shortcut Setp Screen.
Photobooth Shortcut Buttons screen DSLR Remote Pro 3.8.1. Shows where to change the text and size of buttons.
1. Edit the text of any button; here Start Photobooth has been changed to Go!
2. You can also change the size of the buttons
3. Press OK to save the new settings before leaving this screen.
Main screen with customized Shortcut Buttons. Start Photobooth has been changed to Go! DLSR Remote Pro 3.8.1
Password protect or lockdown the settings
You can prevent unauthorized access to the Advanced Settings and Photobooth Setup Wizard using Lockdown.
Select view then Lockdown mode..
Setting Lockdown mode in DSLR Remote Pro 3.8.1
Enter a password and press OK to save it.
Lockdown mode is protected with a password
Lockdown prevents unauthorised access to the Advanced Settings and Photobooth Setup Wizard. Operators will still be able to alter the print layout if necessary during an event.
Note: The lockdown password can be reset if necessary. Contact support@breezesys.com for details.
Create your own Shortcut buttons to run specific profiles
Profiles are a powerful tool in Breeze software; they are often used to offer guests choices. You can also use profiles to give the operator a menu of common ways to set the booth up, which are tailored to your business model. Profile 1 might be a basic booth with simple prints; Profile 2 a choice of prints or animated GIFs, Profile 3 prints and GIFs with social sharing. See this post for an introduction to profiles
This section explains how to link profiles you have already created to Shortcut buttons. It does not explain how to create profiles.
Select View then Photobooth Shortcuts Settings to return to the Photobooth Shortcut Setup Screen
PBPI starts this Sunday! Our bags are (almost) packed; Chris and I can’t wait for this amazing opportunity to learn more about the industry, and spend time with as many of you as possible.
Here’s a sneak preview of the breakout sessions Chris will be running at PBPI this year.
Monday 3:30pm – Breeze Systems Photo Booth Software
The first session will focus getting the most from DSLR Remote Pro; including
Chris has a unparalled worldwide reputation in multi-camera arrays. DSLR Remote Pro Multi-Camera has been used in block buster movies, the video games industry and high profile activations for more than 10 years. Learn from the man himself:
What you can do with a camera array
Five, fifteen or ninety five cameras?
Choosing equipment and triggering the cameras
Time it right – syncing with flash
How to create animated GIFs and MP4 movies from your images
Wednesday 2:45pm – Open Session
On the final afternoon Chris will run an Open Session covering topics raised by delegates at PBPI. Likely subjects include
Panoramic photo booth photos
Green screen
Sharing for camera arrays
Hashtag Monitoring
Worked examples
Automation and startup scripts
Find us at the Breeze table in Tech Alley & around the Academy.
The content of sessions may vary to meet the needs of those attending.
PS Just heard from Lisa that there is still time to join in – Enroll here!
Profiles Part 2 explains how to add interest with random profiles
Profiles Part 3 includes a troubleshooting guide and creating a ‘Choose or Surprise me menu
Happy New Year! This first post for 2018 explains how to use profiles to create a touchscreen menu of print layouts.
Breeze photo booth profiles are powerful building blocks you can use to customize your booths to offer guests choices such as print layouts and green screen backgrounds; or add an element of surprise such as random comments in a magic mirror booth.
This blog post has been written for DSLR Remote Pro 3.8.1.
At Step 1 choose ‘1 large photo with 3 smaller ones below’
At Step 2 name the folder your images will be stored 1+3
At Step 3 make any other changes you need before selecting Finish
To customise the print or load predesigned layouts choose Print Layout. As you leave this screen you will be prompted to Save print settings to the default profile. Choose No.
Select the large ‘Advanced Settings’ button then, Save.
You will be asked whether to save the printer settings as well as the photo booth settings:
Saving photo booth settings (1) DSLR Remote Pro 3.8.1
Take care to save the settings in the correct folder; here …\PhotoboothImages\1+3\settings.xml . You are updating the settings saved by the Photobooth Wizard; so choose Yes when asked whether to replace settings.xml :
Saving photo booth settings (2). Overwriting the settings saved by the Photobooth Setup Wizard DSLR Remote Pro 3.8.1
Press OK to leave the Photobooth settings screen. Before moving on select Start Photobooth and check this layout works as you expect.
Run the photobooth setup wizard for a single photo layout
Now repeat the process for the second option on your menu, the single photo. Run the Photobooth Setup Wizard again.
At Step 1 choose ‘Single Photo’
At Step 2 name the folder your images will be stored single
At Step 3 make any other changes you need before selecting Finish
Customise the print using the Print Layout Editor and make any other changes you need.
Select the large ‘Advanced Settings’ button then Save. Take care to save the settings in the correct folder; here …\PhotoboothImages\single\settings.xml
When you have saved your settings Press OK to leave the Photobooth settings screen. Before moving on select Start Photobooth and check this layout works as you expect.
Tip: During this process you need to keep saving your updated settings. Take care to check you are saving them in the correct folder each time.
Run the photo booth setup wizard to create the menu
At Step 1 choose ‘Single Photo’ or any other option
At Step 2 name the folder Menu
Remove the live view from your menu screen
1. Select the large ‘Advanced Settings’ button and remove the live view by uncheckingEnable live view.
2. Select Save and update …\PhotoboothImages\Menu\settings.xml
Removing live view from menu and saving the settings: Photobooth Settings Screen DSLR Remote Pro 3.8.1
Create profiles for the menu and each option
Next create three profiles: one each for the menu, 1+3 print layout, and single print layout. The menu profile needs to be loaded each time the photo booth is started; and after each guest session finishes:
3. Stay in the Photobooth Settings screen and select the Profiles… button. This takes you to the Photobooth Profiles screen.
Defining profiles for the menu and each option: DSLR Remote Pro 3.8.1
4. Set Profile 1 to C:\Users\sue\Documents\PhotoboothImages\menu\settings.xml
5. Set Profile 2 to C:\Users\sue\Documents\PhotoboothImages\1+3\ settings.xml
6. Set Profile 3 to C:\Users\sue\Documents\PhotoboothImages\single\settings.xml
7. Set Default profile loaded at startup and after each shooting sequence to Profile 1. This will display your menu each time the photo booth is started; and after each guest session finishes.
8. Click on OK to leave the profiles screen
9. If you want to be able to use this set of profiles again; save them using the Save Profiles button. I have called the profiles xml file demoprofiles.xml and saved this in my menu folder : …\PhotoboothImages\menu\demoprofiles.xml
Create a new menu screen
Use an image editor to create a new jpg image containing icons for the 2 print layouts. This should be the same size as the screens generated by the wizard. Replace the original ready.jpg screen in PhotoboothImages\Menu with this image.
Photobooth ready.jpg screen: menu offers choice of print layouts. DSLR Remote Pro 3.8.1
Link the menu screen to each menu option using profiles
If necessary start DSLR Remote Pro and select Advanced Settings to Load your menu (…\PhotoboothImages\menu\settings.xml).
Start the booth to check that your new menu screen is displayed; then <Esc> to return to the main DSLR Remote Pro screen.
10. Select Advanced Settings; and select the Settings button for the touchscreen
Touchscreen Settings Screen DSLR Remote Pro 3.8.1
Tip: Touchscreen actions. The Touchscreen settings screen allows you to choose what action the program takes when a guest touches different parts of the screen. These are called touchscreen actions.
11. Select Show/edit touchscreen areas to display a copy of the screen layout showing the ‘Touchscreen actions’ currently enabled. Each action and the part of the screen affected is shown like this
Touchscreen Actions for menu screen before changes DSLR Remote Pro 3.8.1
First remove the actions you no longer need
Remove each action you no longer need from the screen (here Photo Start, Photo Select Color mode, Photo Select B&W mode) by right clicking on the action and choosing Delete Action..
Deleting the Photo Start Touchscreen action from the new menu screen. DSLR Remote Pro 3.8.1
Then add the new actions
Move the mouse over your 1+3 icon and right click; then choose Add Action.
Right click to add a new touchscreen action to the screen DSLR Remote Pro 3.8.1
Choose Profile 2 from the drop-down list.
Selecting the required action from the drop down list. DSLR Remote Pro 3.8.1
Click on OK. Move and resize the red dotted action box to cover your icon.
Resizing the touchscreen action box to cover the icon. DSLR Remote Pro 3.8.1
Repeat for your single photo icon; choosing Profile 3.
Optional: Add a hidden button to the main menu to exit Full screen photobooth mode
Adding a hidden action
You may also wish to add a secret or hidden button to exit the full screen photo booth.
Position the mouse roughly where you want the hidden button (usually a corner of the screen so the operator can find it easily). Right click, choose Add action and then Exit Fullscreen photobooth from the drop down list. Resize and position the red dotted action box as before.
Adding a touchscreen action for a hidden button
Right click the mouse on an unused part of the screen and choose Exit from the list. You will be prompted to save your edited settings – select Yes to return to the touchscreen settings screen.
Saving the new tocuhscreen actions for the menu screen. DSLR Remote Pro 3.8.1.
Add a password to stop guests using the hidden button. Save the changes you have made by choosing OK on the touchscreen Settings Screen:
Adding a password to the hidden option to exit the photo booth. DSLR Remote Pro 3.8.1.
When you leave this screen you will return to the Photobooth Settings screen. Press Save and save the changes you have made to …\PhotoboothImages\Menu\settings.xml as before.
You now have a menu offering a choice of print layouts. The final stage is to add a mechanism for guests to return to the menu from each option screen. You need to add an exit button to each option.
Add an exit button to each option so that guests can return to the main menu
Tip: if you are using the predesigned sets of buttons (such as those provided with DSLR Remote Pro 3.8 and later releases) you may want to use one of these as your back button. They are usually kept in sub-directories at C:>Program Files(x86)>Breezesys>DSLR Remote Pro>wizard as shown here
Tradewind Blue button set used in this example ( kindly provided by Wilkes Photobooth Co http://wilkesbooth.co/breeze-themes). Included with DLSR Remote Pro 3.8.
Use an image editor to edit the ready.jpg image containing icons for the 2 print layouts. These should be the same size as the screens generated by the wizard.
Add a back button to the 1+3 ready.jpg screen
Use an image editor to edit the …\PhotoboothImages\1+3 \ready.jpg image. The final image should be the same size as the screens generated by the wizard. Replace the original ready.jpg screen in …\PhotoboothImages\1+3 with this image.
Updated ready.jpg for 1+3 print layout includes a back button. DSLR Remote Pro 3.8.1. (This screen was created using an image editor outside DSLR Remote Pro.)
Start DSLR Remote Pro, choose Advanced Settings and select Load. To load the settings for your 1+3 layout; select …\PhotoboothImages\1+3\settings.xml
Stay on the Photobooth Settings screen, select the Touchscreen Settings button and then Show/Edit touchscreen areas to display the Touchscreen Actions for the 1+3 ready screen:
Move the mouse to your new back icon and right click to add an action for this icon. Select Add Action as before, then Select Profile 1 from the drop down list. (Profile 1 is the menu profile we set up earlier.)
Adding a touchscreen action to go back to the main menu using Profile 1. DSLR Remote Pro 3.8.1.
Exit and save your updated settings to …\PhotoboothImages\1+3\settings.xml. Click OK to leave the touchscreen settings screen and return to Photobooth Settings. Press Save and update …\PhotoboothImages\1+3\settings.xml before hitting OK to return to the main screen.
Add a back button to the single photo ready.jpg screen
Repeat the steps above for the second print layout. To load the settings for your single print layout; select …\PhotoboothImages\single\settings.xml and save them to the same directory and file when you finish.
Start the photo booth and check everything works correctly
Check that the booth operates as you expect for both options, returning to the main menu ready for the next guests.
Find yourself a drink and take a well earned break
Congratulations – you have learnt how to use one of the most important features of DSLR Remote Pro. You can use the same method to create other menus (and sub menus if you wish).
Want to know more?
Note: This section was updated on February 17th and July 11th 2018.


You must be logged in to post a comment.