Breeze Booth (DSLR+Windows) aka DSLR Remote Pro 3.19.1 was released today, June 28th.
This release adds support for Canon’s new EOS R100 camera.
Video post processing now supports vertical video for Canon’s EOS R100 and EOS M50 Mk II.
DSLR Remote Pro 3.19.1 also includes a new token {lessThan,str1,str2}, and fixes an issue loading settings from the Photobooth settings dialog when print layouts include rotated photos
EOS R100 support
Canon’s mirror-less EOS R100 is a compact and versatile camera offering good value for money. This camera offers
120 frames/second slow motion at 720p
Wireless video capability
Center hotshoe contact allowing external flash to be triggered
Good quality face detect autofocus in live view
Canon EOS R10 showing hotshoe with center contact (Image courtesy of Canon Europe )
Vertical Video post processing
Video post processing now supports vertical video for the EOS R10 and EOS M50 Mk II
DSLR Remote Pro already supports Canon’s EOS R50, R10, R8, R7, R6 Mk II, R6, R5, R and RP models, several M series cameras, and almost all Canon DSLRs. Full list
Upgrade to DSLR Remote Pro 3.19.1 today
DSLR Remote Pro 3.19.1 is a free upgrade for all registered users who purchased DSLR Remote Pro after 28 June 2022. Customers with older licenses need to buy an upgrade license to use this release.
We’ve had a lot of interest in adding time limits to events in DSLR Remote Pro 3.19, so I have added a tutorial to the website explaining how to use this new feature.
Breeze Booth (DSLR+Windows) aka DSLR Remote Pro 3.19 was released today, bringing users support for two new cameras, an easy to use Survey Generator, Outline/Sticker Mode, Print Compositing and Time Limited events
Included in this release
Booth opens at… and closes at.. screens for time limited events
Outline/Scrapbook feature
Simple Survey Generator
Print Compositing
Support fornew Canon camerasEOS R8 and EOS R50.
Time limited events
Set start and end times for a photo booth session and the booth will only operate between these times.
Display custom screens before and after the event.
Password protected exit buttons can override these settings
DSLR Remote Pro adds suport for Canon’s new EOS R8 and EOS R50 cameras.
Canon EOS R8 camera (Image courtesy of Canon Europe)
Chris’s comments on the EOS R8 and EOS R50
The EOS R8 is a compact, high quality full frame camera with excellent autofocus which is capable of 180fps slow motion video. It’s less expensive and more compact than the Canon EOS R6 Mark II while offering similar autofocus and image quality.
The EOS R50 does not have a center contact on the hotshoe. To use this camera for a photo booth with external flash you need a Canon AD-E1 Multi-Function Shoe Adapter which fits into the hotshoe and provides a hotshoe with a center contact. Please note that this adds to the height of the camera: please ensure there is enough space in your photo booth housing for it to fit.
Did you know that there are several ways to add a simple consent screen or disclaimer to DLSR Remote Pro?
Data is usally collected using a survey. However there are simpler ways to ensure guests agree to disclaimers or terms and conditions at the start. This post runs through three alternatives:
Add a disclaimer to the Welcome/standby screen
Add a disclaimer to the Ready screen (with optional link to detailed T&C)
Use a profile menu screen for the disclaimer
Note: All three methods provide a gate guests pass by answering one question. In the worked examples I use But first.. May we share your photos online. Replace this with any question which suits your purpose.
When you need guests to answer several questions, record or analyze their responses, use a survey instead.
Use the welcome/standby screen
To query consent at the standby screen,:
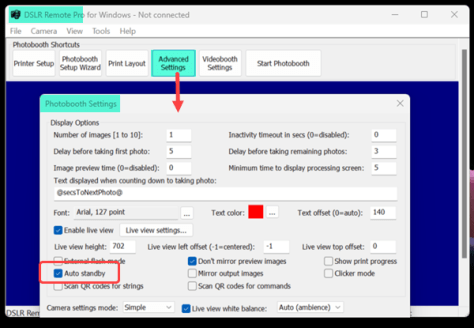
Check Auto standby in Advanced settings
Add a suitable graphic called welcome.jpg to the PhotoboothImages folder
Add the touchscreen action to switch from standby to your Ready screen
Check Auto standby
Auto standby returns the booth to the Welcome screen instead of the Ready screen at the end of each session.
Start DSLR Remote Pro and click on Advanced Settings. Check Auto standby and save your changes.
Checking Auto standby in Breeze DSLR Remote Pro
Add your welcome.jpg
Make your graphic a jpg image which is the same size as your screen (in pixels). Call the graphic requesting consent to use the photos welcome.jpg and add it to your PhotoboothImages folder.
You can ask the same question on the ready screen instead of the standby screen.
You can also link from the ready screen to Information pages providing detailed term and conditions.
Guests clicking Yes!starts the countdown. Guests choosing No are returned to the standby screen. Guests clicking Maybe are shown information screen(s).
In the example above, ready.jpg is white with Yes, No and Maybe buttons. (Maybe is optional and links to information screens.)
ready_overlay.png provides the question text on a transparent background so that it shows in front of the live view.
Make sure both ready.jpg and ready_overlay.jpg are the same size in pixels as the screen.
You may prefer to switch off live view in the ready screen by checking Disable live view in ready screen in Live View Settings.
Yes/accept to take the guest to the ready screen of a second profile.
No/reject returns the guest to standby using the Switch from ready to standby action
Maybe takes the guest to information screen(s) as above
Before you leave…
Check everything works and save your changes before you finish.
More about guest consent
Collecting data and recording consent
Create custom surveys to collect guest data and record consent.
Survey data can be analysed, displayed in prints, and used to separate images into different folders.
Information screens
To add a detailed GDPR compliant privacy statement, terms and conditions or any other information screen(s) to your booth use DSLR Remote Pro Information screens.
Coming soon
Watch out for DSLR Remote Pro 3.19, which will introduce a new way to create simple surveys.
Working with profiles? Remember to load the profile before you start, and save the updated profile when you finish.
Tell DSLR Remote Pro to share photos by email and/or text
Start DSLR Remote Pro and if necessary load your design or profile.
Before sending emails from Breeze you need to set up the email server settings. You only need to do this the first time you send emails from the booth. How to add your email account details.
Check email sharing on the Output screen
This tells the program that you want to offer guests the option to share by email.
Setting the flag which tells DSLR Remote Pro to offer sharing images by email
Create or update a sharing screen
Check whether you already have a sharing screen share.jpg in your PhotoboothImages folder.
Current PhotoboothImages folder (Breeze DSLR Remote Pro 3.15.5)
Screen graphic share.jpg
If there is no share.jpg in in the PhotoboothImages folder use an image editor to create one.
The new screen graphic should be the same size in pixels as the other screens. Include buttons for your sharing options and to exit the screen.
Sharing screen graphic share.jpg with email and exit buttons (Breeze DSLR Remote Pro 3.15.5)
If you already have a sharing screen,add an email button to share.jpg
NB: You can copy the sharing icons we provide for the setup wizard, or use your own png images
Icons used by the setup wizard can be found at C:\Users\…\Documents\Breeze Systems\DSLR Remote Pro\wizard. Copy these or use your own png image. (Image shows icons used by Tradewind White)
Add touch screen actions to the sharing screen
Open the touch screen editor
Opening the touch screen editor (DSLR Remote Pro 3.15.5)
Right click and select Share: share.jpg screen . This displays your share.jpg graphic, the area of the screen covered by the image, and any actions which have already been already set up.
Adding touch screen actions which match the sharing screen graphic (Breeze DSLR Remote Pro 3.15.5)
Right click on an unused part of the screen
Add the action Sharing: Email photos.
Drag and drop this action to cover your email button (1)
If you don’t already have a close action, add a second action Sharing: Close sharing screen
Drag and drop the Close action over your close button (2)
If these buttons overlay the image area, move/resize the image to separate them (3)
Right click once more to exit the touch screen editor, saving your changes.
Working with profiles: remember to save the updated profile before you leave. Troubleshooting profiles
More about sharing by email
Find out how to collect email addresses used to share images, customize email content, share GIFs and find the best balance between sharing images quickly and sending the highest quality imageshere
Sharing at large and busy events, touch free sharing and sharing statistics are covered here
Adding SMS/MMS text sharing to your design
Add text based sharing in the same way.
You will need a share.jpg screen in your PhotoboothImages folder, which includes text and exit buttons.
Sharing screen graphic share.jpg with text, email and exit buttons (Breeze DSLR Remote Pro 3.15.5)
Check MMS/SMS sharing on the Output Settings screen
Setting the flag which tells DSLR Remote Pro to offer sharing images by SMS/MMS
Add the MMS/SMS touch screen action to the sharing screen
Go bck to the touch screen editor and add the Sharing: Send MMS/SMS action to the sharing screen
Right click on an unused part of the screen
Add the action Sharing: Send MMS/SMS.
Drag and drop this action to cover your text button
If you don’t already have a close action,, add a second action Sharing: Close sharing screen
Drag and drop the Close action over your close button
If these buttons overlay each other or the image area, move/resize the actions to separate them
Right click once more to exit the touch screen editor, saving your changes.
Working with profiles: remember to save the updated profile before you leave. Troubleshooting profiles
Adding the Sharing: Send MMS/SMS action to the sharing screen graphic (Breeze DSLR Remote Pro 3.15.5)
More about sharing by MMS/SMS
Not sure whether to send SMS+Image, SMS or MMS texts? Find the answer and learn how to customize text messages, send texts via Breeze Hub or use touch free texting here
Find out how to view cell phone numbers used to share images and sharing statistics here
DSLR Remote Pro 3.18.2.1 was released today, March 9th. This is a minor update, fixing issues in DSLR Remote Pro 3.18.2 where touchscreen keyboards converted all input to upper case and the program could crash when using SHIFT+Ctrl+left click to save the keyboard settings.
Photo Booth Expo 2023
2023 was our busiest Expo for years. Breeze, EventKite and Everybooth shared a stand showcasing Breeze for Windows and Breeze for iPad running on Everybooth’s lovely wooden booths. Images were uploaded to EventKite’s new microsite and gallery.
Visitors loved the black and white video and photos taken by DLSR Remote Pro, and were astonished by the power and speed of Breeze for iPad 3.3.
Breeze DSLR Remote Pro 3.18.2 using Canon EOS M50 Mk II
Breeze for iPads’ ability to offer built in background removal with live view for both video and photos was a hit, as was the ability to pair the iPad with Canons’ mirrorless and DSLR cameras.
Sharp eyed visitors may have noticed that overlays on both the DSLR Remote Pro and Breeze for iPad images vary, sharing prime position between the three businesses on the stand. Both Breeze for iPad and DSLR Remote Pro include the ability to randomly vary layouts.
Upgrade to DSLR Remote Pro 3.18.2.1 today
DSLR Remote Pro 3.18.2 is a free upgrade for all registered users who purchased DSLR Remote Pro after 9 March 2022. Customers with older licenses need to buy an upgrade license to use this release.
Thanks as well to Steve for his stunning interfaces which showcased both apps and booths to perfection, and to Grecia Ventura for kindly allowing us to use her photos.
Breeze Booth (DSLR+Windows) aka DSLR Remote Pro 3.18.2 was released today, February 14th.
This release adds support for Canon’s fabulous new EOS R6 Mark II camera, introduces a watermark over prints displayed in the print confirmation and sharing screens, and the ability to retry failed uploads.
EOS R6 Mark II support
The mirror-less EOS R6 Mark II is a superb camera for high end photo booth operators, especially those offering slow motion and video. The R6 Mark II comes with
180 frames/second or 120 frames/second slow motion at 1080p
Center hotshoe contact allowing external flash to be triggered
Class leading face and eye detect autofocus
DSLR Remote Pro already supports Canon’s EOS R10, R7, R6, R5, R and RP models, several M series cameras, and almost all Canon DSLRs.
Watermark on screen copy of prints
We’re getting a lot of interest in using DSLR Remote Pro for pay to print and pay to share booths at fixed installations.
To discourage guests from taking a photo of the booth screen instead of paying for it, DSLR Remote Pro 3.18.2 can watermark prints displayed in both the print confirmation and sharing screens.
The watermark image must be called print_watermark.png and placed in the photo booth images folder.
Upgrade to DSLR Remote Pro 3.18.2 today
DSLR Remote Pro 3.18.2 is a free upgrade for all registered users who purchased DSLR Remote Pro after 14 February 2022. Customers with older licenses need to buy an upgrade license to use this release.


You must be logged in to post a comment.