“Where are the images from my event? I am sure I saved them and have looked everywhere on the computer …..”
DSLR Remote Pro holds the key
Start DSLR Remote Pro, click on File then Preferences
Select File then Prefernces to show the DSLR Remote Pro prefernces screen (DSLR Remote Pro 3.11.3
This brings up the Preferences window, which tells you which folder images are saved in:
The DSLR Remote Pro Preferences screen shows the folder where images are stored, and displays an example image name
In this example the original photos are stored in a folder called C:\Users\sue\Documents\PhotoBoothImages\2018-09-06
PhotoBoothImages folder showing sub folder 2018-09-06 containing images taken on 6th September, 2018
Where are copies of prints, slideshow GIFs, green screen and other processed photos stored?
Usually you will find these in a sub folder of the main image folder, eg C:\Users\sue\Documents\PhotoBoothImages\2018-08-27\prints
DSLR Remote Pro gives you a huge amount of control over what and where you save images. Advanced users often use tokens as part of their file naming.
Use the Output Settings window to check where to find still images and slideshow GIFs.
Output Settings
Click on Advanced Settings, then the Output OptionsSettings… button to reach this window:
DSLR Remote Pro Output Settings screen (Breeze DSLR Remote Pro 3.11.3)
(1) Copies of each print are saved in a subfolder called Prints if Output is set to Save and print JPEG copy or JPEG copy only
(2) Copies of processed photos are saved in a subfolder called Processed. This includes images which have been rotated, cropped, digitally zoomed, green screened, converted to B&W, toned, had Instagram style filter applied or are post processed using Photoshop.
(3) If you select deletion of images which guests choose not to print, DSLR Remote Pro does delete them!
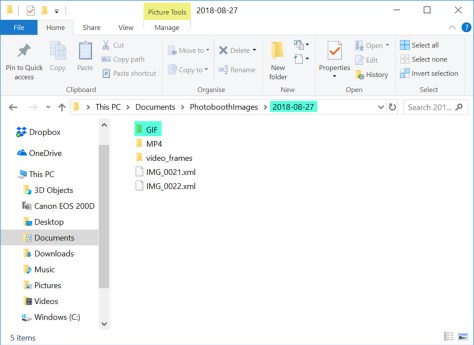
(4) Slideshow GIFs are either (a) stored in a sub folder called GIF or (b) in the prints sub folder
(4a) Folder showing images taken on 2018-08-27. Original images (IMG_0001.JPG etc) are in the main folder, slideshow GIFs in sub folder GIF, MP4 copies of the GIFs in sub folder MP4, print layouts in sub folder prints(4b) Here the slideshow GIFs are stored in the prints sub folder with the JPG print layouts (DLSR Remote Pro 3.11.3
Boomerang GIFs are created from video, and are usually stored in either in (a)sub folder GIF or (b) sub folder prints
(a) Folder showing images taken on 2018-08-27. Boomerang GIFs in sub folder GIF, MP4 copies of the GIFs in sub folder MP4. (DSLR Remote Pro 3.11.3)(b) Here boomerang GIFs are stored in the prints sub folder (DLSR Remote Pro 3.11.3)
Look in the Animated GIF Settings (Video Booth Mode) window to check where to find your boomerang GIFs. Click on File, then Video Booth Settings, then select the Animated GIF settings button to access this window:-
The Animated GIF Animated GIF Settings (Video Booth Mode) window shows where boomerang GIFs are stored. Select File, then Video Booth Settings, then Animated GIF settings to reach this window (DSLR Remote Pro 3.11.3)
(6) Check to save PNG copies of live view image frames used to construct GIFS will be stored in sub-folder GIF_frames,
(7) Check to save boomerang GIFs in the prints sub folder
(8) Checked to create MP4 copies of boomerang GIFs
(9) MP4 copies of GIFs can be stored in sub folder MP4, subfolder prints or the same folder as the GIFs
Improved control for placing green screen image against background
DSLR Remote Pro 3.11.3 introduces cropping and rotation of green screen images, and improves image positioning against the background
Video sharing
Share photo booth videos from the booth
Easy to adjust MP4 quality (fast for ease of sharing, slow for high quality)
Optional delay to allow post processing video (allows scripts to process video before sharing)
This release is a free upgrade for all registered users who purchased DSLR Remote Pro after 15th August 2017. Customers with older licenses need to buy an upgrade license to use this release.
Guests can email photos, animated GIFs and Canon M50 slowmo videos and other videos* they create in DSLR Remote Pro 3.11.3. If Internet access during the event is poor, you can send the emails later.
Update March 2021: This post has been replaced by a new tutorial
This post explains how to email images from a touchscreen photo booth running DSLR Remote Pro. You will also learn how to tell the program about your email server settings, brand and customize the emails you send.
Let’s run through this in more detail, starting with the setup wizard:
Run the Photobooth Setup Wizard
Start DSLR Remote Pro and run the Photobooth Setup Wizard (1). Choose which options to offer guests at Step 2 (2). In this example guests can choose between still photos and boomerang (aka burst) GIFs (3). You can offer video (or photos and video) instead at this point.
Check the option Email photos (4) .
Checking the box Email photos at Step 2 of the setup wizard ( DSLR Remote Pro 3.11.3)
Select any other options you need before clicking on <Next> and completing Step 3 of the wizard.
You can set up your own booth with this sharing screen using just the 3 step wizard:
Email sharing screen created by the Photobooth Setup Wizard (DSLR Remote Pro 3.11.3)
Setup the email server settings
The first time you email from DSLR Remote Pro you need to set up the email server settings:
Select File (5) then Photobooth Settings(6) to access these settings
This will display the Photobooth Settings screen.
Go to the Output Settings(8) and check Email (9). You can then select Email Server Settings screen at (10)
To send an email you need to specify the host name and port number of your email server. Most email servers also require a username and a password. For additional security check Use SSL for secure email.
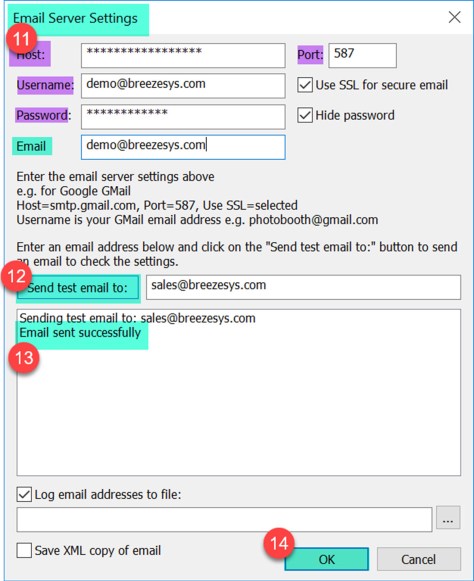
The values of Host, Username, Password, Email and Port(11) you enter on the Email Server Settings screen are specific to the email provider you are using.
Before you move on, check everything works by sending a test email to your own email address(12). DSLR Remote Pro displays Email sent successfully(13) when this message has been sent. Check that you receive the test email.
Remember to click OK(14) to save your settings as you leave this screen.
Including your name with the email address
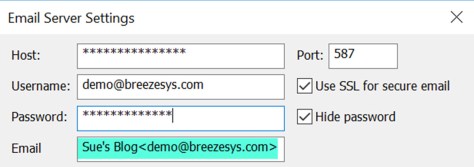
To include the name of the sender with the email address enter the name followed by the email address enclosed in angle brackets e.g. Sue’s Blog <demo@breezesys.com>.
Here the sender name is ‘Sue’s Blog’ and the email address demo@breezesys.com (DSLR Remote Pro 3.11.3)
Logging guest email addresses & sending them after the event
You can keep a log of email addresses used by guests, providing valuable data for your own or corporate client’s use.
If an event Internet connection is flaky or non-existent you can save the email details and send them later.
The port number is usually 587 when using SSL secure email or 25 otherwise (but check the port numbers used by your ISP).
Emails look more professional when sent from your own domain.
Most free email services require the sender’s email address to the be the same as the email account specified by the username and password.
Gmail users should set access for less secure apps to Turn on in your Google account settings otherwise GMail will refuse to send the email.
Customize and brand your email messages
Use the standard email message
You do not have to customize the message sent with your photos and animated GIFS. If you use the standard settings in DSLR Remote Pro all emails will include the image(s) captured in the booth and the text Your photo booth photos taken on 14 August 2018 (or whatever date the images were taken).
Customizing the email subject and message
The emails guests send can be a powerful marketing tool for your business. Make them work for you by customizing the message sent with your image(s). Use Breeze tokens, your own text, images and html in the Email Settingsscreen.
Select File, then Output Settings, then Email settings to reach this screen:
Select File, then Output Settings, then Email settings to customize emails sent from DSLR Remote Pro
The first time you see the email settings screen it contains the default message DSLR Remote Pro sends with your emails. Edit this to meet your needs.
Default Email Settings screen in Breeze DSLR Remote Pro 3.11.3
You can change the both the subject and content of the emails sent with guest images.
Reduce the time and bandwidth taken to send and receive emails by choosing a suitable maximum image size.
Creating a standard email template using the {eventName} token
{eventName} is a special Breeze token which can be shared between Breeze programs. You can use {eventName} in your emails and print layouts to save time customizing your booth for each event.
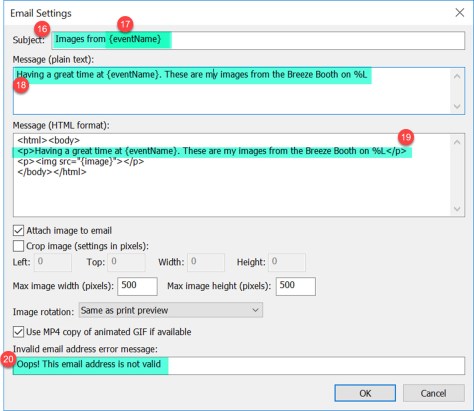
Here I have both changed the text and used {eventName} to customize the email subject (17), plain text (18) and html (19) versions of the content. I also changed the message seen by guests if they type an invalid email address (20).
When the email is sent Images from {eventName} will be replaced by Images from Sue & Chris’s Big Party. The text sent with the email will also say Having a great time at Sue & Chris’s Big Party. These are my images from the Breeze Booth on 14 August 2018.
{eventName} can also be used in print captions, and as part of folder and file names. For my next event I just need to change {eventName} to John & Jane’s Wedding ….
Note: %L is another Breeze token, which will be replaced by the date the images were taken.
How do I enter and change {eventName} for each event?
Start DSLR Remote Pro, click on File then Photobooth event info… to reach the Photo Booth Event Info screenPhoto Booth Event Info screen with {eventname} set to Sue & Chris’s big Party (DSLR Remote Pro 3.11.3)
You may have spotted Event Strings on this screen. You can use {eventString1} to {eventString5} in the same way as {eventName} .
Why do I need to send both plain text and html?
The emails DSLR Remote Pro sends from your booth may be viewed on lots of different devices including Apple and Android smart phones, tablets and PCs. Most modern devices can read html emails; we also send a plain text version in case the html version cannot be read.
Thank you for reading this post. I have covered how to send emails from DSLR Remote Pro, outlined how to brand and customize the emails, create your own standard template which is automatically updated for different events, and tell the program about your email service provider.
If you are ready for more, Steve’s video is a great introduction to using tokens. You can also learn more about customizing emails in the program help files.
If this post is helpful to you, please share it with others in our industry.
* DSLR Remote Pro 3.11.3 was released today 15 August 2018, and is a free upgrade for anyone whose license was issued in the last year. This release introduces the ability to share videos captured in video booth mode, including Canon M50 slow mo videos. Please note that emailing large attachments during events will slow the booth down.
Update 16 August: You can run this new script alongside DSLR Remote Pro 3.11.3to rotate and resize videos and add an optional overlay and soundtrack before videos are shared. We expect to include these features into DSLR Remote Pro in a future release.
Support for new cameras: Canon EOS 6D Mark II, 200D, Rebel SL2,1500D, 2000D, Rebel T7, 3000D, 4000D
What is Flipbook Photobooth?
Breeze Flipbook Photobooth is Windows based event software for creating flip books using a Canon DSLR camera. Guests capture a short animation and play it back by flicking through the pages of a printed flip book.
Run Flipbook Photobooth as a standalone app shooting the animation, creating and printing flip books
Print flip books from from boomerang GIFs created in DSLR Remote Pro
Most the equipment is the same as you need for a DSLR based photo booth. Books are usually printed on a dye sublimation printer capable of printing 6×2 strips.
Branding and customisation – front cover, individual flip book pages, and screens can all be branded and customised
Breeze flexibility as standard! Offer guests a choice of green screen backgrounds or book covers. Add an extra dimension by changing the background or overlay as the book progresses. Upsell larger books or more pages. Use multiple printers at large corporate events. Breeze Flipbook Photobooth supports dye sub media, laser and inkjet printers.
This slideshow requires JavaScript.
See Flipbook Photobooth in action
Thanks to Nick Andrews of Open Air Photobooth for allowing us to show this demo of Flipbook Photobooth at Osheaga 2014
Nick runs events and sells photo booth/flip book station packages using Breeze event software.
Printing flip books from boomerang GIFs created in DSLR Remote Pro
Flipbook photobooth 1.8 comes with two scripts which create flip books when guests make boomerang GIFs in DSLR Remote Pro. One script creates a flip book for every boomerang GIF, the other asks the guest whether to print the flip book.
You can find these scripts in the Flipbook Photobooth installation folder. This is usually C:\Program Files (x86)\Breezesys\Flip Book Photobooth (1) as as shown here:
Breeze Flipbook Photobooth 1.8 includes 2 scripts you can use to create flip books from DSLR Remote Pro boomerang GIFs
Note: These scripts use the free Windows scripting tool, AutoHotKey. You need to download and install AutoHotKey before you run them.
auto_print.ahk(2) prints the flip book automatically when the animated GIF is accepted in DSLR Remote Pro.
auto_print_with_prompt.ahk(3) ask the guests whether to print the flip book.
Breeze also provide a free script which creates a GIF animation of each flip book sequence. This script uses the free Windows scripting tool, AutoHotKey and the ImageMagick convert command line tool. AutoHotKey must be downloaded and installed before you run the script.
Download the script and unzip all the files in the ZIP file to a single folder
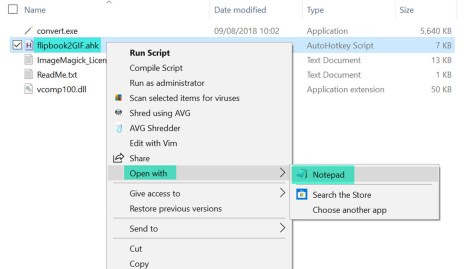
Double click on flipbook2GIF.ahk to run the script.
Open the script in a text editor such as Notepad for detailed instructions.
Please note that this script is provided free of charge and comes without any warranty or support.
You can share these GIFs using Breeze Kiosk or third party sharing software
Each Flipbook Photobooth license costs just US $250 (excluding any tax) and includes one year’s free upgrades. Buy your license online from the Breeze website
New photo booth mode where guests see themselves pose live, start the action and view the animated GIF/movie on screen
Ability to brand and customise the screens seen by guests
Integrated control for Esper Trigger boxes
Point and click camera alignment
Ability to add soundtrack to videos
Support for new cameras.
New cameras
DLSR Remote Pro Multi-Camera 2.0 adds support for Canon EOS 2000D/Rebel T7 (aka Canon EOS 1500D and Canon EOS Kiss X90), Canon EOS 4000D (aka Canon EOS 3000D) and Canon EOS M50 (aka Canon EOS Kiss M).
Note: the Canon EOS M50 and Canon EOS 3000D/Canon EOS 4000D are not recommended for event rigs where all the cameras need to be triggered at the same time because the cameras don’t have remote release sockets. The Canon EOS 3000D/Canon EOS 4000D also does not have support for external power.
DLSR Remote Pro Multi-Camera 2.0 is a free upgrade for all registered users who purchased a license on or after 25th July 2017. Customers with older Breeze Multi-Camera licenses can buy an upgrade license to use this release.


You must be logged in to post a comment.