Articial Intelligence (AI) based background removal is a fantastic alternative to green screen. The quality is awesome, there’s no cumbersome backdrop, and lighting is much simpler. It doesn’t even matter when your guests wear green.
Use background removal with both DSLR Remote Pro and Booth (iPad + iPhone) slideshow GIFs and prints
Who hasn’t wanted to escape to a different place recently?
Transport guests to the location of their dreams
Replace less than perfect backgrounds
Make the most of small spaces and dispense with backdrops
Attract visitors by facing your booth towards them
Three background removal services to choose from
At present Breeze supports background removal services from AI Background Remove, Gadbooth, and removebg . These are paid services offered by third parties. More
Please see Partner Information below for important information on 3rd party programs and services.
Reliable Internet: AI based background removal is a web based service, so you need a reliable internet connection at the event.
More about background removal with DLSR Remote Pro and Booth (iPad + iPhone)
The ability to upload to and download from third party applications such as AI Background Remove, Gadbooth, and removebg is subject to each third party concerned continuing to allow such interactions.
These features are tested before they are released but may cease to function or be removed without notice if the third party concerned no longer allows such interaction, or changes the method/protocol required.
Did you know that Breeze Multi-Camera v2.1 introduced an option for the Multi-Camera Animator to use Microsoft MediaWriter instead of ffmpeg to create MP4 videos?
Microsoft MediaWriter libraries are much faster
ffmpeg libraries are more flexible and still appropriate for some applications
Multi-Camera 2.1 is a free upgrade for all registered users who purchased Multi-Camera (previously called DSLR Remote Pro Multi-Camera) after 28th November 2017. Customers with older licenses need to buy an upgrade license to use this release.
New to Multi-Camera? Just download a copy of the program and try it for free. You can run the program with up to 4 cameras for 2 weeks on the fully functional evaluation license.
Breeze Booth 1.0.3 was released on July 17th. What’s new?
Send text messages and emails with multiple attachmentsdirectly from the App
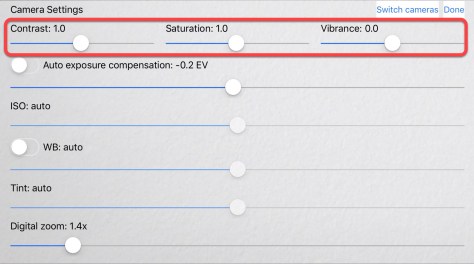
New camera controls for contrast, vibrance and saturation
Simple touch screen controls let guests zoom in/out and make images brighter or darker.
Logo overlay for animated GIFs.
Simpler sharing straight from the App
Share photos and GIFs directly from the Breeze Booth App by text (uses Twilio) or email.
Corporate clients will love having total control over email content and appearance. Email addresses and cell phone numbers are also hidden from later guests.
Emails can include multiple attachments – so you can share any combination of animated GIF/MP4, individual images and the print layout.
Breeze Booth 1.0.3 email with both individual images and slideshow GIF attached (courtesy of Photo Booth Guys)
We’ve added three new slider controls for contrast, vibrance and saturation.
Breeze Booth 1.0.3 camera controls include Contrast, Saturation and Vibrance
Saturation adjusts the strength of the colors, and vibrance adjusts the saturation while keeping pleasing skin tones. Use contrast to change the difference between light and dark colors.
Guest controlled zoom and brightness
Let your guests adjust zoom and exposure compensation (brightness) while protecting the full range of camera controls. Breeze Booth 1.0.3 adds touch screen actions to the ready and menu screens for both exposure compensation and digital zoom settings .
New branding overlay for GIFs
Quikcly add a branding overlay to burst and slideshow GIFs by simply including the png overlay in the screens folder. Call the overlay gif_logo_overlay.png for burst GIFs and slideshow_gif_logo_overlay.png for slideshow GIFs.
How do I upgrade to this release?
Breeze Booth 1.0.3, Breeze Booth Event Editor v1.3 and Breeze Hub v1.0 were released on 17th July and are free upgrades for all Breeze Booth customers.
Download the Windows based companion apps Event Editor and Hub here
Can I try this for free?
Yes! Download and try Breeze Booth and companion Apps Event Editor and Breeze Hub free of charge. You don’t even need to buy a license to create your own events. Just download and install Breeze Booth Event Editor 1.3 onto a Windows PC.
* Devices must run iOS 12. At time of writing (July 2019) Breeze Booth supports iPad Pro 11 and iPhone X series and well as iPads with 4:3 screens and iPhones with 16:9 screens
How to buy a Breeze Booth subscription
Breeze Booth subscriptions cost just US $49 /month or US $440 /per year. Open an account at breezebooth.net before you buy a subscription.
Thank you for taking the time to read this post. Please share it with others
Mirror booths usually do not display the camera’s live view because guests see themselves pose in the mirror.
Breeze DSLR Remote Pro’s support for bespoke interfaces and custom menus makes it a great choice for magic mirrors and photo booths. You can hide the live view whether you are offering still photos, GIFs, slow mo or video booth:
Fusion Booth running DSLR Remote Pro with choice of boomerang GIF, slow motion or photos (Image courtesy of Incredible Booth)
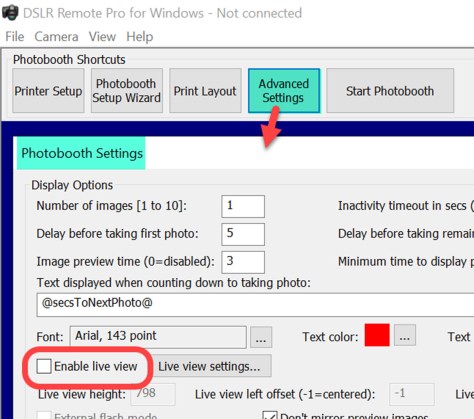
To capture still photos without displaying the live view simply switch it off in Advanced Settings.
Live view unchecked to hide the live view when capturing still images (Breeze DSLR Remote Pro 3.12)
This is great when you want to make slideshow GIFs from a set of still photos.
Breeze boomerang GIFs are captured from the camera’s live view, so when live view is switched off you cannot shoot boomerang GIFs.
Hide the live view
Mirror booth users and others who want to shoot boomerang GIFs without showing the live view need to hide it. There is a simple trick to this – move the live view so that it is no longer displayed on screen. If your screen is 1080 x 1920 pixels, offset the live view by more than this (In this example I have offset by 2000 pixels in both directions):
This slideshow requires JavaScript.
Guests will still see the countdown but not the live view. Magic!
Breeze DSLR Remote Pro powers photo booths and mirror booths worldwide. Licenses cost just US $275* each and include one year’s free upgrades. This post shows screenshots from Breeze DSLR Remote Pro 3.12
This Windows based App runs as a fully functional trial for up to 14 days supporting most Canon DSLR cameras and Canon’s mirrorless M50.
Support for new cameras: Canon EOS 6D Mark II, 200D, Rebel SL2,1500D, 2000D, Rebel T7, 3000D, 4000D
What is Flipbook Photobooth?
Breeze Flipbook Photobooth is Windows based event software for creating flip books using a Canon DSLR camera. Guests capture a short animation and play it back by flicking through the pages of a printed flip book.
Run Flipbook Photobooth as a standalone app shooting the animation, creating and printing flip books
Print flip books from from boomerang GIFs created in DSLR Remote Pro
Most the equipment is the same as you need for a DSLR based photo booth. Books are usually printed on a dye sublimation printer capable of printing 6×2 strips.
Branding and customisation – front cover, individual flip book pages, and screens can all be branded and customised
Breeze flexibility as standard! Offer guests a choice of green screen backgrounds or book covers. Add an extra dimension by changing the background or overlay as the book progresses. Upsell larger books or more pages. Use multiple printers at large corporate events. Breeze Flipbook Photobooth supports dye sub media, laser and inkjet printers.
This slideshow requires JavaScript.
See Flipbook Photobooth in action
Thanks to Nick Andrews of Open Air Photobooth for allowing us to show this demo of Flipbook Photobooth at Osheaga 2014
Nick runs events and sells photo booth/flip book station packages using Breeze event software.
Printing flip books from boomerang GIFs created in DSLR Remote Pro
Flipbook photobooth 1.8 comes with two scripts which create flip books when guests make boomerang GIFs in DSLR Remote Pro. One script creates a flip book for every boomerang GIF, the other asks the guest whether to print the flip book.
You can find these scripts in the Flipbook Photobooth installation folder. This is usually C:\Program Files (x86)\Breezesys\Flip Book Photobooth (1) as as shown here:
Breeze Flipbook Photobooth 1.8 includes 2 scripts you can use to create flip books from DSLR Remote Pro boomerang GIFs
Note: These scripts use the free Windows scripting tool, AutoHotKey. You need to download and install AutoHotKey before you run them.
auto_print.ahk(2) prints the flip book automatically when the animated GIF is accepted in DSLR Remote Pro.
auto_print_with_prompt.ahk(3) ask the guests whether to print the flip book.
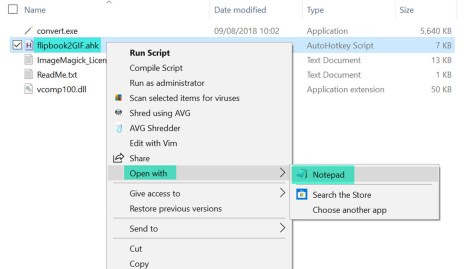
Breeze also provide a free script which creates a GIF animation of each flip book sequence. This script uses the free Windows scripting tool, AutoHotKey and the ImageMagick convert command line tool. AutoHotKey must be downloaded and installed before you run the script.
Download the script and unzip all the files in the ZIP file to a single folder
Double click on flipbook2GIF.ahk to run the script.
Open the script in a text editor such as Notepad for detailed instructions.
Please note that this script is provided free of charge and comes without any warranty or support.
You can share these GIFs using Breeze Kiosk or third party sharing software
Each Flipbook Photobooth license costs just US $250 (excluding any tax) and includes one year’s free upgrades. Buy your license online from the Breeze website
1.Run the setup wizard to create simple boomerang GIFs. You can find details in the the video for the 3.12 Setup Wizard
Customise the boomerang GIF
2. Next click on File (A) then Videobooth Settings (B) to show the Videobooth Settings screen.
3. Check that the boxes for Create Animated GIF and Use camera’s photo mode are both checked, then select the Animated GIF Settings buttom (C) to see the Animated GIF Settings (video booth) screen
Video Booth Settings screen choosing settings for boomerang animated GIF DSLR Remote Pro 3.8.1
3. The settings below create a ‘boomerang’ animated GIF from the whole photo (landscape orientation) without any border. This GIF will be 600 wide x 400 pixels high. When you have chosen the settings you need click OK (here and the other pop up windows until you return to the main screen).
Add the animated overlay
4. You need the same number of overlay images as frames in the boomerang GIF. In this example the animated GIF has 29 frames (separate images) created from 15 original images*. You need 29 overlay images; called video_stills_overlay_1.png, video_stills_overlay_2.png …. video_stills_overlay_29.png .
*If you don’t use a title, there are 28 frames so you only need 28 overlays.
DSLR Remote Pro 3.8 boomerang GIF: 29 overlay images placed in folder used for screens
Give your boomerang GIF a title
Note: Boomerang GIFs need one extra overlay if they have a title.
For a single title create a title image named video_stills_title.jpg and insert this into the same PhotoBoothImages folder.
For an animated title replace video_stills_title.jpg with several images called video_stills_title_1.jpg, video_stills_title_2.jpg, video_stills_title_3.jpg etc
You can adjust the length of time the title is displayed (D) and whether it is shown at the start or end of the animation (E) in the Animated GIF Settings (videobooth mode) screen
Adjusting the title for a boomerang (burst) animated GIF DSLR Remote Pro 3.8
Run the photobooth and boomerang GIFs created by guests will have animated overlays.
This example uses DSLR Remote Pro’s simulated camera; a handy feature which lets you try out features and set up designs without connecting a real camera to the computer. The GIF has an animated overlay of falling snow and a title. It has been captured in black & white.
Boomerang GIF with animated overlay and title Breeze DSLR Remote Pro 3.8.1
The falling snow effect here uses 29 images to create the animation. The snow flakes are in a different position on each image.
You are welcome to use these snowflake overlays in your own booth with DSLR Remote Pro. If you found this post useful please share it with others.
DSLR Remote Pro 3.12 is a free upgrade for all registered users who purchased a license on or after 26th November 2017.
You can make two kinds of animated GIFs using DSLR Remote Pro 3.8 and Webcam Photobooth 2.4 : slideshow and boomerang. Slideshow GIFs contain still photos taken during normal photobooth operation. You can set up your booth to print the strips (or other layout) and share the same photos in an animated GIF – which looks much more interesting than viewing a strip on a phone.
Boomerang aka Burst GIFs are captured with a short video clip. Both types of GIF can be shared via MMS/SMS, emailed and uploaded to social media.
How to create slideshow GIFs
This blog post explains how to create slideshow GIFs with animated overlays using the Photo Booth Setup Wizard in DSLR Remote Pro 3.8. Photos are printed in the usual way; guests can share the same images as an animated GIF. You can customize your GIFs using the advanced settings.
Start DSLR Remote Pro and run the Photobooth Setup Wizard. This example uses a strip of 4 photos. Choose whether to share via Twitter, MMS/SMS or email at Step 3. (Leave these boxes unchecked if you are using a separate sharing station.) This example creates a 4 photo strip; guests can share their GIFs using MMS/SMS.
2. Choose Settings on the Photobooth Settings screen
3. Check Share animated GIFs so that guests can share their GIF from the booth. (Leave this box unchecked if you are using a separate sharing station.)
4. Check Create an animated GIF from the photos
5. Then choose the Animated GIF settings to display the Animated GIF settings screen:
Animated GIF settings screen DSLR Remote Pro 3.8
6. A photo width of 600 pixels is a good start point. Use the settings in the image above to create an animated GIF from the whole photo (landscape orientation) without any border. Check the final box if you want to make an MP4 copy of each GIF.
7. When you have chosen the settings you need click OK (here and the other pop up windows until you return to the main screen).
Adding an animated overlay to a slideshow GIF
You can create an animated overlay from a set of transparent png images. The falling snow effect here uses 12 images to create the animation. The snow flakes are in a different position on each image. (3 snowflake overlays are shown over each of the 4 photos.) You can download the snowflake overlays here .
To add an animated overlay return to the Animated GIF Settings screen (Repeat 1 to 5 above, selecting Advanced Settings, then Settings, then Animated GIF Settings.)
Change the number of overlays per photo to 3 and click OK (here and the other pop up windows until you return to the main screen).
Animated GIF settings for animated overlay (here 3 overlays per photo)
Now copy the overlay images you downloaded into the PhotoBoothImages folder containing your screens (A). The overlays must be named GIF_overlay_1.png through to GIF_overlay_12.png (B).
PhotoBoothImages folder containing screen layouts and overlay png files
Run the booth and you will create both a strip of four photos and a slideshow GIF with the animated overlay here:
Christmas slideshow GIF with animated overlay DSLR Remote Pro 3.8
Breeze Systems is proud to announce the release of DSLR Remote Pro 3.8. Easier to use and more powerful than ever before, DSLR Remote Pro 3.8 includes two free button sets designed by Wilkes Booth Co.
Highlights of the new release
Fast simple branding for photo booth screens
Create and save new photo booth screen themes
Transfer themes between PCs
Free sets of touchscreen buttons
Create custom caption sets in any almost language
Photobooth Setup Wizard now simplifies screen customization
Brand screens quickly and easily with new DSLR Remote Pro themes
Create themed photobooth screen sets
Create, load and save DSLR Remote Pro themes containing screen background, touchscreen button, and caption sets
DSLR Remote Pro 3.8 theme including (A) screens, (B) buttons & (C) captions
A. Complete sets of custom photo booth screen backgrounds can now be generated from a single image. The same background image can be tiled, stretched or cropped to fit any screen with new themes
DSLR Remote Pro 3.8 single background_tiled.jpeg image used to create themed set of background screens
B. Create your own buttons or choose from those shipped with DSLR Remote Pro 3.8. Touchscreen buttons can be placed below the image or to one side using the Setup Wizard.
C. Customize captions in almost any language. Adjust the color of your text.
Transfer themes between PCs
To generate themed screens on PCs with different screen size/aspect ratio by just copy the theme to the new PC and run thePhotobooth Setup Wizard.
Free touchscreen button sets
Breeze DSLR Remote Pro 3.8 includes 2 new free button sets created by Wilkes Booth Co
DSLR Remote Pro 3.8 Welcome screen: Wilkes Booth Co Tradewind White buttons
DSLR Remote Pro 3.8 Sharing screen: Wilkes Booth Co Tradewind Blue buttons
Choose whether to run buttons across the screen or to the side using the Photobooth Setup Wizard.
Create custom caption sets
Breeze software is used in over 80 countries world wide. DSLR Remote Pro already supports Unicode and handles characters in most languages. Use the Photoboth Setup Wizard to create reusable caption sets, and apply them to different themes.
DSLR Remote Pro 3.8 is shipped with English, German, Polish, Italian and Romanian captions.
This is the first of a series of posts explaining how to setup your photo booth using the DSLR Remote Pro 3.7.3 Photobooth Setup Wizard.
Getting Started with DSLR Remote Pro (2) will explain how to customize your prints. Getting Started with DSLR Remote Pro (3) will explain how to customize your screens.
Downloading the program
First download DSLR Remote Pro from our website; and install the program on your computer. You can run the program as a free trial for up to two weeks from the day you download it.
Downloading DSLR Remote Pro 3.7.3 from http://breezesys.com/downloads.htm#dslr
Start the program. If you are running a trial version of the program you will see the registration window each time you start. Click on Evaluate.
DSLR Remote Pro 3.7.3 registration dialog
There are five buttons at the top of the main screen. They are shortcuts to the most used parts of the program.
DSLR Remote Pro 3.7.3 Photobooth Shortcut buttons
Printer Setup
Photobooth Setup Wizard
Print Layout
Advanced Settings
Start Photobooth
First connect your printer to the computer and switch it on. You can also connect and switch on your camera now; or use the ‘simulated camera’ at this stage.
Select Printer Setup to tell DSLR Remote Pro about about the printer you intend to use. Choose prints in Portrait or Landscape orientation.
Hint: Portrait is used for narrow strips of 3 or 4 photos, unless you have a DNP printer.
DSLR Remote Pro 3.7.3 Printer Setup screen showing Landscape oriented 6″ x 4″ print layout (non DNP printers)
Hint: For DNP printers using 6″ by 4″ media portrait and landscape orientation are swapped.
DSLR Remote Pro 3.7.3 Printer Setup screen showing Landscape oriented 6″ x 4″ print layout ( DNP printers only select ‘Portrait’ instead of ‘Landscape’)
Finish by clicking on OK.
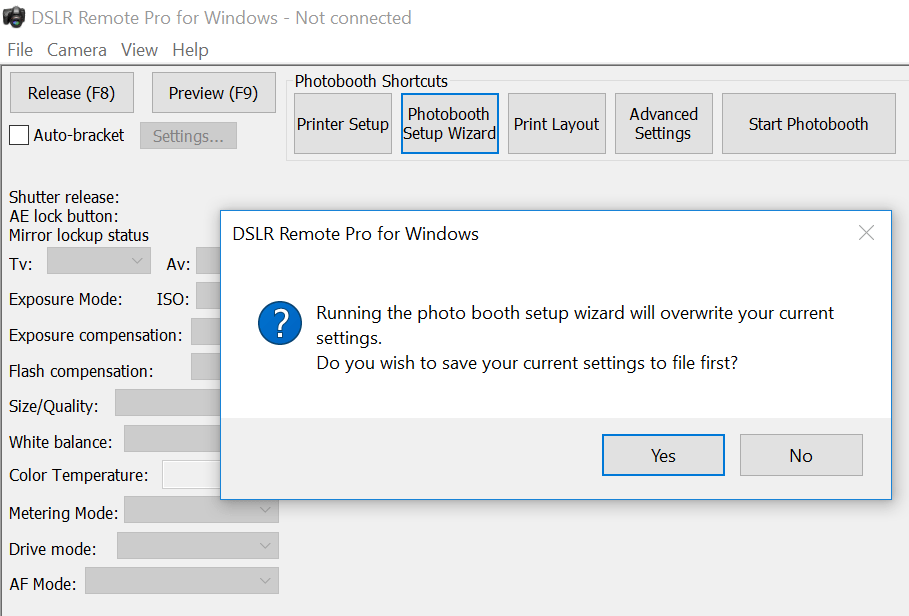
Now start the PhotoboothSetup Wizard. The program will prompt you to save any existing settings before the wizard overwrites them
DSLR Remote Pro 3.7.3 check at start of Photobooth Setup Wizard
At Step 1 you choose the photo layout you need. The wizard offers a choice of 8 popular layouts; if you want something different choose whichever is closest to your design (you will be able to change this later).
DSLR Remote Pro 3.7.3 Photobooth Setup wizard step 1. Landscape layout with 1 large and 3 small photos
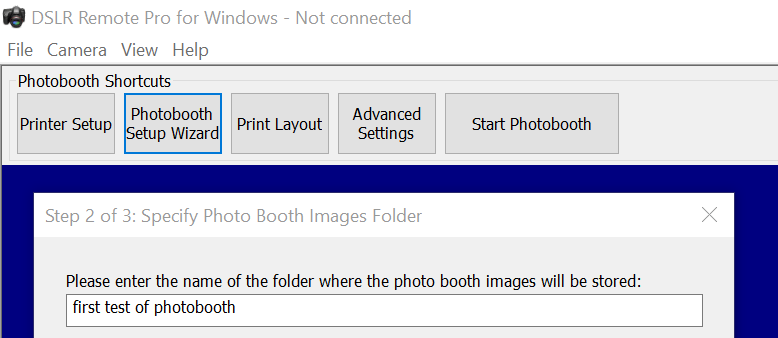
Next Step 2. Tell the program which folder to save the photo booth photos you are going to shoot.
DSLR Remote Pro 3.7.3 Photobooth Setup Wizard Step 2
Finally choose the options you want to offer your guests.
The first 5 check boxes tell the Wizard whether you are using a touchscreen, whether guests can choose between color and B&W prints, whether to display a preview of each photo after it is taken and the maximum number of prints allowed.
The next five check boxes tell the wizard whether a sharing screen (after the photos are taken) should offer uploads to guest’s Facebook and/or Twitter account, share photos by email or MMS/SMS, or offer optional printing. Hint: some operators prefer to offer browsing and sharing from a kiosk separate to the booth. You can use Breeze Kiosk for this. To share and print photos away from the booth leave these boxes unchecked.
Beginners should leave ‘Add a background.jpeg’ blank at this stage. Print layouts can be branded/customised later.
To offer ‘boomerang’ animated GIFs check ‘Enable videobooth..’ and ‘Capture Boomerang GIFs..’.
To offer video booth check ‘Enable videobooth..’
Click on <Finished> and you will see a final screen reminding you where the screen and print layouts created by the wizard have been stored; and where photos taken today will be stored.
DSLR Remote Pro 3.7.3 Photobooth Setup Wizard completed
Close this window, connect your camera and switch it on before selecting ‘Start Photobooth’. That’s it!
DSLR Remote Pro 3.7.3 default photo booth screen created by the Photobooth Setup Wizard
Thanks to all who came to the stand and listened to Chris’s presentation at the first UK Photo Booth Show. We had an amazing time catching up with old friends and making new ones.
The Breeze stand focused on three industry trends: animated GIFs, 3D activations, and magic mirrors.
DSLR Remote Pro appeared in multiple guises on several stands. It was beautifully complemented by a Wilkes booth and ran the magic mirrors on our own stand and at I Love Photobooth; partnered with Breeze Kiosk at Everybooth; and powered green screen software at Incredible Booth.
Andrew Bliesner’s professionalism, knowledge of our software and willingness to share his experience and tips with visitors was fantastic. The screen and GIF designs were adapted from Breeze Themes at Wilkes Photobooth ‘The Lab’. Thanks Andrew and Steve!
Activations creating 3D GIFs are are increasingly popular; and Breeze software is trusted by many industry leading operators to provide ‘bullet time’ animated GIFs.
Samuel Waters‘ video shows just how fast this process is:
Thanks to Matt at Noonah for lending us the multi-camera rig in this video. You can buy your own multi-camera system powered by DSLR Remote Pro Multi-Camera from Noonah.
I Love Photobooths kindly lent us the magic mirror running DSLR Remote Pro to show on the stand. Purchase the complete magic mirror from I Love Photobooths (their Green Screen Dream Machine and Hashtag Printers also run Breeze software).
Missed Chris’s talk on light painting? Much of the content is covered here
Chris demonstrating light painting props at Photo Booth Show 2017 (Photo by Peter Leese Everybooth)
Interested in multi-camera activations? Download a copy of DSLR Remote Pro Multi-Camera and try it for yourself. Chris will also be giving a presentations about multi-camera systems at PBPI in January and PBX 2018 in March.
A big thank you to Jon Sharp for organising the show.


You must be logged in to post a comment.