Breeze DSLR Remote Pro 3.16.1 & Hub 1.2.6.1 were released today, fixing an issue adding attachments to emails as file attachments.
DSLR Remote Pro 3.16.1 also fixes an issue with UIDs not being updated in stills photo booth mode when the keyboard shortcut F5 is used to start the shooting sequence.
We recommend everyone using Hub 1.2.6 and DSLR Remote Pro 3.16 upgrades to these releases.
DSLR Remote Pro is also known as Breeze Booth (DSLR+ Windows)
Do I need to pay to upgrade to DSLR Remote Pro 3.16.1?
The first Breeze tutorial of 2021 has been written to help fix that most irritating issue – when the camera won’t connect to the app. Finding the cause can be difficult and frustrating. Solving camera connection problems is here to help.
Google changed the requirements for authenticating Gmail emails this year. As a result many Gmail users found they could no longer send emails from third party apps.
*Update March 2021: DSLR Remote Pro, Kiosk and Hub now all support Gmail’s new authentication requirements
How does this affect emails from Breeze?
Gmail users now need to ‘authenticate’ ie approve third party applications which send emails from their gmail accounts.
If you do not use gmail to send emails from Breeze, this post does not affect you.
The latest release of DSLR Remote Pro (v3.15) adds support for Gmail’s new authentication requirements. Similar support will be rolled out to Booth (Windows + Webcam) aka Webcam Photobooth in the next releaset.
You will need to authenticate Gmail emails for Breeze on every PC sending gmail emails from DSLR Remote Pro. The remainder of this post explains how to do this.
How to get your Gmail emails working again:
DSLR Remote Pro 3.15 users should go to the Email Server Settings screen, and
(1) Set Host to gmail.
Accessing the Email Server settings screen to authenticate Gmail (Breeze DSLR Remote Pro 3.15)
You may need to select OK, then return to Email Server Settings window before you see the Gmail authenticate… button.
Select Gmail authenticate… to go through Google’s online authentication process.
When you press Gmail authenticate.. for the first time, a web page is displayed where you complete the authentication process. When you finish, Google sends you an email confirming what you have done :
If you have more than one gmail account, you may be asked to select the one you use to send emails from Breeze.
Google authentication process 1 of 5
Give the program permission to send emails on your behalf:
Google authentication process 2 of 5
Confirm the level of access you are giving to the program. Breeze apps just need consent to send emails.
Google authentication process 3 of 5
Google will confirm that the app can send emails, and you can close the browser window.
Google authentication process 4 of 5
Google also send an email confirming that you have allowed Breeze Booth to send emails:
Content of email confirming successful authentication Google authentication process 5 of 5
Before you leave the DSLR Remote Pro Email Server Settings screen, send yourself a test email (2):
(2) Sending a test email from DSLR Remote Pro 3.15. (3) , and (3) confirmation that the email has been sent
(3) DSLR Remote Pro displays a message confirming that you have been sent a test email
Please Note: if you are using a free Gmail account, the Email address used at (4) will be ignored by Google and the email will be sent using your ***@gmail.com email address:
Test email sent by DSLR Remote Pro 3.15
What about other Breeze programs?
We will be adding Gmail authentication support to our other Windows apps in the next release of each program.
For the time being we suggest using an alternative email service to send emails from Breeze
You will often need to add or edit the files in your PhotoboothImages folder when you customize the screens in your booth or mirror. Most of you know that you must name the files you add correctly so that DSLR Remote Pro and other Breeze programs can find them. If you are sure the filename is right but the program doesn’t seem to see it, check the filename extension.
It is very easy to name a file 1.jpg.jpg by mistake, and Windows makes this hard to spot, because Windows File explorer doesn’t show the extension (.jpg or .avi etc) unless you tell it to.
In this post I will show you how to spot errors more easily:
Always display file name extensions
The first example shows an Icons view of the images for a basic booth set up with the Wizard. I find this visual overview very helpful. If you look at the filenames (highlighted in red) you will see that the .jpg file name extensions are missing:
Typical icon view of PhotoboothImages folder. Windows has hidden the file extensions
The View tab shows you that the File name extensions box is not checked:
Checking this box will reveal the .jpg extensions:
When File name extensions is checked, the .jpg etc extensions are shown
Fascinating – but why does this matter?
If you accidentally name the a file 1.jpg.jpg instead of just 1.jpg it will be very clear when you look at this window:
Here the first image has accidentally been named 1.jpg.jpg
If you cannot see these file extensions this is much easier to miss:
1.jpg.jpg is labelled 1.jpg – very easy to miss!
If you look at the Details view of the same folder this is what you will see:
Again 1.jpg.jpg is labelled 1.jpgWhen you force Windows to show the file extension my mistake jumps out
Thank you for taking the time to read this. Do share the post with others who may find it useful.
How to use Dropbox to transfer new and updated events from the Event Editor 1.2 (on a Windows PC) to your iPads. This post includes a trouble shooting section.
June 2020: This post has been replaced by a website tutorial here
June 2019: Post updated to clarify that events can be saved straight to Dropbox
May 2019: Some images and text in this post have been updated to reflect the latest releases of the Breeze Booth App and Event Editor 1.2
Introduction
When you download Breeze Booth from the App Store, you are prompted to sync (ie download) sample events from Breeze servers at https://bb4ipad/com/sync
When you create your own events you also need to transfer them to your devices. The simplest way to do this is to use Dropbox. This post explains how to set up Dropbox on each iPad (or iPhone) and download events using Dropbox.
Note: Breeze Booth now supports both iPads and iPhones running iOS12. References to iPads in this post also refer to iPhones.
Setting up Dropbox on your iPad
Install the official Dropbox app on your iPad (this can be downloaded from the Apple App Store).
Select Sign in to Dropbox in Breeze Booth for iPad’s app settings and authorize the app. This will create a “Breeze Booth for iPad” folder in your Dropbox “Apps” folder.
1. Log into Dropbox on the iPad
Copy the events on your PC to your Dropbox folder
Once you have set up Dropbox for Breeze Booth you need to copy your folder of events into the correct Dropbox folder to transfer them to the iPad.
Copy the events folder fromC:\Users\yourname\Documents\Breeze Booth for iPad
Copying the whole events folder
toC:\Users\yourname\Dropbox\Apps\Breeze Booth for iPad
Dropbox folder structure for events
Note: When you sync the events using Dropbox on your iPad, the program will look for this folder. You must name it correctly, or the App will not find your events.
Note to advanced users: You can use tokens including {eventName} in your Dropbox folder naming. This post does not cover this.
Saving events straight to Dropbox
Once the initial set of events have been copied to Dropbox, you can either save new and updated events directly into Dropbox, or continue using an intermediate folder and manually copy them. Saving events straight to Dropbox is simpler and faster.
To direct the Event Editor to load and save events in Dropbox, select File then Open, navigate to C:\Users\…\Dropbox\Apps\Breeze Booth for iPad\events and open events.xml
To point the Event Editor to your Dropbox events folder, click on File then Open, navigate to C:\Users\…\Dropbox\Apps\Breeze Booth for iPad\events and open events.xml
When you return to the main Event Editor screen note that the folder name at the top has changed:
Event Editor 1.2 main screen with folder highlighted
You will be prompted to save your changes before closing the Event Editor
Breeze Booth EventEditor prompts you to save any changes before closing the program
Tell Breeze Booth for iPad to sync events using Dropbox
As there are several ways to sync events, you need to tell your iPad which to choose. In Breeze Booth for iPad go to Settings and select the Sync via Dropbox.
This slideshow requires JavaScript.
Import the latest version of your events into Breeze Booth for iPad from Dropbox
You can choose whether to update (‘sync’) all your events at the same time, or update a single event. Updating all events is the best way to check everything on the iPad is up to date, but may be slower than updating a single event (especially if you have a poor Internet connection).
You can also update the event list before updating individual events.
Get an updated list of events
Update list of events button (Breeze Booth Events screen)
Get the latest version of all your events
Update all events button (Breeze Booth Events screen)
Get the latest version of a single event
Once the event(s) have been updated, you are ready to run them
Concerned about guests getting access to your Dropbox files from the iPad?
Advanced users: Signing into the Dropbox App on an iPad and signing Breeze Booth for iPad into your Dropbox account are not the same. Once your events are set up correctly, you can secure your Dropbox account by:
either signing out from the Dropbox App and keeping Breeze Booth for iPad signed into Dropbox
orDeleting the Dropbox App from the iPad
Only delete the Dropbox App from the iPad when Breeze Booth for iPad is signed in to DropBox. If you sign Breeze Booth for iPad out from Dropbox, you will need to reinstall the official Dropbox app before signing back in again.
You can also set an exit password to keep guests from accessing the Breeze Booth for iPad settings page
Using an exit password to keep sticky fingered guests from the Breeze Booth for iPad settings page
This slideshow requires JavaScript.
Keep life simple when syncing with Dropbox
Do name your folders correctly
Do not uninstall Breeze Booth for iPad from your iPads
Do not delete the Breeze Booth for iPad folder in Dropbox
Stuck? Getting out of trouble
iPad App can’t find my new/updated events
Path not found errors occur when the App cannot find the event files. Causes:
Dropbox has not finished syncing the files to the iPad
Dropbox folders or files are not named correctly
Path not found: Event cannot be synced because of a folder or file naming error
Motr
Error: not logged into Dropbox occurs if Breeze Booth for iPad is not signed into Dropbox
Unable to sync event because not logged into Dropbox
If you can’t find an answer in the help files, feel free to email support@breezesys.com or post in the Breeze User group on Facebook
Summary
This post explained how to transfer new and updated events from a PC to Breeze Booth for iPad using Dropbox. You will need a Dropbox account and an Internet connection for this to work.
“Where are the images from my event? I am sure I saved them and have looked everywhere on the computer …..”
DSLR Remote Pro holds the key
Start DSLR Remote Pro, click on File then Preferences
Select File then Prefernces to show the DSLR Remote Pro prefernces screen (DSLR Remote Pro 3.11.3
This brings up the Preferences window, which tells you which folder images are saved in:
The DSLR Remote Pro Preferences screen shows the folder where images are stored, and displays an example image name
In this example the original photos are stored in a folder called C:\Users\sue\Documents\PhotoBoothImages\2018-09-06
PhotoBoothImages folder showing sub folder 2018-09-06 containing images taken on 6th September, 2018
Where are copies of prints, slideshow GIFs, green screen and other processed photos stored?
Usually you will find these in a sub folder of the main image folder, eg C:\Users\sue\Documents\PhotoBoothImages\2018-08-27\prints
DSLR Remote Pro gives you a huge amount of control over what and where you save images. Advanced users often use tokens as part of their file naming.
Use the Output Settings window to check where to find still images and slideshow GIFs.
Output Settings
Click on Advanced Settings, then the Output OptionsSettings… button to reach this window:
DSLR Remote Pro Output Settings screen (Breeze DSLR Remote Pro 3.11.3)
(1) Copies of each print are saved in a subfolder called Prints if Output is set to Save and print JPEG copy or JPEG copy only
(2) Copies of processed photos are saved in a subfolder called Processed. This includes images which have been rotated, cropped, digitally zoomed, green screened, converted to B&W, toned, had Instagram style filter applied or are post processed using Photoshop.
(3) If you select deletion of images which guests choose not to print, DSLR Remote Pro does delete them!
(4) Slideshow GIFs are either (a) stored in a sub folder called GIF or (b) in the prints sub folder
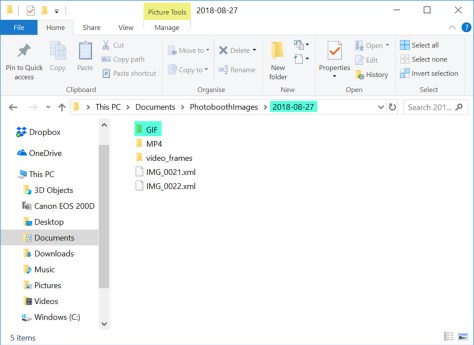
(4a) Folder showing images taken on 2018-08-27. Original images (IMG_0001.JPG etc) are in the main folder, slideshow GIFs in sub folder GIF, MP4 copies of the GIFs in sub folder MP4, print layouts in sub folder prints
(4b) Here the slideshow GIFs are stored in the prints sub folder with the JPG print layouts (DLSR Remote Pro 3.11.3
Boomerang GIFs are created from video, and are usually stored in either in (a)sub folder GIF or (b) sub folder prints
(a) Folder showing images taken on 2018-08-27. Boomerang GIFs in sub folder GIF, MP4 copies of the GIFs in sub folder MP4. (DSLR Remote Pro 3.11.3)
(b) Here boomerang GIFs are stored in the prints sub folder (DLSR Remote Pro 3.11.3)
Look in the Animated GIF Settings (Video Booth Mode) window to check where to find your boomerang GIFs. Click on File, then Video Booth Settings, then select the Animated GIF settings button to access this window:-
The Animated GIF Animated GIF Settings (Video Booth Mode) window shows where boomerang GIFs are stored. Select File, then Video Booth Settings, then Animated GIF settings to reach this window (DSLR Remote Pro 3.11.3)
(6) Check to save PNG copies of live view image frames used to construct GIFS will be stored in sub-folder GIF_frames,
(7) Check to save boomerang GIFs in the prints sub folder
(8) Checked to create MP4 copies of boomerang GIFs
(9) MP4 copies of GIFs can be stored in sub folder MP4, subfolder prints or the same folder as the GIFs
It’s great to hear that many more of you are using profiles. One common problem we come across runs something like this
I have been using profiles to do [… wonderful things I could never offer before]. Today I am running a different event, but whenever I start the program/each group of guests finish their session it goes back to the old settings. What is wrong?
When you use profiles you may have checked the boxes to load default profiles at start up/ after each session / when the program starts. You need to uncheck these boxes when you no longer want to use these proflies.
When you don’t want to use profiles for an event follow these steps:
Canon’s DSLR cameras can be set to auto focus (AF) or manual focus (MF). The auto focus setting is very convenient for photo booth operators, but when the camera cannot find anything to focus on it will not take a photo.
You may notice a long pause before the camera takes a photo. The focus motor whirrs and the camera lens moves as the camera tries to focus. Two different error messages may be displayed: ‘Unable to release shutter’ or ‘Unable to focus’.
Unable to release shutter
When setting up the booth the operator presses Release(F8) or Preview (F9) to check camera operation. No photo is taken and this error message is displayed:
DSLR Remote Pro 3.7.3 ‘Unable to release shutter’ error message
Unable to focus
After the countdown there is a long pause before the camera takes the first photo. The focus motor whirrs and the camera lens moves as the camera tries to focus. Eventually this message* is displayed:
DSLR Remote Pro 3.7.3 ‘Unable to focus!’ error message *
*Hint (localization)You can translate this message into your local language using the PhotoboothAfErrorMsg message in the configuration files
Why does this happen?
Usually the camera cannot focus because
there is not enough light
the booth is empty and has a plain background
guests are too close to the camera
the lens cap has not been removed
Autofocus works best with good lighting and guests positioned at the right distance from the camera. It may be improved by changing from a plain background. The most reliable solution is to switch the camera to manual focus.
How to make sure the camera will fire: Set the camera to manual focus
Exception : cameras with dual pixel AF. If your camera has dual pixel AF please see the Camera Settings section of the program help files. (At present the Canon EOS DSLR cameras with dual pixel AF are the Canon EOS 800D/Rebel T7i, 200D/Rebel SL2, 70D, 77D, 80D, 7D Mark II, 5D Mark IV and 6D Mark II*.)
*Support for the EOS 6D Mark II will be added to the next release of DSLR Remote Pro.
Simplest way to set the camera to manual focus
Set the AF/MF switch on the camera lens to the MF (manual focus) position.
Each time you set up the booth turn the focus ring on the camera lens until you see a sharp image on the PC live view display.
Canon REBEL T5 (1200D) showing AF/MF switch Photo by Kārlis Dambrāns (edited to highlight AF MF switch)
Use the screen on the back of the camera to set the custom function “C.Fn IV: Operations/Others – Shutter/AE lock button” to “1:AE lock/AF” (refer to your camera manual if necessary).
Customer function IV screen on Canon EOS 200D camera
This setting has the advantage that focus can still be adjusted remotely from the PC but auto focus won’t be used when taking a photo. The lens can be focused in fullscreen photobooth mode by typing Ctrl+A.
For more precise control of focus exit photobooth mode and type Ctrl+L to display the live view window. Then use the <<<, <<, <, >, >>, >> buttons or the mouse wheel to manually adjust the focus.
If you found this post helpful please share it with others.
You must be logged in to post a comment.