Category Archives: Webcam Photobooth

Quick Tips – Print Preview Issues

A couple of quick tips for beginners using the Print Preview screen in their booth.

This post has been written for Breeze Booth (DSLR+Windows) aka DSLR Remote Pro, but also applies to Webcam Photobooth.

  • New users sometimes ask why the print preview shows a photo or strip in the wrong orientation, while the printed output is fine.
  • Another issue which occurs with the print preview is that the print covers all or part of the buttons.

Print Preview in wrong rotation

This is most often seen with DNP 4×6 media after running the Photobooth Setup Wizard:

Breeze DSLR Remote Pro Print Preview screenshot with double strip in wrong rotation
Breeze Print Preview double strip before fixing (Breeze DSLR Remote Pro)
Breeze DSLR Remote Pro Print Preview screenshot showing incorrect rotation
Breeze Print Preview single photo before fixing (Breeze DSLR Remote Pro)

Why does this happen?

DNP printers swap portrait and landcape when you print 4×6 inch (100 x 150 mm) prints.

This has no effect on the physical prints, but makes Print Preview screens look strange.

How to fix:

  1. Open the Print Layout Editor
  2. Click on Printer Setup
  3. Swap Orientation from Portrait to Landscape ( or Landscape to Portrait)
  4. Click on Preset Layouts
  5. Select your chosen layout – here Double Strip of 4
  6. Check Print Layout
  7. Check Print Preview

This slideshow requires JavaScript.

The next most common issue reported for in print previews is that the print partly covers the buttons.

Print Preview image overlaps the touchscreen buttons

Breeze DSLR Remote Pro Print Preview screenshot with print partly covering buttons

This problem usually happens when buttons are placed at the bottom of the screen and the print is in portrait (vertical).

How to fix:

Open the touchscreen actions window for confirm_printing screen and reduce the size of the print preview image:

Adjusting the print preview images in the Touchscreen actions window

If you are new to touchscreen actions, read the tutorial here

Open confirm_printing.jpg in touchscreen actions, and click on Print preview area

Drag and drop the Print Preview area until the buttons are no longer hidden:

Touchscreen action print area no longer covers buttons

Save your changes as you leave the touchscreen actions window,  and run a session to check everything works as expected.

Remember to close DSLR Remote Pro when you finish, to save your changes.


© Breeze Systems 2023

New Tutorial – changing the colors of Breeze keyboard screens

Breeze apps offer unparalled creative control over what guests see and experience at your booth and sharing kiosks.

I’ve just added a new tutorial to the website to help DSLR Remote Pro, Kiosk and Webcam Photobooth users change the colors of the keyboard screens used for email and text based sharing.

Find Changing the colors of keyboard screens here


© Breeze Systems 2022

Webcam 2.6 adds touch free operation

Breeze Booth (Webcam+Windows) 2.6 aka Webcam Photobooth was released today.

This release adds QR code based touch free operation and sharing, and support for the latest email security protocols

What do I get from Webcam 2.6?

  • Better guest experience
  • Hands free operation
  • Faster, touch free sharing
  • Less waiting in line
  • Contactless data collection
  • Pre registration and data collection support
  • Support for Gmail authentication
  • Support for Transport Layer Security (TLS) 1.2

Touch free booth control

Offer your clients totally hands free operation and a better guest experience with contactless data collection, touchless start, and fast hygenic  sharing.

Fast touch free emails and texts

Guests type their email address or cell phone number once into their smart phone,  generating  a unique QR code they use to power the booth and send emails and texts. Fast, simple, hygenic.  Genuine contactless booth operation.

Touch free links to your online gallery

Turning the QR code concept on it’s head, you can also display a QR code on your sharing screen for guests to scan with their smart phone. Use this to direct guests to your online gallery for immediate social sharing.


What is Gmail Authentication and how can it affect me?

Google changed the requirements for authenticating Gmail emails in 2020.  Gmail users now need to  ‘authenticate’ ie approve third party applications which send emails from their gmail accounts.

Adding support for Gmail Authentication to Webcam Photobooth means you can use Gmail to share photos from the booth. More

What is Transport Layer Security and how might it affect me?

You may be familiar with Gmail authentication, but it’s quite likely you never heard of Transport Layer Security (TLS) before.

Transport Layer Security (TLS) is a protocol used to send communications securely over computer networks. Many ISPs send emails using simple mail transfer protocol (SMTP), and SMTP emails use transport layer security (TLS).

A growing number of ISPs require TLS version 1.2, so we have added support for this to Webcam  2.6

By adding support for TLS 1.2 to Webcam 2.6, emails from the booth still work as and when your ISP decides it’s a requirement.

Note TLS 1.2 is also supported in DSLR Remote Pro, Kiosk and Hub. More

Try Webcam Photobooth 2.6 for yourself

Webcam Photobooth 2.6 is a free upgrade for all registered users who purchased Webcam Photobooth after 1st July 2021. Customers with older licenses need to buy an upgrade license to use this release.

Download Webcam Photobooth      Buy Webcam Photobooth

Thank you for taking the time to read this. Do share the post with others who may find it useful.

© Breeze Systems July 2022

Choosing a computer for your Windows photo booth

My all time favorite comment in the Breeze Facebook group began

Anything with more processing power than a potato can generally run Breeze.

It’s absolutely true that you can run a stills Breeze photo booth on a low powered computer, although we don’t support the King Edward or Yukon Gold.

The same poster added

 …I’m not doing gifs or videos, just photo layouts and prints.

Which was a sensible caveat. Before choosing your computer, think how it will be used.

Videos, burst GIFs, photos with filters, background removal and other effects run much better on a more powerful machine.

Probably not the best power source for a video booth

We have added a new page to the website Choosing a computer for your photo booth.

This page replaces one of our most popular blog posts and includes advice about hardware requirements for processing videos quickly. This is  probably the most demanding task for a photo booth computer.

Have a great weekend,

Sue

© Breeze Systems 2022


New tutorial – Using Touch Screen Actions to customize Breeze screens

Breeze apps offer unparalled creative control over what guests see and experience at your booth. The power and flexibility of touch screen actions are key to this experience.

When Breeze Booth apps are powered by touch screens, touch screen actions control what happens when a guest touches the screen.

I have added a new tutorial to the website to help DSLR Remote Pro, Multi-Camera, Webcam Photobooth & Flipbook Photobooth users use these actions to take control of the guest interface. Find Customizing Breeze Screens here


Breeze profiles – Building Multi-Choice Menus and Unexpected Twists

Breeze profiles are unique and powerful building blocks you can use to  create simple multi choice menus through to complex choice based scenarios.

Use profiles to create multi-language booths, choose between different print layouts or add an element of surprise.

Profiles add random animations and effects to mirrors and conventional booths.

The Breeze website has three new tutorials explaining how to use profiles. They are written for Booth (DSLR +Windows) aka DSLR Remote Pro, and can be adapted for use with Booth (Webcam+Windows) aka Webcam Photobooth.

  • Part 1 introduces profiles and shows how to use them to build a simple menu. The worked example creates a menu offering a choice of two print layouts.
  • Part 2 shows how to spice up a booth by randomly mixing different designs.
  • Part 3 covers both troubleshooting and combining a menu with a random ‘surprise me’ option.

Get started – offering a choice of print layouts

Guests can choose between print layouts

Getting started takes you step by step through using profiles to build a menu from which guests choose a print layout.

Use the same approach to offer a choice of green screen experience or background removal.

Find creative approaches to choose between backgrounds for prints and GIFs

Find Getting Started with Profiles here

Random Profiles

Guests are randmoly taken to difference experiences from this screen (Breeze DSLR Remote Pro Prroflies)

Random profiles can be used to add excitment and interest to a booth or mirror. Vary the animations and audible comments in magic mirrors, surprise guests by placing them in different environments (AI background removal or green screen), and build wheel of fortune booths.

Note: You need to use random profiles to randomly change your screens and create menus. There is a simpler way to offer random print and GIF designs, which you can find here

Surprise guests by switching betwen print and GIF designs. More..

Find Part 2 – Random Effects here

Choose and Surprise Me booths & Troubleshooting Profiles

The first two Profiles tutorials explain how to create a menu based booth and one switching randomly between different profiles.

Breeze Profiles Part 3 starts by running through common problems using profiles, then moves on to building a Choose or Surprise Me structure.

Find Part 3 –  Choose and Surprise me & Trobuleshooting Profiles here

Many thanks to Steve Bliesner for sharing the multi-language menu featured at the start of this post.

© Breeze Systems 2021

Adding a hidden exit to your booth

How do I add a secret button to exit the booth?

It’s important that guests cannot exit your photo booth screens, but you need a controlled way out.

When the booth has a keyboard attached just hit the Escape key from the Breeze Ready screen.

To exit using the touch screen, you need a hidden button. Ideally combine this with password protection.

Adding the secret button and password

This page explains how to add a hidden exit to both DSLR Remote Pro and Webcam Photobooth. Add the exit command to your touch screen settings.

Getting to the touchscreen settings in DSLR Remote Pro

Accessing touch screen settings  (1) and adding your password (6) (DSLR Remote Pro 3.15.2)

Getting to the touchscreen settings in Webcam Photobooth

Accessing touch screen settings  (1) and adding your password (6) (Webcam Photobooth)

(1) Start the program and go to the touch screen settings for your Ready screen. There will be a short pause before you see the next screen:

Adding an Exit button to the Ready screen (DSLR Remote Pro 3.15.2)

Right click anywhere on this screen to show the current screen and add new actions.

Actions make something happen when the screen is touched in a particular area. This screen already has actions to start the booth and switch between color and black & white. We are going to add a new action to exit the Ready screen.

(2) Select Add Action

(3) Choose the action Exit Full screen photobooth from the drop down list

(4) Drag and drop the action to a convenient location. Use an empty corner of your screen for hidden buttons. Guests won’t see them but you and your staff will find them easily.

(5) Right click again and choose Exit

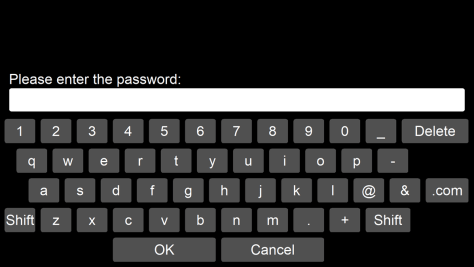
6) Add a password in case a guest guesses the location of your button, or touches it by mistake.

Remember to save your changes as you leave each screen.

What this looks like in practice

Your Ready screen looks exactly the same, there is no clue that the button exists:

Ready screen with no sign of hidden exit (Breeze DSLR Remote Pro 3.15.2)
The same screen showing the location of the hidden exit

Anyone finding the secret button the can’t exit the booth  without knowing the exit password I added at (6) .

To exit the booth you also need to know the exit password (Breeze DSLR Remote Pro 3.15.2)

Adding other actions to your screens

Touch screen actions are powerful tools which give Breeze programs enormous flexibility. Use them to access the reprint selection screen, an information or T&C screen, add choices using profiles and much more.

Guests often ask for an extra print after their session has finished. DSLR Remote Pro includes options to display a reprint selection screen. Link to this screen using the Display Reprint Selection Screen action

© Breeze Systems 2020

Glamazon activation (The Photo booth Guys)

Thanks to Steve Bliesner & Photo Booth Guys Australia  for letting us share this video of their latest activation for Amazon.

Steve writes

Working in harmony to create high end activations that go out for, not $100-200 an hour.. but $1000 – $ 2000 an hour.

I used every trick in the Breeze book to pull this one off.

Breeze for iPad was running a very custom survey to collect data on guests, to determine what Drag Queen they would be and what personalised text they wanted on their GIF and Print. Additionally, guests entered their email address (so they didn’t have to use a sharing station later).

That data was sent via Breeze Hub, to Breeze Kiosk, where a QR code had been generated, and was then scanned in via a barcode reader, by our staff, in to Breeze Webcam.

Webcam had a customised interface that was live streamed to two large screens… (that masked any sensitive information and removed any interface control elements).

With one scan, that QR code kicked off the session, auto chose the chosen Drag Queen, personalised their print and GIF and emailed the image to the guest.

There is only one company that makes software that allows people like you and me to do stuff like this.

Meet Steve at the Breeze stand (#1113) at Photo Booth Expo next week.

Using Snap Chat lenses with Breeze

Snap Chat has an awesome library of virtual props or  ‘lenses’. Did you know that you can use these lenses to add an incredible variety of  virtual props to   Breeze Booth (Webcam +Windows) aka Webcam Photobooth?

Check out our new Snap Camera tutorial to learn more.

This tutorial walks you through integrating Snap Camera with Webcam Photobooth to add amazing 3D ‘lenses’ (virtual props) to your photos, GIFs and videos.

Chris has also updated the Webcam_Snap_Camera.ahk script to add a shortcut showing the toolbar position, and improved the  sending of shortcut keys.

What is Booth (Webcam + Windows)?

Previously known as Webcam Photobooth, this Windows app turns a webcam into an event photo booth, creating fun GIFs, prints and videos. Webcam Photobooth is a one-off purchase costing just US $175*, and includes one year’s free upgrades.

Download Webcam Photobooth      Buy Webcam Photobooth

*Price valid at time of writing, and excludes any tax due.

Breeze Systems February 2020