Tag Archives: consent

Adding a quick consent screen to your booth

Did you know that there are several ways to add a simple consent screen or disclaimer to DLSR Remote Pro?

Data is usally collected using a survey. However there are simpler ways to ensure guests agree to disclaimers or terms and conditions at the start.  This post runs  through three alternatives:

  • Add a disclaimer to the Welcome/standby screen
  • Add a disclaimer to the Ready screen (with optional link to detailed T&C)
  • Use a profile menu screen for the disclaimer

Note: All three methods provide a gate guests pass by answering one question. In the worked examples I use But first.. May we share your photos online. Replace this  with any question which suits your purpose.

When you need guests to answer several questions, record or analyze their responses, use a survey instead.

Use the welcome/standby screen

To query consent at the standby screen,:

  • Check Auto standby in Advanced settings
  • Add a suitable  graphic called welcome.jpg to the PhotoboothImages folder
  • Add the touchscreen action to switch from standby to your Ready screen

Check Auto standby

Auto standby returns the booth to the Welcome screen instead of the Ready screen at the end of each session.

Start DSLR Remote Pro and click on Advanced Settings. Check Auto standby and save your changes.
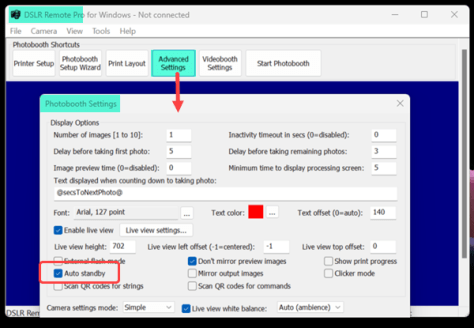
Checking Auto standby in Breeze DSLR Remote Pro

Add your welcome.jpg

Make your graphic a jpg image which is the same size as your screen (in pixels). Call the graphic requesting consent to use the photos welcome.jpg and add it to your PhotoboothImages folder.

To attract attention, you can also animate the screen.  How to animate screens.

Add the touchscreen action

Add the touchscreen action Switch from standby to ready  to welcome.jpg

Using touch screen actions

Use the Ready screen ready.jpg

You can ask the same question on the ready screen instead of the standby screen.

You can also link from the ready screen to Information pages providing detailed term and conditions.

Guests clicking Yes! starts the countdown. Guests choosing No are returned to the standby screen. Guests clicking Maybe are shown information screen(s).

In the example above, ready.jpg is white with  Yes, No and Maybe buttons. (Maybe is optional and links to information screens.)

ready_overlay.png provides the question text on a transparent background so that it shows in front of the live view.

Make sure both ready.jpg and ready_overlay.jpg are the same size in pixels as the screen.

You may prefer to switch off live view in the ready screen by checking Disable live view in ready screen in Live View Settings.

Add the touchscreen actions

You need to add three touchscreen actions to the ready screen.

  1. Add action Photo start to the Yes! button
  2. Add action Switch from ready screen to standby to the No button
  3. Add action Photo info open to the Maybe button
Adding touchscreen actions to Breeze DSLR Remote Pro ready screen

Learn how to add information screens here

Use a profile menu

This option may be preferred by advanced users comfortable with profiles. If you are not familiar with profiles, use  one of the approaches above.

Build a menu profile asking May we share your photos… ?

Use

  • Yes/accept to take the guest to the ready screen of a second profile.
  • No/reject returns the guest to standby using the Switch from ready to standby action
  • Maybe takes the guest to information screen(s) as above

Before you leave…

Check everything works and save your changes before you finish.

More about guest consent

Collecting data and recording consent

Create custom surveys to collect guest data and record consent.

Survey data can be analysed, displayed in prints, and used to separate images into different folders.

Information screens

To add a detailed GDPR compliant privacy statement, terms and conditions or any other information screen(s) to your booth use DSLR Remote Pro Information screens.

Coming soon

Watch out for DSLR Remote Pro 3.19, which will introduce a new way to create simple surveys.

© Breeze Systems May 2023

Breeze Tokens – your new best friend

Powerful, surprisingly simple, logical.  In this video tutorial Steve  introduces Breeze tokens and explains how they can be your new best friend.

Steve takes you through how to

  • Make life easier for your staff setting up events
  • Make life simpler – automate folder naming for different events
  • Collect data about guest choices for corporate clients
  • Group images by team name, zip code or other attribute chosen by your client
  • Automatically group images into different folders based on response to survey questions
  •  GDPR/ privacy  – split images into different folders based on guest consent
  • GDPR/privacy  – label images to show whether guests consent to using them for different uses

This tutorial focuses on DSLR Remote Pro  3.11.1 . Breeze tokens can also be used in Breeze Booth for iPad, DSLR Remote Pro Multi-Camera, Hotfolder Prints, Breeze Kiosk and Webcam Photobooth.

The following notes are intended as a quick reference to some of the details in the video.

Some of the Breeze DSLR Remote Pro tokens used in this tutorial

Event tokens are special tokens which can be shared between different Breeze programs running on the same PC. They include the event name {eventName} , and several print counters.

Note: Tokens are case sensitive.

Print layouts

Tokens can be used to print information like today’s date less 8 hours {dateLess8h}) without editing the print layout each time it is used.

Why ‘date less 8 hours’? Use when events run past midnight, but you don’t want the images created after midnight to be stored under a different date. If your booths are always fast asleep before midnight you can use  %d or %L token instead

Print template names

{printTemplateName} can be used in the folder path for images captured at an event.

Combining tokens with profiles

{photoboothSubdir} can be used to sort images into folders based on guest choices

Tokens for data collection surveys

DSLR Remote Pro surveys can have multiple screens each with multiple questions

{survey1_text1} stores the text a guest enters in response to the first question on the first survey screen

Information screens containing detailed information such as a Privacy Statement ot Terms and Conditions can also be added in DSLR Remote Pro 3.11.1 and later releases.

Tokens for check box surveys

Example of a checkbox survey used to obtained consent to specific uses of images taken in a booth. Breeze DSLR Remote Pro 3.11.1

In this example {survey1_chkbox1} will contain the value 1 if the first box (live feed) is checked, or 0 if it is not checked.

{survey1_chkbox2} will contain the value 1 if the second box (use for advertising) is checked, or 0 if it is not checked.

Check box surveys can also have multiple questions over several screens.

Friendly names for folders and images based on check box surveys

Example of separating images into two folders – one for images where guests have agreed that they are shared in a live feed, the other for images where guests have declined this.
Tokens can be included in the pathname for the follder where images are stored during an event. In this example images are separated into two download folders based on the guest’s answer to the live feed question in the survey. (DSLR Remote Pro 3.11.1)
DSLR Remote Pro creates the folders and stores images in appropriate folders as they are created

Take this further

Download DSLR Remote Pro

For a full list of tokens see the help files for each program:

Print counters : DSLR Remote Pro 3.11 introduces tokens for accessing the print counters : {printQuotaUsed},{printCounterEvent} and {printCounterLocal}. Print counters can be used to automate a photo booth with a fixed print quota e.g. by loading a “share only” profile when the print quota has been used.. They can also be displayed in print captions.

How to add consent checkboxes to Breeze Kiosk

The introduction of GDPR has focussed interest on the ability to obtain specific, granular consent from guests. Breeze Kiosk is ready to help.

Breeze Kiosk 1.4.4 allows you to present up to 10 consent boxes to guests when they email, or text images, upload them to Facebook or Twitter. Each check box can be opt-in or pre-checked, optional or mandatory.

Note: You can also add consent boxes to the sharing screens for DSLR Remote Pro and Webcam Photobooth.  You can also survey guests in DSLR Remote Pro, record consent for sharing and display privacy information before the images are taken.

Great – so how do I add a consent box?

Start Breeze Kiosk and select (1)Settings

(2)Select the folder you want Breeze Kiosk to watch for images

(3) Check the appropriate boxes to say whether you want to display still images(JPEG), animated GIFs and/or MP4and movies

(4) You will need to select a folder where the screen images used by Breeze Kiosk are stored.

(5) Check boxes to tell the program which print and sharing options you want to offer guests.

In this post I will show you how to add a consent check boxes when guests email photos.

(6) Go to the email server settings screen

Breeze Kiosk email server settings screen
Set Breeze Kiosk to log email addresses entered in a csv file

(If this is the first time you have sent emails from Breeze Kiosk on this computer, you will need to set up the settings for your email server)

(7)Check the box to log email addresses to a file, and tell the program what this file is called/where to find it.

If you need to send  emails offline check the offline mode box at (8) before pressing OK.

Now we need to copy (or create your own) XML file and put in into the folder which holds your screen images. Don’t panic if you have never seen XML before! There are some examples you can copy in the program help files .  All we need to do is make a few simple tweaks.

Copy and paste this text from the Breeze Kiosk help file into a text editor such as Microsoft Notepad (which comes free with Windows 10)

Example XML for email keyboard Breeze Kiosk 1.4.4
Defining the guest consent text and checkbox for emailed images. Breeze Kiosk 1.4.4 (a_

(9) This checkbox has value 0 (zero) for opt-in consent. For pre-checked consent change the value to 1

(10) The text for this check box has been highlighted in green. Change this to the wording you need.

(11) When you finish your changes, select File to save them. You need to call the file email_keyboard.xml and save it in the folderyou chose for your screen images. [As (4) above]

email_keyboard.xml is saved in the screens folder

While I am here, how do I change the background color of the email screen?

Breeze Kiosk email screen XML
XML for email screen with white background and custom pre-checked consent box Breeze Kiosk 1.4.4

(12) To change the color of the background screen and of the text of your prompts (13), you need to add the text highlighted in green to your XML.

<background_color>0xFFFFFF</background_color>
<key_text_color>0x000000</key_text_color>

0xFFFFFF is the HEX notation for RGB  white.  0x000000 is the HEX notation for RGB black. Hint: If you haven’t come across HEX notation for RGB colors before, use Photoshop or google RGB color checker to identify the color you want to use.

Now when my guest selects the email icon they see this white screen:

Email keyboard for Breeze Kiosk with pre-checked consent
Email keyboard with custom consent Breeze Kiosk 1.4.4

How to I add two or more check boxes?

You need to add these three lines for the second check box

Example xml for email keyboard with two check boxes Breeze Kiosk 1.4.4

The second check box is opt-in, so the prompt value is 0 (zero). I have also changed the Y coordinate of the check box to place it below the first box. The final result is here:

Email screen with two check boxes for consent Breeze Kiosk 1.4.4
This Email screen has two check boxes Breeze Kiosk 1.4.4

Want to know more?

How to add mandatory check boxes and other tips

What else can I do with Breeze Kiosk?

Adding consent check boxes and user surveys to DSLR Remote Pro before the images are taken

Adding consent boxes to DSLR Remote Pro sharing screens

Adding consent boxes to Webcam Photobooth sharing screens

How to get your hands on it

Download Breeze Kiosk and try it for yourself for up to 14 days before buying a license.

Download and try Breeze Kiosk 1.4.4

Buy full license   Buy upgrade license