Note: This post was updated in September 2019 for the latest releases of Hotfolder Prints 1.8, and Webcam Photobooth 1.5.
If you are new to DSLR Remote Pro or Webcam Photobooth, first run the Photo booth Setup Wizard. This creates all the screens for a basic working system. It also creates print layouts with a plain white background. The video demonstrates
How to change the background color of your prints
How to add logos and other graphic icons to your prints (DSLR Remote Pro 3.12, Hotfolder Prints 1.8 and Webcam Photobooth 1.5)
How to add simple captions
how to use Breeze tokens to show the correct date on prints
How to use Breeze tokens to automatically add the event name to prints (DSLR Remote Pro 3.12 andHotfolder Prints 1.8 only)
How to import pre-designed layouts
How to add a QR code
Notes
The video is intended to give you a taste of the Print Layout Editor. See the program help files for more details
Find a great video introduction to using tokens with Breeze here
There are minor differences in the way tokens work in these three programs:
{eventName} and {dateLess8h} are new in Hotfolder Prints 1.8
{eventName} is not yet supported in Webcam Photobooth
DSLR Remote Pro Print Layout Editor displays the current value of tokens
Hotfolder Prints and Webcam Photobooth Print Layout Editors display the token names in the print layout editor
Importing pre-designed layouts into Breeze
Learn more about using layouts I used in the video here .These free templates were kindly provided by SMOVE for use by Breeze customers.
NB: Logos are not saved in the Photobooth Print Layout (pblt file) in this release. To use both predesigned layout and logos, you need to import the layout before adding the logos to your design.
Try for yourself
Download copies of DSLR Remote Pro, Hotfolder Prints and Webcam Photobooth from our website
If you found this post useful please share it with others.
There are two main ways to import layouts into DSLR Remote Pro.
Drag and drop the template directly into DSLR Remote Pro (best for single templates).
Copy the templates into your template folder, then import each template into DSLR Remote Pro using the Print Layout Editor when you need it (more effective for collections of templates).
First set up your printer
If necessary, download and install the printer drivers to your computer.
This example will import a 6” x 4” (15cm x 10cm) print layout. Before you start you need to load the printer with 6” by 4“media and set it to 300dpi.
Put the print template(s) into an accessible folder
Whether you download print layouts from a third-party website or copy them from another computer they need to be kept in folder(s) accessible to your booth computer.
In this post I will copy the template into the template folder on my PC. You may prefer to store templates in Dropbox or another cloud-based system accessible to multiple booths.
Download the photo booth layout and open zipped files
In this example I am using a 6” x4” template with a 1 +3 layout.
Copy the zipped file to another folder to unzip it. I have copied the file to my templates folder Sue Photobooth Print Templates which is in the same directory as my PhotoboothImages Folder.
Start DSLR Remote Pro and run the Photobooth Setup Wizard
At Step 3
1. Check the printer is set correctly.
2. Choose the print layout closest to the template you are using
3. Click on <Finish>
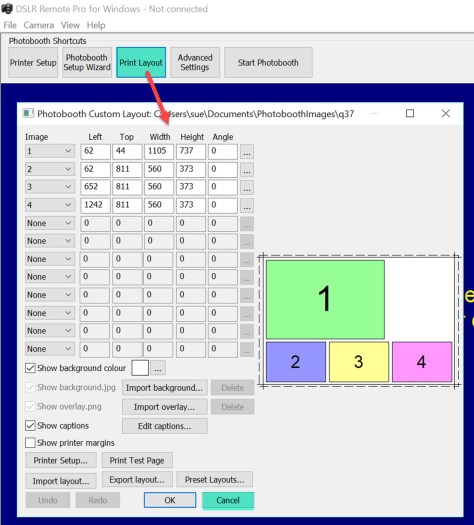
If you look at the Print Layout Editor now you will see the default 1 + 3 print layout. (Cancel to leave the Layout Editor).
Drag and drop into DSLR Remote Pro
DSLR Remote Pro allows you to drag and drop a print layout into the main screen or into the Print Layout Editor
Drag and drop a print layout template into Breeze DSLR Remote Pro 3.9.1 main screenDrag and drop a print layout template into Breeze DSLR Remote Pro 3.9.1 Print Layout Editor (also works for Webcam Photbooth 2.4)
You will be asked to confirm whether you want to import the template:
Print Template import confirmation window DSLR Remote Pro 3.9.1
Select Yes and the Print Layout Editor will display the template you imported.
Customize and save the revised template
First save a backup copy of the original layout using Export Layout, then customize the layout to meet your needs.This post does not explain how to use the Print Layout Editor; you can find detailed instructions here. In this example I will change the caption.
Editing a caption in the Print Layout Editor DSLR Remote Pro 3.9.1
The changes are shown immediately in the Print Layout Editor.
When you have finished customising the print layout, export the template to save it.
Alternative: Use the Print Layout Editor to import templates
There is an alternative to dragging and dropping templates into DSLR Remote Pro. You can copy templates into a folder accessible to your booth, then import the template you need using the Import Layout (1) button in the Print Layout Editor.
Importing a layout into the Print Layout Editor DSLR Remote Pro 3.9.1 (also works with Webcam Photobooth 2.4)
(2) Select the folder containing your layout(s), and then the layout you want to import. (3) Click on OK to import the layout into the Print Layout Editor. You can edit and save the customized template as before.
Notes
Webcam Photobooth users need to select the “DSLR template compatibility” option at Step 3 of the Photobooth Setup Wizard to use templates designed for DSLR Remote Pro.
Selecting DSLR template compatiblity mode using the Setup Wizard in Webcam Photobooth 2.4 S
Zipped files: many templates are downloaded or copied as zipped (compressed) files, which need to be unzipped before they can be used. The example here uses a zipped file downloaded from the Breeze website.
Printer drivers: you may need to download and install drivers for your printer to the computer you are using.
Using a second computer to edit print layouts. You do not need to create and edit print layouts on the booth computer. Keep a copy of DSLR Remote Pro on an office computer to design, customize and edit your print layouts; export them from the program and either store them somewhere accessible to your booths, or copy the complete layouts to each booth computer.


You must be logged in to post a comment.