You will often need to add or edit the files in your PhotoboothImages folder when you customize the screens in your booth or mirror. Most of you know that you must name the files you add correctly so that DSLR Remote Pro and other Breeze programs can find them. If you are sure the filename is right but the program doesn’t seem to see it, check the filename extension.
It is very easy to name a file 1.jpg.jpg by mistake, and Windows makes this hard to spot, because Windows File explorer doesn’t show the extension (.jpg or .avi etc) unless you tell it to.
In this post I will show you how to spot errors more easily:
Always display file name extensions
The first example shows an Icons view of the images for a basic booth set up with the Wizard. I find this visual overview very helpful. If you look at the filenames (highlighted in red) you will see that the .jpg file name extensions are missing:
Typical icon view of PhotoboothImages folder. Windows has hidden the file extensions
The View tab shows you that the File name extensions box is not checked:
Checking this box will reveal the .jpg extensions:
When File name extensions is checked, the .jpg etc extensions are shown
Fascinating – but why does this matter?
If you accidentally name the a file 1.jpg.jpg instead of just 1.jpg it will be very clear when you look at this window:
Here the first image has accidentally been named 1.jpg.jpg
If you cannot see these file extensions this is much easier to miss:
1.jpg.jpg is labelled 1.jpg – very easy to miss!
If you look at the Details view of the same folder this is what you will see:
Again 1.jpg.jpg is labelled 1.jpgWhen you force Windows to show the file extension my mistake jumps out
Thank you for taking the time to read this. Do share the post with others who may find it useful.
Breeze Booth for iPad is a powerful photo booth app designed with flexibility, redundancy and creativity in mind.
Breeze Booth features the most powerful and flexible interface designer of any iPad app in the industry. Create graphically stunning designs, complex multi-menu navigations, engaging data surveys and customised keyboards. Quickly deploy them to a fleet of iPads using trusted cloud services (Dropbox, iCloud etc) or via your own private and secure web servers.
Make it yours. Make it your clients. Breeze Booth can be re-skinned to make it look like your very own photo booth software. All from just US $49/month or US $440/year.
Greetings everyone! My name is Peyton Vincent with CEG Interactive, an award-winning company that specializes in photo booth rental in San Diego as well as specialty photo activations nationwide. I first started using Breeze Systems software in 2007 with our very first portable photo booth. Back in those days, we were renting photo booths for weddings and parties but as we expanded our offerings, our clientbase grew to include concert tours, conventions, and sporting events nationwide.
While the majority of our jobs have relied on DSLR Remote Pro over the years, we found our niche by being photo booth technologists and innovators that wanted to constantly find new ways to re-invent the photo booth. We also regularly use Hotfolder Prints, Breeze Viewer, Webcam Photo Booth, Breeze Kiosk, and last but not least, Breeze Multi-Camera.
I have been invited by Chris and Sue to write some helpful features that are focused mostly around that last one which goes by a bunch of different names. See how many you recognize!
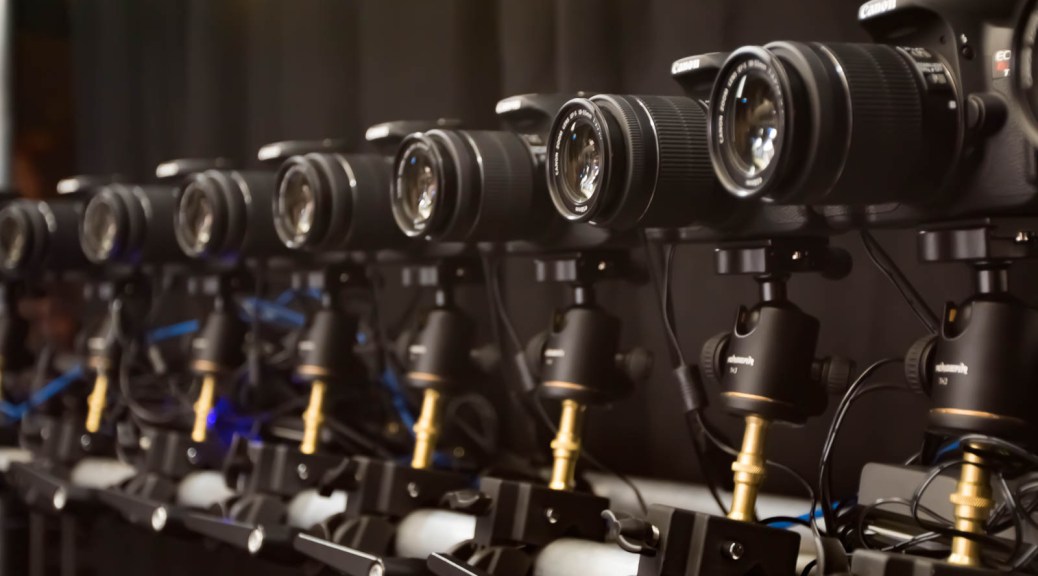
Other than the obvious, a multi-camera array photo booth consists of a system of interconnected cameras that are usually defined as follows:
Rigidly-attached to a curved structure that keeps them from shifting
Aimed at a central point or axis
Evenly-spaced so that the animation effect shifts between the cameras at a constant speed
DSLR cameras and lenses are of the same make/model/focal length. Breeze Multi-Camera is designed to tether exclusively with Canon DSLRs. However, with some custom work, it’s probably possible to use the animator program with image file sets captured by cameras of a different make.
Each camera is fired in either a “chase” where there’s a specified delay between each angle which creates a “virtual dolly” and/or slow motion bullet time effect OR they are all fired at the exact same instant to create a true “time freeze” effect.
I’m a visual guy (which is probably why I’m a photo booth nerd instead of a writer) so lets move on to the fun stuff…photo examples! I will end this first article with a multi-camera comparison guide that shows you how the number of cameras, type of backdrop, triggering method, etc can create a wide variety of different effects.
2 Camera “3D Photo Booth”
Event guests showing off their stylish 3D glasses and 3D photo prints!Full color traditional photo prints as well as anaglyphic prints that can be viewed in 3D with the red/blue 3D glasses.
6 Camera Array Photo Booth
6 camera array with printed 10×10 tension fabric backdrop6 camera photo booth with a 10×14 printed backdrop
7 Camera – Super Wide Angle
6 camera array using Canon EF-S 10-18mm Super Wide Angle Lenses. This was a test shot and we ended up fine tuning calibration before the event began.
6 Camera – Green Screen Array
12 Camera Array – 3D Light Painting
12 Camera Array
We used two 9×9 black sequin backdrops for this shoot.
12 Camera Array – Green Screen
3D green screen confetti plus hand-tossed white confetti!
12 Camera Array – Creative Set
12 Camera Array – Green Screen with 3D artwork
18 Camera Array – 180 Photo Booth
18 Camera Array – Time Delay Trigger “Virtual Dolly” Effect
Please stay tuned for our next feature were we cover more topics like hardware component selection, software settings, system design, and more! In the meantime, check out our website more information about the multi-camera photo booth services that we offer to our customers at CEG Interactive.
I have reserved places for the folks on the iPad waiting list for this class – please drop me an email and confirm whether you would like to take them up.
Chris and Steve are running two Breeze Master Classes at Photo Booth Expo this year – Introducing Breeze Booth for iPad, and Interface design for DSLR Remote Pro and Multi-Camera. Tickets are free to PBX Key Pass holders. The original classes have been fully booked for some time.
Both will also give Keynote presentations at PBX. Steve will open on Sunday at 12 with What I’ve Learned From Doing 1000 Events A Year. Chris will cover Choosing the Right Camera for your Booth on Tuesday at 9am. You don’t need to book for Keynote presentations, which are open to all PBX Key Pass holders.
Introducing Breeze Booth for iPad
Monday 25th February 11-12.30 & 3-4.30 Steve Bliesner & Chris Breeze
Get the low down on the latest Breeze App from Steve Bliesner (Breeze Brand Ambassador and Photo Booth Guys) and Chris Breeze (Breeze founder and developer).
Book your place at Introducing Breeze Booth for iPad (The password is PBX)
If you can no longer use your ticket, please email sales@breezesys.com so that I can give it to someone else. Thank you.
As most of you know, Chris is founder and developer in chief at Breeze. Steve Bliesner is our Breeze Brand Ambassador as well as running the Photo Booth Guys and Wilkes Photobooth. Steve’s Breeze class at BoothCon 2019 was standing room only; we expect both the PBX classes to be packed.
This is the fifth Year of Photo Booth Expo, the world’s largest Photo Booth Show. It’s a great chance to catch up with you all as well as showing the latest Breeze offerings at our booth. See you soon.
How to use Dropbox to transfer new and updated events from the Event Editor 1.2 (on a Windows PC) to your iPads. This post includes a trouble shooting section.
June 2020: This post has been replaced by a website tutorial here
June 2019: Post updated to clarify that events can be saved straight to Dropbox
May 2019: Some images and text in this post have been updated to reflect the latest releases of the Breeze Booth App and Event Editor 1.2
Introduction
When you download Breeze Booth from the App Store, you are prompted to sync (ie download) sample events from Breeze servers at https://bb4ipad/com/sync
When you create your own events you also need to transfer them to your devices. The simplest way to do this is to use Dropbox. This post explains how to set up Dropbox on each iPad (or iPhone) and download events using Dropbox.
Note: Breeze Booth now supports both iPads and iPhones running iOS12. References to iPads in this post also refer to iPhones.
Setting up Dropbox on your iPad
Install the official Dropbox app on your iPad (this can be downloaded from the Apple App Store).
Select Sign in to Dropbox in Breeze Booth for iPad’s app settings and authorize the app. This will create a “Breeze Booth for iPad” folder in your Dropbox “Apps” folder.
1. Log into Dropbox on the iPad
Copy the events on your PC to your Dropbox folder
Once you have set up Dropbox for Breeze Booth you need to copy your folder of events into the correct Dropbox folder to transfer them to the iPad.
Copy the events folder fromC:\Users\yourname\Documents\Breeze Booth for iPad
Copying the whole events folder
toC:\Users\yourname\Dropbox\Apps\Breeze Booth for iPad
Dropbox folder structure for events
Note: When you sync the events using Dropbox on your iPad, the program will look for this folder. You must name it correctly, or the App will not find your events.
Note to advanced users: You can use tokens including {eventName} in your Dropbox folder naming. This post does not cover this.
Saving events straight to Dropbox
Once the initial set of events have been copied to Dropbox, you can either save new and updated events directly into Dropbox, or continue using an intermediate folder and manually copy them. Saving events straight to Dropbox is simpler and faster.
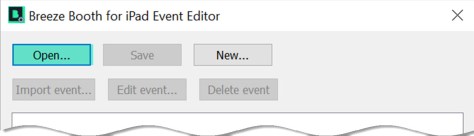
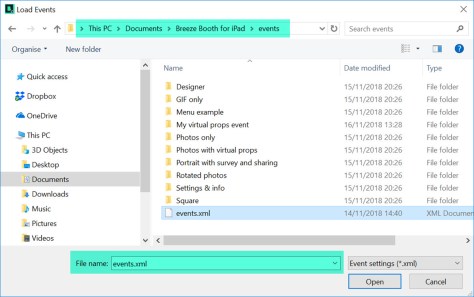
To direct the Event Editor to load and save events in Dropbox, select File then Open, navigate to C:\Users\…\Dropbox\Apps\Breeze Booth for iPad\events and open events.xml
To point the Event Editor to your Dropbox events folder, click on File then Open, navigate to C:\Users\…\Dropbox\Apps\Breeze Booth for iPad\events and open events.xml
When you return to the main Event Editor screen note that the folder name at the top has changed:
Event Editor 1.2 main screen with folder highlighted
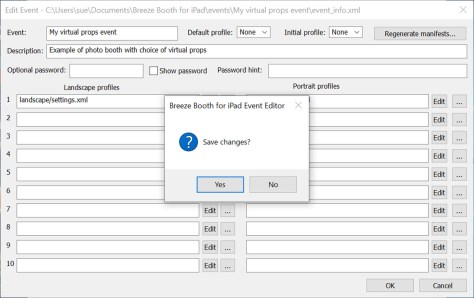
You will be prompted to save your changes before closing the Event Editor
Breeze Booth EventEditor prompts you to save any changes before closing the program
Tell Breeze Booth for iPad to sync events using Dropbox
As there are several ways to sync events, you need to tell your iPad which to choose. In Breeze Booth for iPad go to Settings and select the Sync via Dropbox.
This slideshow requires JavaScript.
Import the latest version of your events into Breeze Booth for iPad from Dropbox
You can choose whether to update (‘sync’) all your events at the same time, or update a single event. Updating all events is the best way to check everything on the iPad is up to date, but may be slower than updating a single event (especially if you have a poor Internet connection).
You can also update the event list before updating individual events.
Get an updated list of events
Update list of events button (Breeze Booth Events screen)
Get the latest version of all your events
Update all events button (Breeze Booth Events screen)
Get the latest version of a single event
Once the event(s) have been updated, you are ready to run them
Concerned about guests getting access to your Dropbox files from the iPad?
Advanced users: Signing into the Dropbox App on an iPad and signing Breeze Booth for iPad into your Dropbox account are not the same. Once your events are set up correctly, you can secure your Dropbox account by:
either signing out from the Dropbox App and keeping Breeze Booth for iPad signed into Dropbox
orDeleting the Dropbox App from the iPad
Only delete the Dropbox App from the iPad when Breeze Booth for iPad is signed in to DropBox. If you sign Breeze Booth for iPad out from Dropbox, you will need to reinstall the official Dropbox app before signing back in again.
You can also set an exit password to keep guests from accessing the Breeze Booth for iPad settings page
Using an exit password to keep sticky fingered guests from the Breeze Booth for iPad settings page
This slideshow requires JavaScript.
Keep life simple when syncing with Dropbox
Do name your folders correctly
Do not uninstall Breeze Booth for iPad from your iPads
Do not delete the Breeze Booth for iPad folder in Dropbox
Stuck? Getting out of trouble
iPad App can’t find my new/updated events
Path not found errors occur when the App cannot find the event files. Causes:
Dropbox has not finished syncing the files to the iPad
Dropbox folders or files are not named correctly
Path not found: Event cannot be synced because of a folder or file naming error
Motr
Error: not logged into Dropbox occurs if Breeze Booth for iPad is not signed into Dropbox
Unable to sync event because not logged into Dropbox
If you can’t find an answer in the help files, feel free to email support@breezesys.com or post in the Breeze User group on Facebook
Summary
This post explained how to transfer new and updated events from a PC to Breeze Booth for iPad using Dropbox. You will need a Dropbox account and an Internet connection for this to work.
This post explains how to create and edit your own events for Breeze Booth for iPad using the Breeze Booth Event Editor 1.1 on a Windows PC, and covers
what’s new in this release
first steps : how to download, install and run the Event Editor on your PC
loading events into the event editor
cloning an event as a start point for a custom design
Easier editing – you will find it much simpler to load events into the Editor, copy them and save your work.
Simpler cloning of events
Ability to import events from elsewhere
Improved event format
Simpler manifest regeneration
Chris has also added the ability to set up both initial and default profiles for an event, & load profiles from menu 1 or menu 2
Download and install Breeze Booth Event Editor & sample events
Event Editor runs on a Windows 10, 8 or 7 computer. Download it from here.
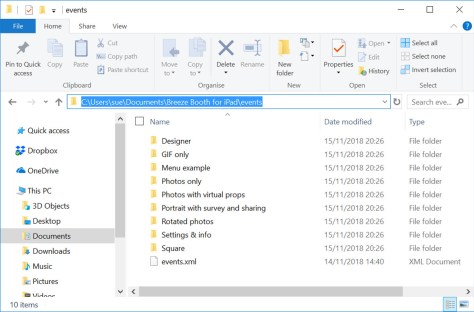
You will also automatically download Breeze Hub and the designs for nine sample events. When you install the event editor, these events will automatically be saved in your Documents folder C:\Users\…\Documents\Breeze Booth for iPad\events
The Breeze Booth Event Editor installer has created this folder of sample events. C:\Users\sue\Documents\Breeze Booth for iPad\events
There is a sub-folder for each sample event, and a file called events.xml which you need to open in the Event Editor:
Run Breeze Booth Event Editor
Start the Event Editor, and select Open.
Starting Breeze Booth Event Editor 1.1 for the first time
Load the list of existing events by selecting events.xml in C:\Users\…\Documents\Breeze Booth for iPad\events
Select events.xml to load the list of events into Breeze Booth Event Editor
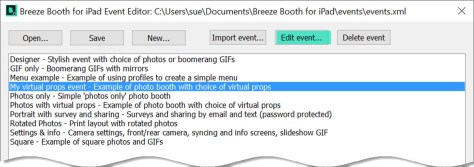
Initial list of sample events displayed in BBEE
List of sample events loaded into Breeze Booth Event Editor 1.1(This list was created from the events.xml file we opened)
The first event is called Designer and showcases many of the features included with Breeze Booth for iPad. You are welcome to use this design (or parts of it) with Breeze Booth for iPad at your own events.
The remaining 8 events are much simpler. They are intended to help you create your own designs.
This post will show you how to copy one of these simple events (Photos with virtual props) and edit it for your own use.
Photos with virtual props takes one photo and shares it on a custom background. Guests choose between 3 virtual props. They can also choose whether to shoot in color, B&W, sepia, comic effect or using a filter. The photo can be shared by email .
Cloning ‘Photos with virtual props’
Right click on Photos with virtual props and select Clone Event…
Right click on an event to clone it
You can change the name, description and folder name of the new event:
This slideshow requires JavaScript.
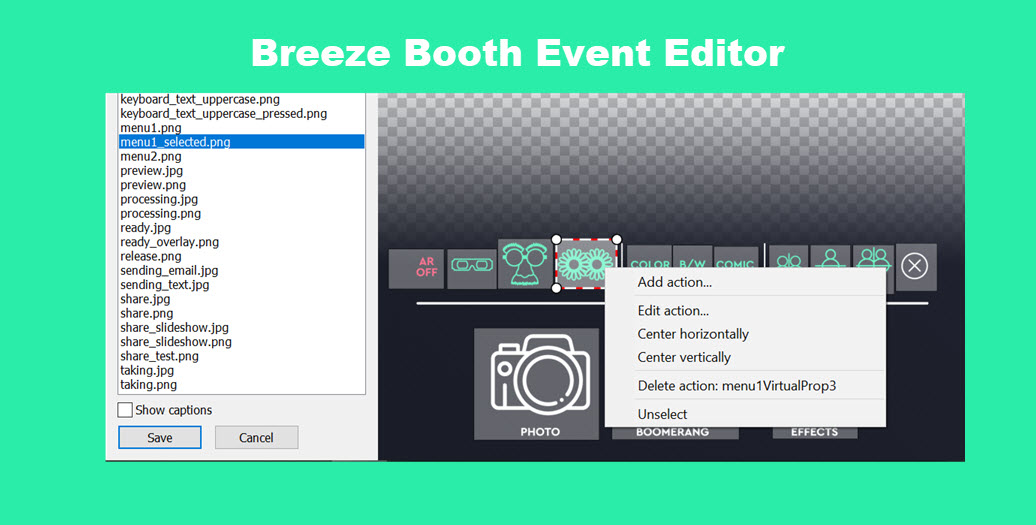
Editing an event
Portrait, landscape or both?
Breeze Booth for iPad lets guests switch between portrait and landscape orientation on the fly (great for roaming booths like the Ring Roamer). My virtual props event can be used in both portrait and landscape orientation, so has designs for both.
If you will always run an event in the same orientation, you don’t need to create both designs.
Open My virtual props
Select My virtual props… and check Edit event…
We will just edit the portrait version of My virtual props event today. Click on the portrait Edit button:
This brings us to the Photo Booth Settings screen, where you can start to customize your design
Tabs on Photo Booth Settings screen (Breeze Both for iPad build 20)
The original Photos with virtual props takes one photo and shares it on a colored background with a custom logo. Guests choose between 3 virtual props. They can also choose whether to shoot in color, B&W, sepia, comic effect or using a filter. The photo can be shared by email .
We are going to change My virtual props event to
take 2 square photos
remove the branded background print layout
add a new background color, 2 logos* and a caption to the print layout
create a slideshow GIF from the 2 photos
customize the wording of the email
share the slideshow GIF instead of the print layout
*You can add up to 5 different png or jpg logos to each print layout in addition to the background and overlay. This is a simple way of branding a design for a particular event, and can also be used as a quick way to add an image of the bride and groom (taken earlier in the day) to wedding photo booths.
Photo Booth Settings Screen
The Photo Booth Settings Screen is displayed for the profile you selected. It has 5 tabs : General, Photos, Slideshow GIFs, Burst GIFs, and Share. You can access powerful editors to design your screens, prints and GIFs from these settings.
Photo Booth Settings – General tab
11) Change the aspect ratio of the photos to square
Changing the photo aspect ratio to square (Breeze booth Event Editor)
You can find a full list of Breeze Booth for iPad screens here
Photo Booth Settings – Photos tab
12) Change the number of photos to 2
13) Change the countdown text color to black
14) Open the Print Layout Editor
Changing the number of photos, color of countdown text and opening the Print Layout editor in Breeze Booth Event Editor
Print Layout Editor
Use the Print layout editor to customize your prints. In the slideshow below I will:
15) Remove the branded background
16) Add a new background color to the print
17) Change the printed photo to a square
18) Right click on the background to add the second photo
19) Resize and reposition the two photos
20) Add the two logos
21) Right click on the background to add a caption, then right click again to edit it
22) Save my changes
Note: You can add up to 5 different JPG or PNG logos to a print
This slideshow requires JavaScript.
Photo Booth Settings – Slideshow GIFs tab
Check Create animated GIF,... to create an animated GIF from the two photos
Creating a slideshow GIF from the photos
Photo Booth Settings – Share tab
23) Check Share slideshow first to share the GIF instead of a print layout
24) Open the slideshow email editor to customize the message
Telling Breeze Booth for iPad to share the slideshow GIF
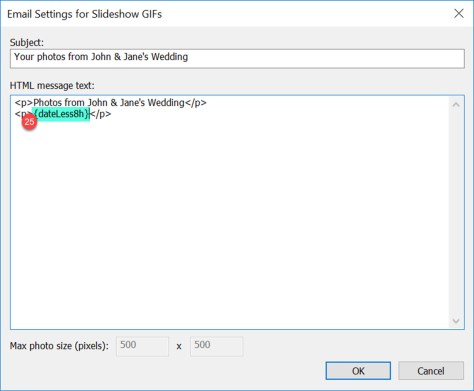
Breeze Booth Event Editor email editor for slideshow GIFs
Change the subject and email text. You can use Breeze tokens (25) in emails
Before you leave the event editor….
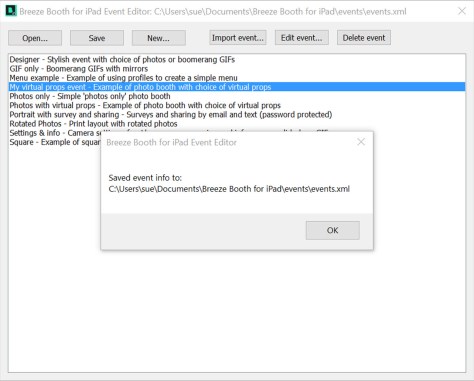
When you have finished editing the event, check OK to save all your changes.
Add an extra countdown GIF and sharing screen to the asset folder
The new event includes has two photos instead of one so we need a second countdown GIF 2.gif . We also need a screen called share_slideshow.jpg to share the new slideshow GIF.
I have copied the existing 1.gif and share.jpg screens to 2.gif and share_slideshow.jpg in C:\Users\sue\Documents\Breeze Booth for iPad\events\My virtual props event\portrait
C:\Users\sue\Documents\Breeze Booth for iPad\events\My virtual props event\portrait showing 2.gif and share_slideshow.jpg
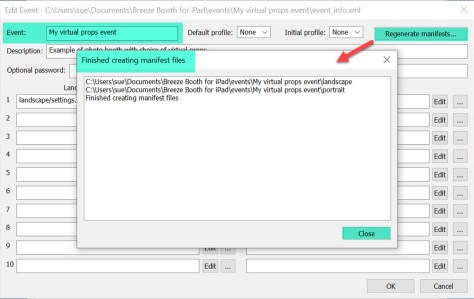
When you make any changes to this folder you must also go back to the Breeze Booth Event Editor, open the event and regenerate the manifests
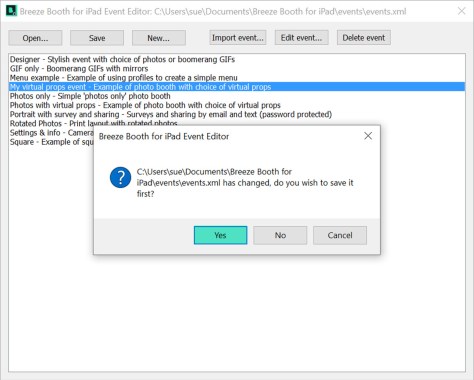
Closing the Event Editor
If you make any changes to your events, the Event Editor will prompt you to save changes to your events.xml folder. It is important that you select Yes to save the changes you have made and update the manifest.
Copying events from a PC to your iPads
There are currently 3 ways to copy events from your PC to an iPad:
Upload the events folder to a folder on a web server, then go the to the settings screen in Breeze Booth for Ipad and edit the URL for the sync server to point to this folder. Then use the events screen in Breeze Booth for iPad to sync the events. Important: This method can only be used with secure servers that have https e.g. https://breezesys.com. It will not work with http URLs. Sample events are available by setting the sync server to https://bb4ipad.com/sync in the iPad’s app settings.
Method 3: Copy the files via iCloud
Copy the event folder to a folder on iCloud that is visible on the iPad. Then use the Files app to copy the files to Breeze Booth for iPad’s assets folder.
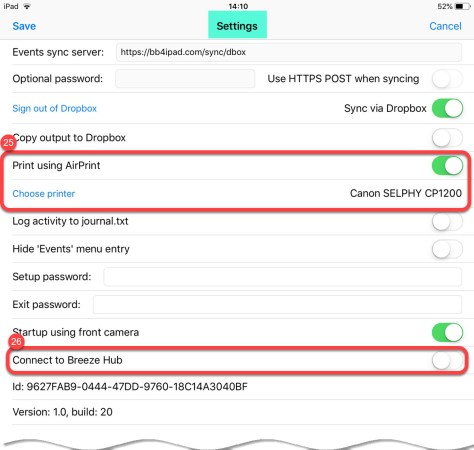
Using AirPrint to print directly from Breeze Booth for iPad
25) To print directly from the iPad connect up your printer ( which must support AirPrint) and choose Print using Airprint on the Breeze Booth for iPad Settings screen
26) To print using a Windows PC you need Breeze Hub. Choose Connect to Breeze Hub on the Breeze Booth or iPad Settings screen
Summary
This post has taken you through downloading and installing both the Breeze Booth Event Editor and a set of sample events onto a Windows PC. I have also shown how to create your own event based on one of the samples provided by Breeze, and outlined ways to transfer new and updated events to your iPads. Finally there are short notes about printing using Airprint and a Windows PC.
If you found this post useful please share it with others.
Chris and Steve are running two Breeze Master Classes at Photo Booth Expo this year – Introducing Breeze Booth for iPad, and Interface design for DSLR Remote Pro and Multi-Camera. Tickets are free to PBX Key Pass holders Update: 9 February: Both Masterclasses are now fully booked
Both will also give Keynote presentations at PBX. Steve will open on Sunday at 12 with What I’ve Learned From Doing 1000 Events A Year. Chris will cover Choosing the Right Camera for your Booth on Tuesday at 9am. You don’t need to book for Keynote presentations, which are open to all PBX Key Pass holders.
Masterclasses
Introducing Breeze Booth for iPad
Monday 25th February 11-12.30 Steve Bliesner & Chris Breeze
Get the low down on the latest Breeze App from Steve Bliesner (Breeze Brand Ambassador and Photo Booth Guys) and Chris Breeze (Breeze founder and developer).
Update: 9 February This course is now fully booked. To join a waiting list for returned tickets, email sales@breezesys.com using subject line PBX Breeze Booth for iPad Masterclass.
If you can no longer use your ticket, please email sales@breezesys.com so that I can give it to someone else. Thank you.
Interface Design for DSLR Remote Pro & Breeze Multi-Camera
Tuesday 11-12.30 Steve Bliesner & Chris Breeze
Get the most from these powerful DSLR based photo booth Apps with Chris and Steve. This master class will cover
Designing unique interfaces for Breeze booths and Multi-Cam
Making the most of the new Multi-Camera photo booth mode
Update: 9 February This course is now fully booked. To join a waiting list for returned tickets, email sales@breezesys.com using subject line PBX Breeze Booth Interface Design Masterclass.
If you can no longer use your ticket, please email sales@breezesys.com so that I can give it to someone else. Thank you.
PBX expect both classes to be booked out, and have asked that you choose the class you prefer.
As most of you know, Chris is founder and developer in chief at Breeze. Steve Bliesner is our Breeze Brand Ambassador as well as running the Photo Booth Guys and Wilkes Photobooth. Steve’s Breeze class at BoothCon 2019 was standing room only; we expect both the PBX classes to be packed.
This is the fifth Year of Photo Booth Expo, the world’s largest Photo Booth Show. It’s a great chance to catch up with you all as well as showing the latest Breeze offerings at our booth. See you soon.
Breeze Hub is a simple (but powerful) utility, that can manage the process of printing, emailing and the SMS* of images from other Breeze software products such as: Breeze Booth for iPad, Breeze Booth for Windows (DSLR Remote Pro) and Breeze Kiosk.
*SMS is designed for sending images via a microsite and does not currently send the actual image.
Breeze Hub, showing 2 iPads connected over a local network, and several emails that have been sent.
Where it started
Hub was initially developed as a print server app, to enable the printing of images from Breeze iPad based photo booths to professional dye sub printers. Additionally, it was designed as a way to easily sync images back to a Windows PC across a local network from your iPad.
Since then, the capabilities of Hub have expanded, and it can now also be used to email and SMS* images from Breeze Booth for Windows (DSLR Remote Pro), Breeze Kiosk and of course, Breeze Booth for iPad.
Breeze Booth for iPad
Breeze Booth for iPad + Breeze Hub
If you are using Breeze Booth for iPad and you want to print at your event, Hub is the fastest and best way to do so. Hub can run on a small, low powered Windows PC, that connects to your printer via USB. The iPad then connects to Hub over WIFI, and quickly sends the images to be printed. At the same time, Hub can also share your images via email and SMS.
Breeze Booth for Windows (Aka DSLR Remote Pro)
Breeze Booth for Windows running Breeze Hub
If you send emails from Breeze Booth for Windows (DSLR Remote Pro), Hub can run on the same PC, which then allows you to send emails in the background (no waiting for images to upload before next session starts) AND it allows you to attach all images, layouts and GIFs from each session as well as designing more attractive email templates, that can include the thumbnail images.
To get started, configure your emails in Breeze Booth as normal, ensuring that you have enabled XML logging. You can then configure your attachment settings to suit your needs (see GIF below).
Configure the email settings in Breeze Booth for Windows, ensuring that XML logging is enabled. Keep in mind, Breeze Booth requires SMTP settings to be entered, but these will be ignored, as the email will be sent from Breeze Hub instead.
Configure Breeze Hub to enable emails, ensuring you have entered your SMTP details.
When designing your email template, if you are using thumbnails in the body of the email, you need to ensure that you are using the relevant tags to display the images:
{image1} – the thumbnail of the print layout or GIF/mp4
{image2} {image4} {image6} etc – the thumbnail of the first, second and third photos in the session
{image3}{image5}{image7} – the high-resolution image of the first, second and third photos in the session (though typically, you would not embed the high resolution images in the email body)
Send emails from Breeze Booth for Windows that attach all images and GIFs/mp4’s from the photo booth session
Where do you install it?
Breeze Hub can be run locally on a PC at your event (for example, on your photo booth/kiosk PC, or on the PC acting as your print server); OR it can be run on a PC in your office, where images from multiple Windows/iPad based Breeze photo booths and Kiosks, can be emailed or sent via SMS* from one central location – essentially creating your own mini cloud solution.
Thank you all for your business this year, and for being such an amazing bunch of people!
It has been great to meet lots of you in person at PBPI, PBX, Photokina and Photobooth Show Europe; and get to know many more of you through your emails and Facebook posts. Thank you all for your enthusiasm, encouragement, suggestions and comments along the way.
Our computers are switched off on Christmas Day, but we will be processing orders and providing limited support between Christmas and New Year. Please be patient if it takes a little longer than usual to receive upgrade licenses.
BreezeBrowser Pro 1.10 and Downloader Pro 2.5 introduce support for the new Canon CR3 raw file format and recent Canon cameras including the EOS R and M50.
BreezeBrowser Pro 1.10
BreezeBrowser Pro is a smart tool used by professional photographers to organize, cull and enhance photos.
What’s new?
Support for the CR3 raw files used by the mirrorless EOS R and M50 cameras.
Raw file conversion and shooting data display for Canon’s EOS R, M50, EOS 1500D/2000D/Rebel T7 and EOS 3000D/4000D cameras.
Both releases are a free upgrade for all registered users who purchased a license within the last 18 months. Users with older licenses will need to buy an upgrade license to use the latest versions of BreezeBrowser Pro and Downloader Pro.


You must be logged in to post a comment.