Category Archives: Webcam Photobooth

How to import print templates into Breeze DSLR Remote Pro

This post explains how to import readymade templates into Breeze DSLR Remote Pro 3.9.1. Webcam Photobooth 2.4 works in a smilar way.

I have used one of the free templates kindly provided by SMOVE as an example. Import your own templates in the same way.

There are two main ways to import layouts into DSLR Remote Pro.

  • Drag and drop the template directly into DSLR Remote Pro (best for single templates).
  • Copy the templates into your template folder, then import each template into DSLR Remote Pro using the Print Layout Editor when you need it (more effective for collections of templates).

First set up your printer

If necessary, download and install the printer drivers to your computer.

This example will import a 6” x 4” (15cm x 10cm) print layout. Before you start you need to load the printer with 6” by 4“media and set it to 300dpi.

Put the print template(s) into an accessible folder

Whether you download print layouts from a third-party website or copy them from another computer they need to be kept in folder(s) accessible to your booth computer.

In this post I will copy the template into the template folder on my PC. You may prefer to store templates in Dropbox or another cloud-based system accessible to multiple booths.

Download the photo booth layout  and open zipped files

In this example I am using a 6” x4” template with a 1 +3 layout.

To copy this example  on your own computer, download this template from the Breeze website at http://www.breezesys.com/Photobooth/templates6x4.php

Copy the templates to your templates folder

Copy the zipped file to another folder to unzip it. I have copied the file to my templates folder Sue Photobooth Print Templates which is in the same directory as my PhotoboothImages Folder.

Start DSLR Remote Pro and run the Photobooth Setup Wizard

At Step 3

1. Check the printer is set correctly.

2. Choose the print layout closest to the template you are using

3. Click on <Finish>

If you look at the Print Layout Editor now you will see the default 1 + 3 print layout. (Cancel to leave the Layout Editor).
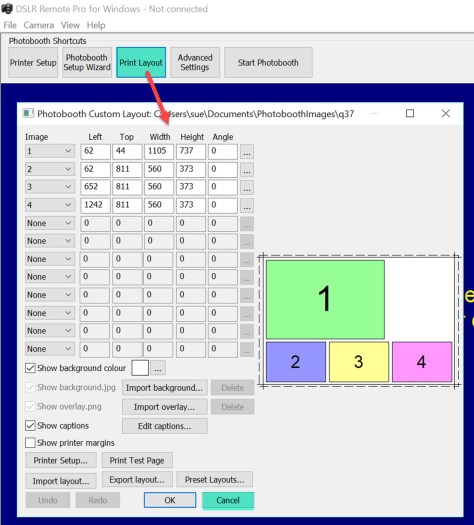
Drag and drop into DSLR Remote Pro

DSLR Remote Pro allows you to drag and drop a print layout into the main screen or into the Print Layout Editor

Shows dragging and dropping a print template into Breeze DSLR Remote Pro 3.9.1
Drag and drop a print layout template into Breeze DSLR Remote Pro 3.9.1 main screen
Shows dragging and dropping a print template into DSLR Remote Pro 3.9.1
Drag and drop a print layout template into Breeze DSLR Remote Pro 3.9.1 Print Layout Editor (also works for Webcam Photbooth 2.4)

You will be asked to confirm whether you want to import the template:

Shows Print Template import confirmation window DSLR Remote Pro 3.9.1
Print Template import confirmation window DSLR Remote Pro 3.9.1

Select Yes and the Print Layout Editor will display the template you imported.

Customize and save the revised template

First save a backup copy of the original layout using Export Layout, then customize the layout to meet your needs. This post does not explain how to use the Print Layout Editor; you can find detailed instructions here. In this example I will change the caption.

Editing a caption in the Print Layout Editor DSLR Remote Pro 3.9.1

The changes are shown immediately in the Print Layout Editor.

When you have finished customising the print layout, export the template to save it.

Alternative:  Use the Print Layout Editor to import templates

There is an alternative to dragging and dropping templates into DSLR Remote Pro. You can copy templates into a folder accessible to your booth, then import the template you need  using the Import Layout (1) button in the Print Layout Editor.

Importing a layout into the Print Layout Editor DSLR Remote Pro 391
Importing a layout into the Print Layout Editor DSLR Remote Pro 3.9.1 (also works with Webcam Photobooth 2.4)

(2) Select the folder containing your layout(s), and then the layout you want to import. (3) Click on  OK to import the layout into the Print Layout Editor. You can edit and save the customized template as before.

Notes

Webcam Photobooth users need to select the “DSLR template compatibility” option at Step 3 of the Photobooth Setup Wizard to use templates designed for DSLR Remote Pro.

Selecting DSLR template compatiblity mode Webcam Photobooth 2.4
Selecting DSLR template compatiblity mode using the Setup Wizard in Webcam Photobooth 2.4 S

Zipped files: many templates are downloaded or copied as zipped (compressed) files, which need to be unzipped before they can be used. The example here uses a zipped file downloaded from the Breeze website.

Printer drivers: you may need to download and install drivers for your printer to the computer you are using.

Using a second computer to edit print layouts. You do not need to create and edit print layouts on the booth computer. Keep a copy of DSLR Remote Pro on an office computer to design, customize and edit your print layouts; export them from the program and either store them somewhere accessible to your booths, or copy the complete layouts to each booth computer.

Download DSLR Remote Pro and try this for yourself

Copyright Breeze Systems Ltd 2018


Free print templates for DSLR Remote Pro and Webcam Photobooth

A big thank you to Tomasz Klusczyk of SMOVE, who has generously shared a set of print layouts for Breeze owners to use with DSLR Remote Pro, Hotfolder and Webcam Photobooth.

Download SMOVE 6”x4” (15cm x 10cm) print templates

Download SMOVE 6”x8” (15cm x 20cm) print templates

Note: Webcam Photobooth users need to select the “DSLR template compatibility” option at Step 3 of the Photobooth Setup Wizard to use these templates:

Selecting DSLR template compatiblity mode Webcam Photobooth 2.4
Selecting DSLR template compatiblity mode using the Setup Wizard in Webcam Photobooth 2.4 S

Find out more

Download DSLR Remote Pro, Hotfolder and Webcam Photobooth

SMOVE logo

SMOVE is a Polish photo booth vendor who design and sell photo booths powered by DSLR Remote Pro thoughout Europe.

Copyright Breeze Systems Ltd 2018. Breeze Systems is not responsible for the content of external sites

Shooting Square photos with Breeze Photo Booth software

Usually photo booth images are shot in ‘landscape’ mode; so that you can comfortably include several people in the shot. Sometimes we want to vary this.

Update: DSLR Remote Pro 3.9 introduced a  simpler way to shoot square images

This post explains how to create and print square  photos using DSLR Remote Pro 3.7.3. Webcam Photobooth, NKRemote and PSRemote work in a very similar way. First we need to change the shape of the live view image; then change the print layout to match.

1. Start DSLR Remote Pro and run the Photobooth Setup Wizard to set up a basic booth, selecting a single photo at Step 1.

DSLR Remote Pro 3.7.3 main screen: Photobooth Setup Wizard button highlighted

2. Start the photo booth. DSLR Remote Pro allows you to customize your booth setup without connecting the camera. (NKRemote  and PSRemote users  connect and switch on the camera. Webcam Photobooth uses the PC’s internal camera if you have not connected an external camera.)

DSLR Remote Pro 3.7.3 main screen: Start Photobooth button highlighted

3. Crop the live view guests see by holding down the ‘shift’ key and pressing the cursor right arrow -> until the live view window is square. The amount of cropping is shown in the lower right corner of the screen. If you overshoot press ‘shift’ and the left arrow <- to reduce the cropping.

DSLR Remote Pro 3.7.3 : changing shape of Live View

4. Check the crop size to see whether the live view window is square: numbers in brackets show (width x height) of the live view.

DSLR Remote Pro 3.7.3 : 160 pixels have been cropped from each side of live view image to a create 640×640 square

5. Press <Escape> to exit Photobooth mode and select the large ‘Print Layout’ button to open the Print Layout Editor.

DSLR Remote Pro 3.7.3 main screen: Print Layout button highlighted

6. Right click on the photo in the print layout and select ‘Edit image position’. Set the image width and height to the same value to make the photo square.

DSLR Remote Pro 3.7.3 Print Layout editor: image on print cropped to square shape

7. Click OK, drag the photo to the required position and/or resize it by dragging the corners. Add any captions, background etc before exporting the layout to save your work.

DSLR Remote Pro 3.7.3 Print Layout editor: Export layout button highlighted

Square photos can be combined with filters to give a pop art effect, or used singly for a ‘polaroid’ look.

This method can be used to create rectangular photos of any proportions you choose. More details.

Ready for more? You can also create round (or any other shape) photos using  a live view overlay and print overlay. You will need to create these overlays in an image editor such as Photoshop. The DSLR Remote Pro help files explain how to customize screens and prints in more detail.

Copyright Breeze Systems 2017

Boomerang basics – animated GIFs with one extra click

Do you want to offer your guests something new with very little effort? You can add animated GIFs to your booth with just one extra click using the  Photo Booth Setup Wizard in DSLR Remote Pro.

DSLR Remote Pro and Webcam Photobooth include two kinds of animated GIFs: boomerang and slideshow. Boomerang GIFs are captured with a short video clip, and usually shared using social media or by email. Slideshow GIFs contain still photos taken during normal photobooth operation. These GIFs can also be shared. The same photos can be printed in a strip or other layouts.

This blog post explains how to create  simple boomerang GIFs using the Photo Booth Setup Wizard in DSLR Remote Pro. Webcam Photobooth works in a very similar way. You can customize your GIFs using the advanced settings.

You need DSLR Remote Pro 3.7, Webcam Photobooth 2.4 or a more recent release; a touchscreen, and your camera must support video. Customers with DSLR Remote Pro licenses issued before 22 February, 2016 also need to buy a DSLR Remote Pro upgrade license. Customers with Webcam Photobooth licenses issued before 17th May 2016 need to buy a Webcam Photobooth upgrade license.

1. Start DSLR Remote Pro. Select the Photobooth Setup Wizard.

DSLR Remote Pro 3.8 main screen showing Photobooth Setup Wizard button


2. At Step 3: Select the sharing and other options you need (B), then check the box to capture animated GIFs (C) . Choose any other options you need before clicking on <Finish> (D).


3. The next screen confirms that you have completed running the Setup Wizard. Close this to return to the main screen.

4. Connect your camera and switch it on before selecting ‘Start Photobooth’. That’s it!

DSLR Remote Pro 3.8 main screen showing Start Photobooth button


5. This is the default photo booth screen created by the Photo Booth Setup Wizard in DSLR Remote Pro 3.7.3 . Guests  switch between boomerang GIFs and still photos using the button in the top right corner.

6. You can choose whether guests share GIFs directly from the booth as shown here, or take time to browse and share them away from the booth with Breeze Kiosk (purchased separately).

7. The dinosaur chase at the top of this page shows what you can achieve just using the photobooth setup wizard.

You can modify the default settings to change the video length and playback speed;  add overlays and a title page to brand GIFs for each event. This example shows the same GIF overlaid with a simple border. The capture rate and image interval have also been altered to give a smoother result. Find out how to customize your own Boomerang GIFs .

7 December 2018: This post has been updated to show the new Photobooth Setup Screens in in DSLR Remote Pro 3.8

Copyright Breeze Systems Ltd 2017