
Continue reading How to shoot in Portrait with your Photo Booth
All posts by Sue Breeze

Using Breeze Booth for iPad (beta) Build 25
Update June 2020:The beta program was closed once Breeze Booth for iPad was released. Getting started with Breeze Booth for iPad
You will need an account with at least one active subscription or voucher to use Breeze Booth for iPad for unlimited photos. You can run Breeze Booth or iPad without signing in to an account but it will be limited to ten photos or GIFs per day before a watermark is added to the output. There is no charge to open the account. Use it to buy subscriptions and redeem vouchers to sign in your iPads.
Please see Creating an Account and Logging into the Web App for more information.
Download Breeze Booth for iPad from the App Store
The remainder of this post is just for those still using the old beta release of the App
What can I do with Breeze Booth for iPad?
New in build 25 …
- Simpler copying and cloning of events
- Ability to set event tokens on the iPad
- Update all events button on the iPad
- Refresh list of events button on the iPad
- Control App with external buttons, motion sensors, USB HIB etc using keyboard shortcuts
- Improved display quality for survey screens and keyboards
- Ability to include tokens in update server URL/Dropbox path
- Improvements to profiles: set up both initial and default profiles for an event, load profiles from menu 1 or menu 2
Build 20 added …
- Support for printing directly from the iPad using AirPrint
- Menu screens to select styles, mirroring, virtual props etc.
- Support for up to 10 different virtual props
- Ability to add logos and resize, rotate and position them in the print layout
- Updated sample events and assets

Your invitation
When you are accepted onto the program you will receive an invitation email from Apple TestFlight

Getting started
Your iPad needs to be running iOS 12.
Installation
Download TestFlight from the Apple App Store. You may need to click on Redeem (1) to show the apps you’re able to beta test. Select Breeze Booth for iPad and (2) INSTALL.
Note: Only check Redeem the first time you download the Breeze Booth for iPad beta. If you have previously downloaded an earlier build, just check UPDATE.

Once you have installed the App, you can open it:

Running Breeze Booth for iPad for the first time
Start the App
Tap the Breeze icon to start the App, then Events

Download the list of events from a server
The first time you run Breeze Booth for iPad the event list will be empty. You need to download events from a server to get started. We have set up a server with several demonstration events for you to download and try out. Tap Update all events in the lower right corner to download all the events from Breeze Systems server. (This may take several minutes. Get yourself a coffee instead of watching a YouTube video on the iPad during the download – if you leave the App the download will fail!)

After downloading the event list tap Close to return to the events screen. You should see a list of events:

The first event is called Designer and showcases many of the features included with Breeze Booth for iPad build 25. You are welcome to use this design at your own events, and customize it to meet your needs.
Please note: Designer sends emails via Breeze Hub. Emails from other sample events can be sent directly from the iPad. Portrait with survey and sharing will send emails either via Breeze Hub or direct from the iPad.
The remaining 8 events are much simpler designs intended to help you create your own designs.
Running an event
Now swipe right to left on any event and tap “Run” to run the event.

Sample Events

Take your first photos and explore the other events we have set up for you to try. (You will need to Exit the event and return to the Events screen to run other events)


Adjust camera settings
The new camera controls and digital zoom can be accessed from the home page or within an event:

Printing and transferring images to a Windows PC
- How to print and share photos using Breeze Hub
- How to edit and create your own events
Summary
Join the beta test program for Breeze Booth for iPad
You will be able to install Breeze Booth for iPad when you receive an email invitation to the email address for your Apple ID.
Breeze Booth for iPad events are defined in a powerful Windows based program called Breeze Booth Event Editor. This post uses a set of predefined ‘events’ that we have set up for you.
We have seen how to sync your iPad with a server containing sample events. First you download a list of events from the server, then all the detailed information you need to run an event.
Once you have taken some photos and animated GIFs on your iPad, download the Breeze Hub to a Windows PC so that you can synch your images to print and share them.
View and share the folders stored on the iPad
The iOS 12 Files app can be used to view the files used by Breeze Booth for iPad. You can share events and their associated photos by copying them to an iCloud or DropBox folder.
Tap Browse in the Files app, then On my iPad . You should see a folder named Breeze Booth.

Tap on the folder to open it and there will be two folders: assets which is where the event configuration is stored and photos where photos, animated GIFs and MP4 movies captured by Breeze Booth are stored.

Viewing images from an event on the iPad
By default Breeze Booth for iPad stores images in folders named by date.

Your feedback matters!
Please let us know what you think. You can either use the TestFlight feedback link below or ping an email to techsupport@breezesys.com

New beta versions
When a new beta is available you should receive a notification email and can install it by running TestFlight, selecting Breeze Booth for iPad and tapping “update”.
Breeze Booth Event Editor1.1
To customize and brand the app you also need
- A PC/laptop running Windows 10, Windows 8 or Windows 7
- A copy of the Breeze Booth Event Editor software
Download and install Breeze Booth Event Editor v1.1, Breeze Hub and sample events.
Breeze Booth for iPad has been developed by Chris Breeze, famous worldwide for his flexible, robust and powerful photo booth software.
Breeze plans to introduce many more new and exciting features over time. We welcome your feedback about potential features and any issues you experience. Please email your feedback to techsupport@breezesys.com
Each beta copy of Breeze Booth for iPad is a time limited version which will run for up to 90 days after it is issued. There is no charge to use this beta version of the program. You are welcome to use the app at events, but do so at your own risk
Thank you!
Chris and I are overwhelmed by your enthusiasm and appreciate the time loads of you are willing to spend testing this new product. We hope you will enjoy using it for many years.
Sue
© 2019 Breeze Systems Limited

DSLR Remote Pro Photobooth Setup Wizard
This post explains how to set up your booth with the Photobooth Setup Wizard in DSLR Remote Pro.
Note: This post was updated in November 2018 and shows DSLR Remote Pro 3.12
We recommend everyone from beginner to expert uses the Photobooth Setup Wizard as a start point for setting up a booth. The wizard also helps generate profiles quickly. This is a simple, speedy and safe way to generate a working system.
A more detailed description of the wizard can be found in the program help files.
This video shows how easy it is to prepare your system using the default settings:
Create a GIF/Photo booth in less than a minute
Now let’s run through how to customize your own booth using just the wizard.
The 3 Step Wizard in more detail
Select Photobooth Setup Wizard (1). First you will be prompted to save your current settings

Step 1
Step 1 simply asks you to name the folder (2) where your photo booth images will be stored. These ‘images’ are the set of screen designs and layout images you will use. (This is usually a subfolder for your PhotoBoothImages folder.) Press Next (3) to move on to Step 1.

Step 2
The second step is to define the screens used by guests to interact with the booth. Adjust the default settings to meet your needs.
Dropdown list to give guests choices (Photos/Boomerang GIF, Photos only, Boomerang GIFs only, Photo or video, Video only)

Single ready screen to choose from Photos or Animated GIFs

Choose Photos or Boomerang GIFs and check Single ready screen so that guests start the booth and choose between still photos and boomerang GIFs from a single screen (as in the video above)
Dropdown list to choose a predefined theme

You can create, load and save DSLR Remote Pro themes containing screen background, touchscreen button, and caption sets, or buy them from third parties.
Your themes may include localized sets of captions in a variety of languages. DSLR Remote Pro 3.12 is shipped with English, German, Polish, Italian and Romanian captions.
Button placement

Dropdown list to adjust live view

Changing the live view in the Wizard will automatically adjust the shape of images in both animated GIFs and prints created by DSLR Remote Pro 3.12.
Color of the background screens and text

Editing individual captions
Import complete captions sets using themes as above. Change (or remove) the text for individual captions using Edit captions:

Additional checkboxes

The first 5 check boxes highlighted in green tell the Wizard whether you are using a touchscreen, whether guests can choose between color and B&W prints, whether to display a preview of each photo after it is taken and the maximum number of prints allowed.

The next five check boxes tell the wizard whether a sharing screen (after the photos are taken) should offer uploads to guests Twitter* accounts, share photos by email or MMS/SMS, or offer optional printing.
Hint: some operators prefer to offer browsing and sharing from a kiosk separate to the booth. You can use Breeze Kiosk for this. To share and print photos away from the booth leave these boxes unchecked.
*Facebook No Longer Available
Please note: On 1st August 2018 Facebook withdrew the permissions required to upload photos from a desktop app in response to the Cambridge Analytica scandal. This means that it is no longer be possible to upload photos to Facebook directly from DSLR Remote Pro. Photos can be shared on Facebook by emailing or texting them to users where they will be able to share them using the Facebook app running on their own device. Alternatively upload the photos to a website or microsite and provide sharing links to allow users to share the photos on Facebook when they view the page on their device.
Inactivity timeout & use default settings

The inactivity timeout is useful if the photo booth is not in continuous use because it disables the live view display and puts the booth into standby mode. Disabling live view will allow the camera’s sensor to cool down to avoid possible overheating problems. The booth can be reactivated by touching the screen. To use the inactivity timeout, just set the number of seconds after which you want to put the booth into standby.
Select Use Default Settings to restore the default settings for the photo booth.
Next takes you to the third and final step (unless you chose only GIFs or video, in which case you skip Step 3).
Step 3

The wizard offers a choice of 8 popular layouts; if you want something different choose whichever is closest to your design (you will be able to change this using the Print Layout Editor later).
Running a GIF booth with animated GIFs and no printing is increasingly popular. The DSLR Remote Pro Wizard no longer asks you to select a printer when you offer only Boomerang GIFs or Video.
How to create your own Breeze themes
Customise your screens Customise your prints
Copyright Breeze Systems 2018

A rebrand for Breeze
2018 is quickly becoming a whirlwind for Breeze, but one that we’re very excited about.
With new products in the pipeline and enhancements being made to existing products, we can’t wait to share our 2018 updates with you.
For now, we just wanted to mention that we’re currently going through a full visual rebrand with Dan, Glen & Spadge; the awesome team at Simple as Milk
What does this mean for our customers?
This rebrand means that you will soon start to see pieces of our new identity pop up here and there throughout our website, social media and at Photo Booth Expo.
It will bring a much needed update to our visual brand, one which better reflects our identity as a company, our products, our technology and our future vision.
We can’t wait to share it with you.
Breeze

Shooting Square photos with Breeze DSLR Remote Pro 3.9
Check a single box in the Photobooth Setup Wizard to shoot and print square photos using Breeze DSLR Remote Pro 3.9.
Usually photo booth images are shot in ‘landscape’ mode; so that you can comfortably include several people in the shot. Sometimes we want to vary this.
Run the Photobooth Setup Wizard
Start DSLR Remote Pro and run the Photobooth Setup Wizard (1) to set up a basic booth, selecting a square live view (2) at Step 2. DSLR Remote Pro allows you to customize your booth setup without connecting the camera.

In this example I have chosen a single photo (3) at Step 3.

Customize the print layout

When you open the Print Layout Editor you will see that the print layout is square. Customize your print as usual.

Start the photo booth

The Photobooth Setup Wizard has cropped both the live view and print layout for you.

Square photos can be combined with filters to give a pop art effect, or used singly for a ‘polaroid’ look.

Ready for more? You can also create round (or any other shape) photos using a live view overlay and print overlay. You will need to create these overlays in an image editor such as Photoshop. The DSLR Remote Pro help files explain how to customize screens and prints in more detail.
Copyright Breeze Systems 2018

How to import print templates into Breeze DSLR Remote Pro
This post explains how to import readymade templates into Breeze DSLR Remote Pro 3.9.1. Webcam Photobooth 2.4 works in a smilar way.
I have used one of the free templates kindly provided by SMOVE as an example. Import your own templates in the same way.
There are two main ways to import layouts into DSLR Remote Pro.
- Drag and drop the template directly into DSLR Remote Pro (best for single templates).
- Copy the templates into your template folder, then import each template into DSLR Remote Pro using the Print Layout Editor when you need it (more effective for collections of templates).
First set up your printer
If necessary, download and install the printer drivers to your computer.
This example will import a 6” x 4” (15cm x 10cm) print layout. Before you start you need to load the printer with 6” by 4“media and set it to 300dpi.
Put the print template(s) into an accessible folder
Whether you download print layouts from a third-party website or copy them from another computer they need to be kept in folder(s) accessible to your booth computer.
In this post I will copy the template into the template folder on my PC. You may prefer to store templates in Dropbox or another cloud-based system accessible to multiple booths.
Download the photo booth layout and open zipped files
In this example I am using a 6” x4” template with a 1 +3 layout.

To copy this example on your own computer, download this template from the Breeze website at http://www.breezesys.com/Photobooth/templates6x4.php
Copy the templates to your templates folder
Copy the zipped file to another folder to unzip it. I have copied the file to my templates folder Sue Photobooth Print Templates which is in the same directory as my PhotoboothImages Folder.
Start DSLR Remote Pro and run the Photobooth Setup Wizard
At Step 3
1. Check the printer is set correctly.
2. Choose the print layout closest to the template you are using
3. Click on <Finish>

If you look at the Print Layout Editor now you will see the default 1 + 3 print layout. (Cancel to leave the Layout Editor).
Drag and drop into DSLR Remote Pro
DSLR Remote Pro allows you to drag and drop a print layout into the main screen or into the Print Layout Editor


You will be asked to confirm whether you want to import the template:

Select Yes and the Print Layout Editor will display the template you imported.

Customize and save the revised template
First save a backup copy of the original layout using Export Layout, then customize the layout to meet your needs. This post does not explain how to use the Print Layout Editor; you can find detailed instructions here. In this example I will change the caption.

The changes are shown immediately in the Print Layout Editor.
When you have finished customising the print layout, export the template to save it.

Alternative: Use the Print Layout Editor to import templates
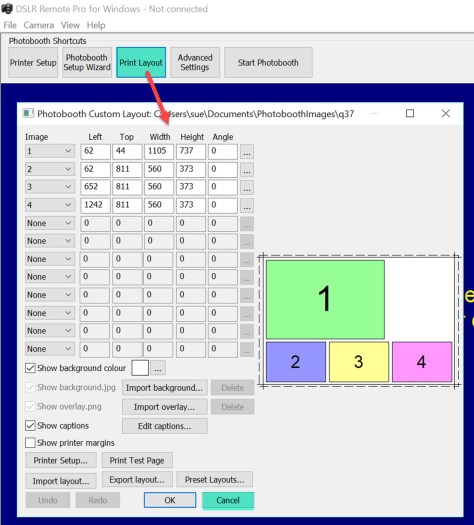
There is an alternative to dragging and dropping templates into DSLR Remote Pro. You can copy templates into a folder accessible to your booth, then import the template you need using the Import Layout (1) button in the Print Layout Editor.

(2) Select the folder containing your layout(s), and then the layout you want to import. (3) Click on OK to import the layout into the Print Layout Editor. You can edit and save the customized template as before.
Notes
Webcam Photobooth users need to select the “DSLR template compatibility” option at Step 3 of the Photobooth Setup Wizard to use templates designed for DSLR Remote Pro.

Zipped files: many templates are downloaded or copied as zipped (compressed) files, which need to be unzipped before they can be used. The example here uses a zipped file downloaded from the Breeze website.
Printer drivers: you may need to download and install drivers for your printer to the computer you are using.
Using a second computer to edit print layouts. You do not need to create and edit print layouts on the booth computer. Keep a copy of DSLR Remote Pro on an office computer to design, customize and edit your print layouts; export them from the program and either store them somewhere accessible to your booths, or copy the complete layouts to each booth computer.
Download DSLR Remote Pro and try this for yourself
Copyright Breeze Systems Ltd 2018

Breeze Workshops & Seminar at Photo Booth Expo 2018
Do you want to learn how to run Multi-Camera activations or become a DSLR Remote Pro Ninja? Chris is running two premium workshops at Photo Booth Expo 2018 this year. These are small classes with lots of opportunities for interaction and questions.
Please note an additional charge is made for premium workshops.
Multi-Camera Arrays Tuesday March 13 (9:00 – 10:30am)
Chris has a unparalled worldwide reputation in multi-camera arrays. DSLR Remote Pro Multi-Camera has been used in block buster movies, the video games industry and high-profile activations for more than 10 years. Multi-camera activations are increasingly popular at events, and attract premium prices.
The multi-camera workshop has just 20 places. Don’t miss this amazing opportunity to learn from Chris
- What you can do with a camera array
- Five, fifteen or ninety five cameras?
- Choosing equipment and triggering the cameras
- Time it right – syncing with flash
- How to create animated GIFs and MP4 movies from your images
- Sharing your GIFs and movies
- Providing printed take-aways
This workshop sold out last year – secure your place now!
DSLR Remote Pro Wednesday March 14 (9:00 – 10:30am)
This popular workshop explains how to get more from your booth with DSLR Remote Pro, and includes
- Letting the Setup Wizard do the hard work
- Branding your screens
- Customizing prints
- Using Profiles to offer choices
- Boomerang GIFs – basics, branding, animated overlays
- Effects and filters using Photoshop Droplets
There are just 25 places. Book early to be sure of yours!
Light Painting seminar Monday March 14 (1:00 – 2:00pm)
Chris will be giving a light painting seminar open to all key pass holders.
Breeze at the PBX trade show
Check out the new Breeze Booth for Ipad, the latest features of DSLR Remote Pro and DSLR Remote Pro Multi-Camera in action at Booth 923 during Trade Show hours. We are looking forward to meeting you!
Copyright Breeze Systems Ltd 2018. Breeze Systems is not responsible for the content of external sites.
Free print templates for DSLR Remote Pro and Webcam Photobooth
A big thank you to Tomasz Klusczyk of SMOVE, who has generously shared a set of print layouts for Breeze owners to use with DSLR Remote Pro, Hotfolder and Webcam Photobooth.
Download SMOVE 6”x4” (15cm x 10cm) print templates
Download SMOVE 6”x8” (15cm x 20cm) print templates
Note: Webcam Photobooth users need to select the “DSLR template compatibility” option at Step 3 of the Photobooth Setup Wizard to use these templates:

Find out more
- How to import print templates into DSLR Remote Pro
- How to import print templates into Webcam Photobooth
- How to import print templates into Hotfolder Prints
Download DSLR Remote Pro, Hotfolder and Webcam Photobooth

SMOVE is a Polish photo booth vendor who design and sell photo booths powered by DSLR Remote Pro thoughout Europe.
Copyright Breeze Systems Ltd 2018. Breeze Systems is not responsible for the content of external sites

DSLR Remote Pro 3.9 released: ‘I’ve fallen in love with Breeze again’
DSLR Remote Pro 3.9 – can you resist?
I’ve fallen in love with Breeze again
PBPI delegates last month enthused about a pre-release version of the program. One even exclaimed “I’ve fallen in love with Breeze again”. I am delighted to announce the release of DSLR Remote Pro 3.9 on Valentine’s Day.
What’s new?
- Improvements to the Photobooth Setup Wizard
- Animated GIFs with soundtrack
- Extra branding/ logo overlay for animated GIFs
- Faster, higher quality green screen processing
- Fix for issue with complex HTML emails
DSLR Remote Pro 3.9 supports most Canon DSLR cameras and runs on Windows 10, 8 and 7. This release is a free upgrade for all registered users who purchased a license on or after 15th February 2017. Customers with an older DSLR Remote Pro license (and any NKRemote license holder) can buy an upgrade license to use this release.
Download and try DSLR Remote Pro 3.9
Buy full license * Buy upgrade license
Easier setup – improvements to Photobooth Setup Wizard for everyone
We recommend everyone from Breeze Newbies to Ninjas uses the Photobooth Setup Wizard as a start point for setting up a booth. This is a simple, speedy and safe way to generate a working system which you can customize to your heart’s content (or spend the time you saved doing something even nicer).

Chris has improved the flow of the Wizard, making it a piece of cake to build a system offering guests choices (such as Photos or GIF), and run the booth with square or full screen live view as an alternative to normal landscape images.
New dropdown list to give guests choices (Photos/Boomerang GIF, Photos only, Boomerang GIFs only, Photo or video, Video only)
New dropdown list to adjust live view

Use the setup wizard to customize the live view. Changing the live view in the Wizard will automatically adjust the animated GIFs and prints created by DSLR Remote Pro 3.9.
New improved ready screen to choose from Photos or Animated GIFs
Choose Photos or Boomerang GIFs and check Single ready screen so that guests start the booth and choose between still photos and boomerang GIFs from a single screen as here:

Shoot and share without printing
Running a ‘shoot and share’ booth with animated GIFs and no printing is increasingly popular. The DSLR Remote Pro 3.9 Wizard no longer asks you to select a printer when you offer only Boomerang GIFs or Video.
New animated GIFs with audio
You can now add an optional soundtrack to the MP4 copy of your animated GIFs. Learn more
Enhanced animated GIF branding with additional overlay
New: add a second overlay to animated GIFs with branding & logo. The additional overlay is an easy way to brand animated GIFs you have created yourself or sourced from third parties. Learn more
Greenscreen processing – higher quality and faster
Print higher quality green screened images more quickly. DSLR Remote Pro 3.9 green screen algorithms have been rewritten to be both faster and produce higher quality results. Greenscreen photobooth
DSLR Remote Pro 3.9 – Try it today!
Copyright Breeze Systems Ltd 2018. Breeze Systems is not responsible for the content of external sites.

7 Steps to Simple Booth Operation
How to make life easier for your booth attendants, and protect the settings you don’t want changed in 7 simple steps.
- Start the booth as soon as DSLR Remote Pro is started
- Hide the camera controls on the main screen
- Hide or reveal the large Photobooth Shortcut buttons
- Choose which Photobooth Shortcut buttons are shown on the main screen
- Change the wording of the Photobooth shortcut buttons
- Password protect or lockdown the Advanced Settings and Photobooth Setup Wizard
- Create your own shortcut buttons to run specific profiles
This post has been written for DSLR Remote Pro 3.8.1.
Start the booth when DSLR Remote Pro is started and the camera connected
To start the Photobooth running as soon as DSLR Remote Pro is started and the camera connected and switched on, select Advanced Settings then check the box Start full screen photobooth automatically ….

Hide the camera controls on the main screen
DSLR Remote Pro allows you to control the camera from your PC. You can find these settings on the left of the main screen (highlighted in green below).

To hide these settings select View then uncheck Show Camera Controls:

The main screen will no longer show the camera settings:

Hide or reveal the large Photobooth Shortcut buttons
The large buttons at the top of the main screen (highlighted in green below) are called Photobooth Shortcut buttons. They are quick ways to control your booth.

To hide or reveal these buttons select View then check or uncheck Photobooth Shortcuts


Choose which Photobooth Shortcut buttons are shown on the main screen
If necessary show the Photobooth Shortcut buttons as above.

Select View then Photobooth Shortcuts Settings to see the Photobooth Shortcut Setp Screen

The standard buttons are highlighted in green above. Check or uncheck any of these buttons to change the Shortcut buttons on the main screen. In this example the operator will only see buttons to start the booth and access the Print Layout Editor (which lets them make changes to the Print Layout)

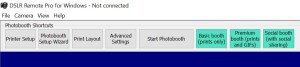
You can display any combination of the following standard Shortcut buttons in DSLR Remote Pro 3.8.1
- Printer Setup
- Edit QR code
- Photobooth Setup Wizard
- Print Layout
- Advanced Settings
- Event Info
- Videobooth Settings
- Reprint Photobooth Photo
- Start Photobooth
- Take Test Photo
- Camera Settings
The default set of five buttons are shown in red in this list.
Change the wording of the Photobooth Shortcut buttons (great for localization)
Select View then Photobooth Shortcuts Settings to see the Photobooth Shortcut Setp Screen.

1. Edit the text of any button; here Start Photobooth has been changed to Go!
2. You can also change the size of the buttons
3. Press OK to save the new settings before leaving this screen.

Password protect or lockdown the settings
You can prevent unauthorized access to the Advanced Settings and Photobooth Setup Wizard using Lockdown.
Select view then Lockdown mode..

Enter a password and press OK to save it.

Lockdown prevents unauthorised access to the Advanced Settings and Photobooth Setup Wizard. Operators will still be able to alter the print layout if necessary during an event.
Note: The lockdown password can be reset if necessary. Contact support@breezesys.com for details.
Create your own Shortcut buttons to run specific profiles
Profiles are a powerful tool in Breeze software; they are often used to offer guests choices. You can also use profiles to give the operator a menu of common ways to set the booth up, which are tailored to your business model. Profile 1 might be a basic booth with simple prints; Profile 2 a choice of prints or animated GIFs, Profile 3 prints and GIFs with social sharing. See this post for an introduction to profiles
This section explains how to link profiles you have already created to Shortcut buttons. It does not explain how to create profiles.
Select View then Photobooth Shortcuts Settings to return to the Photobooth Shortcut Setup Screen

Check the buttons for each profile you want to use (1), and customise the text for each button (2).

When you have finished, press OK (3) to return to the main screen.
The new buttons for each profile are shown highlighted in green.
Download DSLR Remote Pro to try for yourself.
Thank you for taking the time to read this post. If you found it helpful; please share the post with others.
Copyright Breeze Systems Ltd 2018.
You must be logged in to post a comment.