Category Archives: Screens

Build your own iPad events with Event Editor 1.1

Update June 2020: This post is out of date. Please see Getting started with Breeze Booth for iPad

This post explains how to create and edit your own  events for Breeze Booth for iPad using the Breeze Booth Event Editor 1.1 on a Windows PC, and covers

  • what’s new in this release
  • first steps : how to download, install and run the Event Editor on your PC
  • loading events into the event editor
  • cloning an event as a start point for a custom design
  • portrait and landscape events
  • editing an event
  • transferring events to your iPad(s)

Breeze Booth Event Editor v1.1 works with Breeze Booth for iPad beta build 25, and was released on February 16th, 2019

Introduction

The Breeze Booth Event Editor is a powerful Windows based program which can be used to create and edit events for Breeze Booth for iPad.

Do join the beta program and explore Breeze Booth for iPad before using the editor. Play with ‘Designer‘ (the first event) to get a feel for what you can achieve with Breeze Booth for iPad.

New in this release…

Easier editing – you will find it much simpler to load events into the Editor, copy them and save your work.

  • Simpler cloning of events
  • Ability to import events from elsewhere
  • Improved event format
  • Simpler manifest regeneration

Chris has also added the ability to set up both initial and default profiles for an event, & load profiles from menu 1 or menu 2

Download and install Breeze Booth Event Editor & sample events

Event Editor runs on a Windows 10, 8 or 7 computer. Download it from here.

You will also automatically download Breeze Hub and the designs  for nine  sample events. When you install the event  editor, these events will automatically be saved in your Documents folder C:\Users\…\Documents\Breeze Booth for iPad\events

The Breeze Booth Event Editor installer has created this folder of sample events. C:\Users\sue\Documents\Breeze Booth for iPad\events

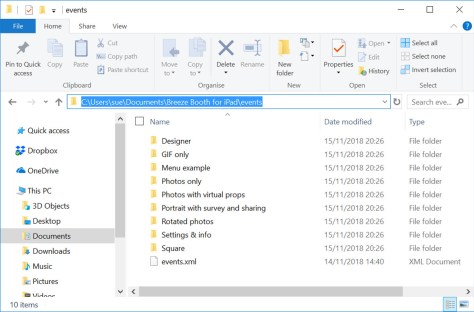
There is a sub-folder for each sample  event, and a file called events.xml which you need to open in the Event Editor:

Run Breeze Booth Event Editor

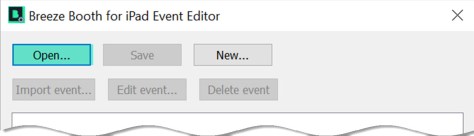
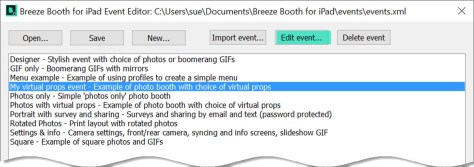
Start the Event Editor, and select Open.

Starting Breeze Booth Event Editor 1.1 for the first time

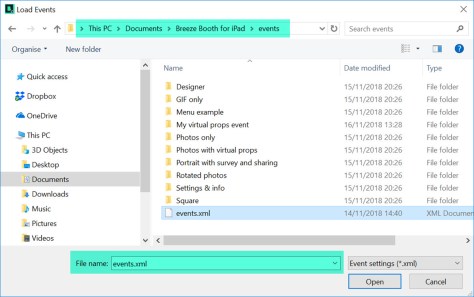
Load the list of existing events by selecting events.xml in C:\Users\…\Documents\Breeze Booth for iPad\events

Select events.xml to load the list of events into Breeze Booth Event Editor

Initial list of sample events displayed in BBEE

List of sample events loaded into Breeze Booth Event Editor 1.1(This list was created from the events.xml file we opened)

The first event is called Designer and showcases many of the features included with Breeze Booth for iPad.  You are welcome to use this design (or parts of it) with Breeze Booth for iPad at your own events.

The remaining 8 events are much simpler. They are intended to help you create your own designs.

This post will show you how to copy one of these simple events (Photos with virtual props) and edit it for your own use.

Photos with virtual props takes one photo and shares it on a custom background. Guests choose between 3 virtual props. They can also choose whether to shoot in color, B&W, sepia, comic effect or using a filter. The photo can be shared by email .

Cloning ‘Photos with virtual props’

Right click on Photos with virtual props and select Clone Event…

Right click on an event to clone it

You can change the name, description and folder name of the new event:
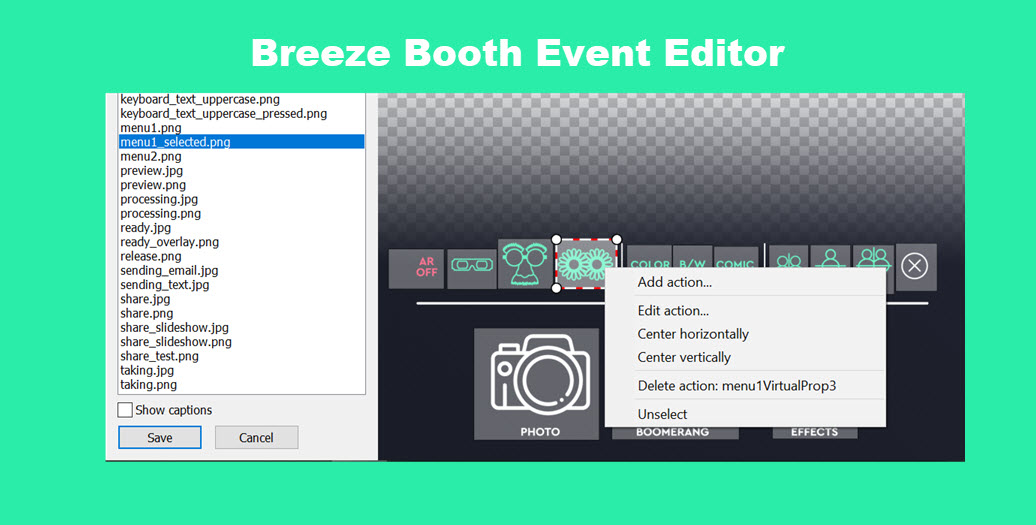
This slideshow requires JavaScript.

Editing an event

Portrait, landscape or both?

Breeze Booth for iPad lets guests switch between portrait and landscape orientation on the fly (great for roaming booths like the Ring Roamer).  My virtual props event can  be used in both portrait and landscape orientation, so has designs for both.

If you will always run an event in the same orientation, you don’t need to create both designs.

Open My virtual props

Select My virtual props… and check Edit event…

We will just edit the portrait version of My virtual props event today. Click on the portrait  Edit button:

This brings us to the Photo Booth Settings screen, where you can start to customize your design

Tabs on Photo Booth Settings screen (Breeze Both for iPad build 20)

The original Photos with virtual props takes one photo and shares it on a colored background with a custom logo. Guests choose between 3 virtual props. They can also choose whether to shoot in color, B&W, sepia, comic effect or using a filter. The photo can be shared by email .

We are going to change My virtual props event to

  • take 2 square photos
  • remove the branded background print layout
  • add a new background color, 2 logos* and a caption to the print layout
  • create a slideshow GIF from the 2 photos
  • customize the wording of the email
  • share the slideshow GIF instead of the print layout

*You can add up to 5 different png or jpg logos to each print layout in addition to the background and overlay. This is a simple way of branding a design for a particular event, and can also be used as a quick way to add an image of the bride and groom (taken earlier in the day) to wedding photo booths.

Photo Booth Settings Screen

The Photo Booth Settings Screen is displayed for the profile you selected.  It has 5 tabs : General, Photos, Slideshow GIFs, Burst GIFs, and Share. You can access powerful editors  to design your screens, prints and GIFs from these settings.

Photo Booth Settings – General tab

11) Change the aspect ratio of the photos to square

Breeze booth Event Editor Phoot Booth Settings General tab
Changing the photo aspect ratio to square (Breeze booth Event Editor)

You can find a full list of Breeze Booth for iPad screens here

Photo Booth Settings – Photos tab

12) Change the number of photos to 2

13) Change the countdown text color to black

14) Open the Print Layout Editor
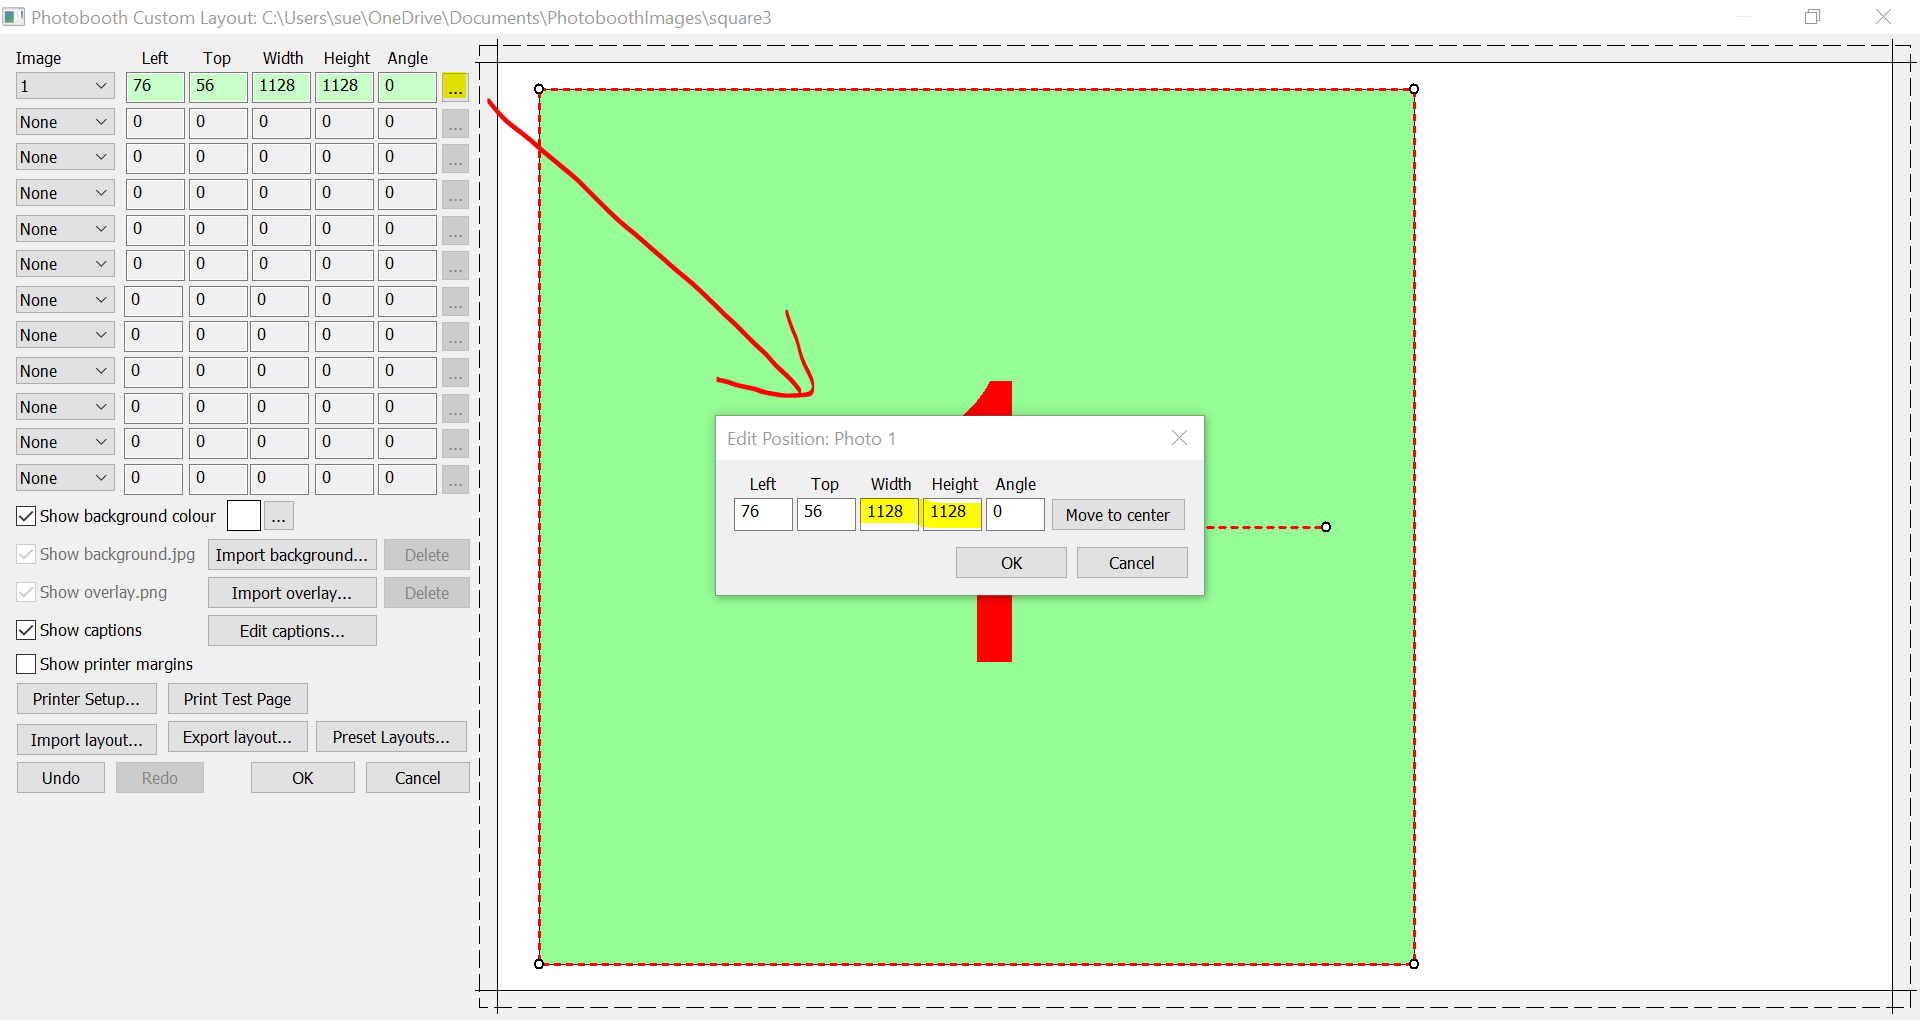
Breeze Booth Event Editor Photo Booth Settings Photos tab
Changing the number of photos, color of countdown text and opening the Print Layout editor in Breeze Booth Event Editor

Print Layout Editor

Use the Print layout editor to customize your prints. In the slideshow below I will:

15) Remove the branded background

16) Add a new background color to the print

17) Change the printed photo to a square

18) Right click on the background to add the second photo

19) Resize and reposition the two photos

20) Add the two logos

21) Right click on the background to add a caption, then right click again to edit it

22) Save my changes

Note: You can add up to 5 different JPG or PNG logos to a print

This slideshow requires JavaScript.

Photo Booth Settings – Slideshow GIFs tab

Check Create animated GIF,... to create an animated GIF from the two photos

Breeze Booth Event Editor Photo Booth Settings Slideshow GIFs tab
Creating a slideshow GIF from the photos

Photo Booth Settings – Share tab

23) Check Share slideshow first to share the GIF instead of a print layout

24) Open the slideshow email editor to customize the message

Breeze Botoh for iPad Photo Booth Settings Share tab
Telling Breeze Booth for iPad to share the slideshow GIF


Breeze Booth Event Editor altering email content
Breeze Booth Event Editor email editor for slideshow GIFs

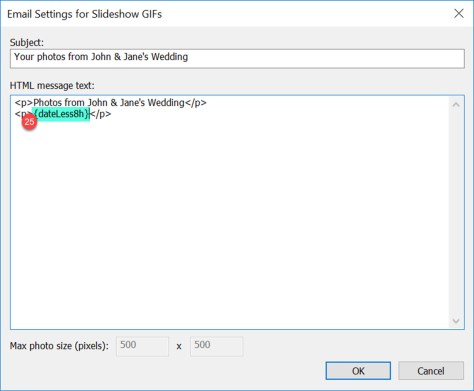
Change the subject and email text. You can use Breeze tokens (25) in emails

Before you leave the event editor….

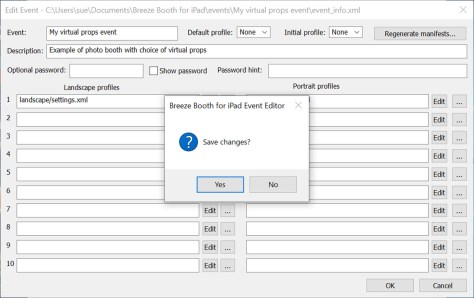
When you have finished editing the event, check OK to save all your changes.

Add an extra countdown GIF and sharing screen to the asset folder

The new event includes has two photos instead of one so we need a second countdown GIF 2.gif . We also need a screen called share_slideshow.jpg to share the new slideshow GIF.

I have copied the existing 1.gif and share.jpg screens to 2.gif and share_slideshow.jpg in C:\Users\sue\Documents\Breeze Booth for iPad\events\My virtual props event\portrait

Content of C:\Users\sue\Documents\Breeze Booth for iPad\events\My virtual props event\portrait
C:\Users\sue\Documents\Breeze Booth for iPad\events\My virtual props event\portrait showing 2.gif and share_slideshow.jpg

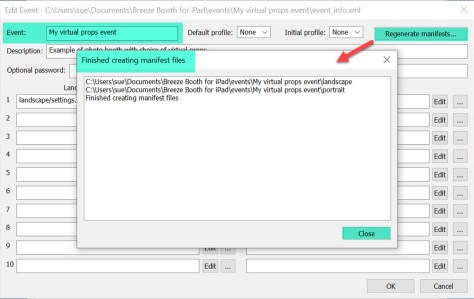
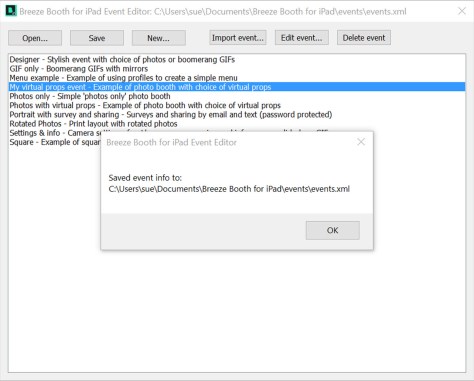
When you make any changes to this folder you must also go back to the Breeze Booth Event Editor, open the event and regenerate the manifests

Closing the Event Editor

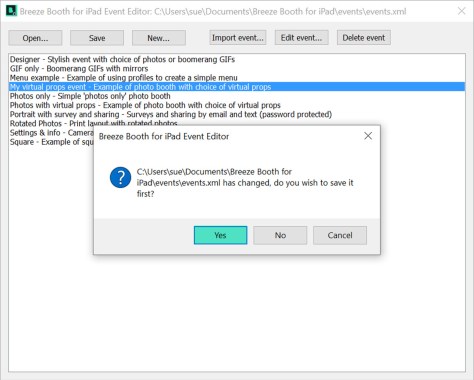
If you make any changes to your events, the Event Editor will prompt you to save changes to your events.xml folder. It is important that you select Yes to save the changes you have made and update the manifest.

Copying events from a PC to your iPads

There are currently 3 ways to copy events from your PC to an iPad:

Method 1: Sync via Dropbox

This is covered in a separate post Syncing events with Dropbox

Method 2: Sync via a secure https web server

Upload the events folder to a folder on a web server, then go the to the settings screen in Breeze Booth for Ipad and edit the URL for the sync server to point to this folder. Then use the events screen in Breeze Booth for iPad to sync the events.
Important: This method can only be used with secure servers that have https e.g. https://breezesys.com. It will not work with http URLs.
Sample events are available by setting the sync server to https://bb4ipad.com/sync in the iPad’s app settings.

Method 3: Copy the files via iCloud

Copy the event folder to a folder on iCloud that is visible on the iPad. Then use the Files app to copy the files to Breeze Booth for iPad’s assets folder.

Printing your photos

You can print using AirPrint or Breeze Hub

Breeze Booth for iPad Settings screen
Using AirPrint to print directly from Breeze Booth for iPad

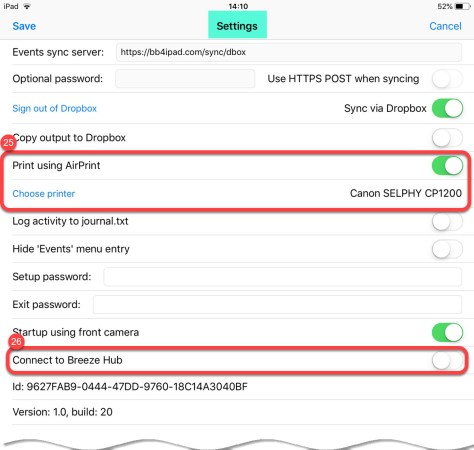
25) To print directly from the iPad connect up your printer ( which must support AirPrint) and choose Print using Airprint on the Breeze Booth for iPad Settings screen

26) To print using a Windows PC you need Breeze Hub.  Choose Connect to Breeze Hub on the Breeze Booth or iPad Settings screen

Summary

This post has taken you through downloading and installing both the Breeze Booth Event Editor and a set of sample events onto a Windows PC.  I have also shown how to create your own event based on one of the samples provided by Breeze, and outlined ways to transfer new and updated events to your iPads. Finally there are short notes about printing using Airprint and a Windows PC.

If you found this post useful please share it with others.

Thanks,

Sue

© Breeze Systems 2019


How to brand and animate Breeze welcome screens

This post explains how to add a custom attraction or standby screen to  DSLR Remote Pro. Breeze calls this a welcome screen.

Use your welcome screen to attract people to your booth, as a quick method of branding, and to protect your camera*. The welcome screen can be a still image, animated GIF or video. You can add sound to attract people’s attention.

*Running live view for long periods drains battery power and can cause the camera’s sensor to heat up. If the photo booth is idle Breeze  automatically cancels the live view and displays the welcome screen.

This post shows how to replace the standard welcome screen with a movie or your own still image. You can customize Webcam Photobooth in the same way.

Breeze Multi-Camera has a similar screen called standby.jpg which can be customized and animated in a similar way.

Note: This post was updated in September 2019 to make it clearer that you need to set the inactivity timeout value

Get started

You can use the photo booth setup wizard to create a working set of screens for your booth.

Default screen set created by the photo booth setup wizard, showing the initial attraction screen welcome.jpg (DSLR Remote Pro 3.11.4)

Add a custom welcome screen

Rename the original welcome.jpg in case you want to use it again. (Mine is called welcome-old.jpg.)

Copy your new image into the same folder, and call it welcome.jpg To fill the screen, make the new image the same size in pixels as the image it replaces.

Shows PhotoBoothImages folder with custom welcome.jpg in DSLR Remote Pro 3.11.4
Paste a new welcome.jpg into your PhotoBoothImages folder. This should be the same size (in pixels) as the original (DSLR Remote Pro 3.11.4)

Inactivity timer

To control how long the booth waits before going into standby mode and displaying the welcome screen, adjust the inactivity timer. Go to Advanced Settings, and set the number of seconds you want to wait until the booth goes into standby mode:

Shows how to set the inactivity time in DSLR Remote Pro 3.11.4
Setting the inactivity time in DSLR Remote Pro 3.11.4

Run the booth, wait a while for it to go into idle mode and your welcome screen will be displayed.

Add a welcome screen with a movie

Add your movie to the PhotoBoothImages folder and name it welcome_loop.mp4 if you want the movie to loop, or welcome.mp4 to run it just once.

Note: You need both the background image ( welcome.jpg) as well as the animation in the PhotoboothImages folder. The background image is often plain black (mirror booths) or a copy of the first frame of your movie. It may appear briefly before the animation starts running.

PhotoBoothImages folder with attraction movie
Here a movie called welcome_loop.mp4 has been added to the PhotoBoothImages folder (DSLR Remote Pro 3.11.4)

That’s it! Start DSLR Remote Pro and check everything is working. You will need to wait for the inactivity timer to kick in before you see your video.

Finer details

What happens if my video is smaller than the screen?

If your video is smaller than your screen, it will be displayed in the center of the screen with your welcome.jpg behind it:

Showing video small than screen in Breeze DSLR Remote Pro 3.11.4
Here the attraction video is smaller than the screen (DSLR Remote Pro 3.11.4)

Can I add GIFs, sound and .MOV movies?

Yes. See the program help files for details

Can I customize the other screens in my booth?

Yes, you can customize most other screens in the same way. Replace the original screen in your PhotoBoothImages folder with another still (.jpg), add a movie (.mp4 or .mov) or GIF file with the same name. For more details, see

Does this work for magic mirrors?

Yes. To add animations and sound to magic mirrors include them in your PhotoBoothImages folder in the same way.

Where can I find animations for my booth/mirror?

There are lots of sources of animations on the web. These are some of the vendors who offer animations and complete Breeze themes for photo booths and mirrors

The movie used here was sourced from Text in Motion , who add your text to their own videos. (Thanks Bob Hajvert for spotting this supplier.)

Breeze Systems is not responsible for the content of external sites.

© Breeze Systems October 2018

Introducing Breeze Kiosk – our flexible sharing software

Have you tried Breeze Kiosk recently? This post outlines ways you can use our flexible and economical sharing software at corporate and social events.

Breeze Kiosk runs on Windows. You can use it to share and print images from Breeze photo booth programs DSLR Remote Pro, Webcam Photobooth and Breeze Booth for iPad.

You can also use Breeze Kiosk with still (JPEG) and animated (GIF, MP4 or MOV) images captured by other software.

How can I use Breeze Kiosk?

  • Run one or multiple image sharing stations at events
  • Display still images, animated GIFs and movies on a low powered Windows tablet/PC
  • Improve guest throughput by moving print and sharing options away from booth
  • Update display with new images as they are created
  • Use tokens to identify the folder being monitored (includes date and time tokens, event name/strings shared with DSLR Remote Pro)
  • Allow guests to browse, share and print images at their leisure
  • Offer immediate sharing via social media, email & cell phone
  • Offer offline sharing via email and cell phone
  • Collect guest data
  • Print high quality images quickly
  • Generate interest with slideshow while kiosk idle
  • Display promotional material during slideshow

Display

  • Brand and customize the display for corporate and themed events (including sharing & print options, background, buttons, keyboard, scrollbar, images)
  • Support for both still (JPEG) and animated (GIF, MP4 or MOV) images
  • Automatic refresh with new images from photo booth or another source
  • Suitable for white label events
  • Operator can delete & remove images

Screen shot from Breeze Kiosk 1.4.4
Breeze Kiosk adapted for a themed event. Custom background, icons, scroll bar & text color (Breeze Kiosk 1.4.4)

Sharing

  • Support for still images, animated GIFs and movies
  • Immediate sharing to email, cell phone, Facebook & Twitter (Internet access needed)
  • Delayed sharing to email +/or cell phone (useful when no, slow or unreliable Internet access)

guests at a party looking at cell phone

Sharing options include

  • Capture of email address, cell phone number, Facebook and Twitter names
  • Opt-in, pre-checked, optional or mandatory  consent to Terms & Conditions
  • Shared images can have different format to those displayed
  • Privacy mode – access limited to own images
  • Custom messages

Breeze Kiosk email entry screen with check box for guest consent. Consent can be recorded in a csv file against the image and email address entered.

Printing

  • Guests browse and print images
  • Print friendly versions of animated GIFs

Print options include

  • Pay to print
  • Email collection
  • Opt-in checkbox for agreement to terms & conditions before sharing/printing
  • Privacy mode – access limited to own images
  • Print counter


Slideshow

  • Supports still images, animated GIFs and movies
  • Automatically updated with new images
  • Branding and customization

Slideshow options include

  • Operator controlled removal of unwanted images
  • Choice of transitions
  • Still adverts
  • Animated GIF and movie-based adverts

Showing how to add advertisments in Breeze Kiosk.
A selection of adverts may be displayed during the slideshow. These can be still images, movies or animated GIFs. Breeze Kiosk 1.4.4

What’s new in Breeze Kiosk 1.4.4?

Breeze Kiosk 1.4.4 introduced the following enhancements:

  • New “auto bleed” option when printing
  • Animated GIF and movie (MP4) adverts displayed in slideshow mode  as well as JPEG still images
  • New option to save XML copies of emails and texts

What will Breeze Kiosk cost?

Each Breeze Kiosk license costs just US $150 for a lifetime license & one year’s free upgrades. For this great price you can run one kiosk and have a second backup/office copy of the program.

If you buy Breeze Kiosk at the same time as DSLR Remote Pro or Hotfolder Prints it costs just US $100 .

Breeze Kiosk 1.4.4 is a free upgrade for all registered users who purchased a license on or after 15th April 2017. Customers with an older Breeze Kiosk license can buy an upgrade license for just US $75 to use this release.

Prices quoted are correct at 25th May 2018, and are valid for online sales from our website. They exclude any tax due.

How to get your hands on it

Download Breeze Kiosk and try it for yourself for up to 14 days before buying a license.

Download and try Breeze Kiosk 1.4.4

Buy full license   Buy upgrade license


Shooting Square photos with Breeze DSLR Remote Pro 3.9

Check a single box in the Photobooth Setup Wizard to shoot and print square photos using Breeze DSLR Remote Pro 3.9.

Usually photo booth images are shot in ‘landscape’ mode; so that you can comfortably include several people in the shot. Sometimes we want to vary this.

Run the Photobooth Setup Wizard

Start DSLR Remote Pro and run the Photobooth Setup Wizard (1) to set up a basic booth, selecting a square live view (2) at Step 2.  DSLR Remote Pro allows you to customize your booth setup without connecting the camera.

Selecting square live view using the Photobooth setup Wizard: DSLR Remote Pro 3.9.1

In this example I have chosen a single photo (3) at Step 3.

Photoboth Setup Wizard: selecting a singe lphoto DSLR Remote Pro 3.9.1
Photoboth Setup Wizard: selecting a single photo DSLR Remote Pro 3.9.1

Customize the print layout

Print Layout Editor button DSLR Remote Pro 3.9.1 main screen
Opening the Print Layout Editor DSLR Remote Pro 3.9.1

When you open the Print Layout Editor you will see that the print layout is square. Customize your print as usual.

Shows DSLR Remote Pro 3.9.1 Print Layout Editor with single square print
Square Photo layout in Print Layout Editor DSLR Remote Pro 3.9.1

Start the photo booth

Select Start Photobooth to run the booth DSLR Remote Pro 3.9.1

The Photobooth Setup Wizard has cropped both the live view and print layout for you.

Default ready screen for square photo DSLR Remote Pro 391.jpg

Square photos can be combined with filters to give a pop art effect, or used singly for a ‘polaroid’ look.

Ready for more? You can also create round (or any other shape) photos using  a live view overlay and print overlay. You will need to create these overlays in an image editor such as Photoshop. The DSLR Remote Pro help files explain how to customize screens and prints in more detail.

Copyright Breeze Systems 2018

7 Steps to Simple Booth Operation

How to make life easier for your booth attendants, and protect the  settings you don’t want changed in 7 simple steps.

  1. Start the booth as soon as DSLR Remote Pro is started
  2. Hide the camera controls on the main screen
  3. Hide or reveal the large Photobooth Shortcut buttons
  4. Choose which Photobooth Shortcut buttons are shown on the main screen
  5. Change the wording of the Photobooth shortcut buttons
  6. Password protect or lockdown the Advanced Settings and Photobooth Setup Wizard
  7. Create your own shortcut buttons to run specific profiles

This post has been written for DSLR Remote Pro 3.8.1.

Start the booth when DSLR Remote Pro is started and the camera connected

To start the Photobooth running as soon as DSLR Remote Pro is started and the camera connected and switched on, select Advanced Settings then check the box Start full screen photobooth automatically ….

Advanced settings screen showing how to start the booth automatically DSLR Remote Pro 3.8.1
Starting the photobooth when the camera is connected DSLR Remote Pro 3.8.1

Hide the camera controls on the main screen

DSLR Remote Pro allows you to control the camera from your PC. You can find these settings on the left of the main screen (highlighted in green below).

Shows DSLR Remote Pro 3.8.1 main screen with camera settings highlighted
DSLR Remote Pro 3.8.1 main screen with camera settings highlighted

To hide these settings select View then uncheck Show Camera Controls:

How to hide the camera controls in DSLR Remote Pro 3.8.1
To hide the camera controls at the left of the screen select View then uncheck Show Camera Controls (DSLR Remote Pro 3.8.1)

The main screen will no longer show the camera settings:

Shows main screen of DSLR Remote Pro 3.8.1 with camera controls hidden
Main screen DSLR Remote Pro 3.8.1 with camera controls hidden

Hide or reveal the large Photobooth Shortcut buttons

The large buttons at the top of the main screen (highlighted in green below) are called Photobooth Shortcut buttons. They are quick ways to control your booth.

Showing Photobooth Shortcut buttons DSLR Remote Pro 3.8.1 main screen
Default Photobooth Shortcut buttons DSLR Remote Pro 3.8.1

To hide or reveal these buttons select View then check or uncheck Photobooth Shortcuts

Shows how to hide or reveal Photobooth Shortcut buttons DSLR Remote Pro 3.8.1
To hide or show the Photobooth Shortcut buttons at the top of the screen select View then (un)check Photobooth Shortcuts (DSLR Remote Pro 3.8.1)

Shows DSLR Remote Pro 3.8.1 main screen with Photobooth Shortcut buttons and camera controls hidden
Main screen with both Photobooth Shortcut buttons and camera controls hidden DSLR Remote Pro 3.8.1

Choose which Photobooth Shortcut buttons are shown on the main screen

If necessary show the Photobooth Shortcut buttons as above.

Select View then Photobooth Shortcuts Settings to see the Photobooth Shortcut Setp Screen

Shows the Photobooth Shortcut Setting window DSLR Remote Pro 3.8.1
Photobooth Shortcut Setting window DSLR Remote Pro 3.8.1

The standard buttons are highlighted in green above. Check or uncheck any of these buttons to change the Shortcut buttons on the main screen. In this example the operator will only see buttons to start the booth and access the Print Layout Editor (which lets them make changes to the Print Layout)

Shows DSLR Remote Pro 3.8.1 main screen with 2 Photobooth Shortcut buttons
Photobooth Shortcut buttons limited to 2 choices DSLR Remote Pro 3.8.1

You can display any combination of the following standard Shortcut buttons in DSLR Remote Pro 3.8.1

  • Printer Setup
  • Edit QR code
  • Photobooth Setup Wizard
  • Print Layout
  • Advanced Settings
  • Event Info
  • Videobooth Settings
  • Reprint Photobooth Photo
  • Start Photobooth
  • Take Test Photo
  • Camera Settings

The default set of five buttons are shown in red in this list.

Change the wording of the Photobooth Shortcut buttons (great for localization)

Select View then Photobooth Shortcuts Settings to see the Photobooth Shortcut Setp Screen.

Shows the DSLR Remote Pro 3.8.1 Photobooth Shortcut Buttons scree
Photobooth Shortcut Buttons screen DSLR Remote Pro 3.8.1. Shows where to change the text and size of buttons.

1. Edit the text of any button; here Start Photobooth has been changed to Go!

2. You can also change the size of the buttons

3. Press OK to save the new settings before leaving this screen.

DLSR Remote Pro 3.8.1 main screen with customized Shortcut Buttons.
Main screen with customized Shortcut Buttons. Start Photobooth has been changed to Go! DLSR Remote Pro 3.8.1

Password protect or lockdown the settings

You can prevent unauthorized access to the Advanced Settings and Photobooth Setup Wizard using Lockdown.

Select view then Lockdown mode..

Shows how to access Lockdown mode in DSLR Remote Pro 3.8.1
Setting Lockdown mode in DSLR Remote Pro 3.8.1

Enter a password and press OK to save it.

Entering password to protect Lockdown mode DSLR Remote Pro 3.8.1
Lockdown mode is protected with a password

Lockdown prevents unauthorised access to the Advanced Settings and Photobooth Setup Wizard. Operators will still be able to alter the print layout if necessary during an event.

Note: The lockdown password can be reset if necessary. Contact support@breezesys.com for details.

Create your own Shortcut buttons to run specific profiles

Profiles are a powerful tool in Breeze software; they are often used to offer guests choices. You can also use profiles to give the operator a menu of common ways to set the booth up, which are tailored to your business model. Profile 1 might be a basic booth with simple prints; Profile 2 a choice of prints or animated GIFs, Profile 3 prints and GIFs with social sharing. See this post for an introduction to profiles

This section explains how to link profiles you have already created to Shortcut buttons. It does not explain how to create profiles.

Select View then Photobooth Shortcuts Settings to return to the Photobooth Shortcut Setup Screen

Shows DSLR Remote Pro 3.8.1 Photobooth Shortcut Buttons Setup screen showing profiles with profiles highlighted
Photobooth Shortcut Buttons Setup screen showing profiles. DSLR Remote Pro 3.8.1

Check the buttons for each profile you want to use (1), and customise the text for each button (2).

When you have finished, press OK (3) to return to the main screen.

The new buttons for each profile are shown highlighted in green.

Download DSLR Remote Pro to try for yourself.

Thank you for taking the time to read this post. If you found it helpful; please share the post with others.

Copyright Breeze Systems Ltd 2018.


New Breeze DSLR Remote Pro 3.8: simple, powerful branding

Breeze Systems is proud to announce the release of DSLR Remote Pro 3.8. Easier to use and more powerful than ever before, DSLR Remote Pro 3.8 includes two free button sets designed by Wilkes Booth Co.

Highlights of the new release

  • Fast simple branding for photo booth screens
  • Create and save new photo booth screen themes
  • Transfer themes between PCs
  • Free sets of touchscreen buttons
  • Create custom caption sets in any almost language
  • Photobooth Setup Wizard now simplifies screen customization
  • Animated backgrounds for green screen boomerang GIFs
  • Support for Canon’s EOS  6D Mark II

Fast, powerful branding for photobooth screens

Brand screens quickly and easily with new DSLR Remote Pro themes

Create themed photobooth screen sets

Create, load and save DSLR Remote Pro themes containing screen background, touchscreen button, and caption sets

DSLR Remote Pro 3.8 theme including (A) screens, (B) buttons & (C) captions

A. Complete sets of custom photo booth screen backgrounds  can now be generated from a single image. The same background image can be tiled, stretched or cropped to fit any screen with new themes

DSLR Remote Pro 3.8 single background_tiled.jpeg image used to create themed set of background screens

B. Create your own buttons or choose from those shipped with DSLR Remote Pro 3.8. Touchscreen buttons can be placed below the image or to one side using the Setup Wizard. 

C. Customize captions in almost any language. Adjust the color of your text.

Transfer themes between PCs

To generate themed screens on PCs with different screen size/aspect ratio by just copy the theme to the new PC and run the Photobooth Setup Wizard.

Free touchscreen button sets

Breeze DSLR Remote Pro 3.8 includes 2 new free button sets created by  Wilkes Booth Co

DSLR Remote Pro 3.8 Welcome screen: Wilkes Booth Co Tradewind White buttons

DSLR Remote Pro 3.8 Sharing screen Wilkes Booth Co Tradewinds Blue buttons
DSLR Remote Pro 3.8 Sharing screen: Wilkes Booth Co Tradewind Blue buttons

Buy Breeze Wizard themes or complete interface designs for DSLR Remote Pro 3.8 from Wilkes Booth Co

Choose whether to run buttons across the screen or to the side using the Photobooth Setup Wizard.

Create custom caption sets

Breeze software is used in over 80 countries world wide. DSLR Remote Pro already supports Unicode and handles characters in most languages. Use the Photoboth Setup Wizard to create reusable caption sets, and apply them to different themes.

DSLR Remote Pro 3.8 is shipped with English, German, Polish, Italian and Romanian captions.

Thanks to Jürgen Mayr (Photobooth-deluxe), Tomasz Klusczyk (Smove), John Bonardo (Babooth), and Dan Neamtu (Mirror Magic), for providing the German, Polish, Italian and Romanian caption sets shipped with DSLR Remote Pro 3.8

Brand and customize screens with the Setup Wizard

  • Change screen and keyboard background color at the touch of a button
  • Generate complete screen sets from a single background image
  • Automatically  tile, stretch or crop images to fit any size of screen
  • Create and save customized caption sets
  • Save touch screen button sets
  • Choose buttons running down the side or across the bottom of the screen

Improved animated GIF support

  • New Animated backgrounds for green screen boomerang GIFs
  • New support for animated GIFs in sharing screens (email, text, Facebook and Twitter)

More new features

  • Useful shared print counter for events
  • Send emails with or without image attachment
  • Enhanced ability to pass information to microsites
  • Tap for speedy countdown
  • Default delay before taking first photo reduced to 5 seconds

DSLR Remote Pro 3.8 is a free upgrade for all registered users who purchased a license on or after 29th November 2016.

Download  DSLR Remote Pro 3.8       Buy your own license


Getting Started DSLR Remote Pro (1): Photobooth Setup Wizard

This is the first of a series of posts explaining how to setup your photo booth using the DSLR Remote Pro 3.7.3 Photobooth Setup Wizard.

Getting Started with DSLR Remote Pro (2) will explain how to customize your prints. Getting Started with DSLR Remote Pro (3) will explain how to customize your screens.

Downloading the program

First download DSLR Remote Pro from our website; and install the program on your computer. You can run the program as a free trial for up to two weeks from the day you download it.

Screen shot downloading DSLR Remote Pro 3.7.3
Downloading DSLR Remote Pro 3.7.3 from http://breezesys.com/downloads.htm#dslr

Start the program. If you are running a trial version of the program you will see the registration window each time you start. Click on Evaluate.

DSLR Remote Pro 3.7.3 registration dialog

There are five buttons at the top of the main screen. They are shortcuts to the most used parts of the program.

DSLR Remote Pro 3.7.3 Photobooth Shortcut buttons

  • Printer Setup
  • Photobooth Setup Wizard
  • Print Layout
  • Advanced Settings
  • Start Photobooth

First connect your printer to the computer and switch it on. You can also connect and switch on your camera now; or use the ‘simulated camera’ at this stage.

Select Printer Setup to tell DSLR Remote Pro about about the printer you intend to use. Choose prints in Portrait or Landscape orientation.

Hint: Portrait is used for narrow strips of 3 or 4 photos, unless you have a DNP printer.

DSLR Remote Pro 3.7.3 Printer Setup screen showing Landscape oriented 6″ x 4″ print layout (non DNP printers)

Hint: For DNP printers using 6″ by 4″ media portrait and landscape orientation are swapped.

DSLR Remote Pro 3.7.3 Printer Setup screen showing Landscape oriented 6″ x 4″ print layout ( DNP printers only select ‘Portrait’ instead of ‘Landscape’)

Finish by clicking on OK.

Now start the Photobooth Setup Wizard. The program will prompt you to save any existing settings before the wizard overwrites them

DSLR Remote Pro 3.7.3 check at start of Photobooth Setup Wizard

At Step 1 you choose the photo layout you need. The wizard offers a choice of 8 popular layouts; if you want something different choose whichever is closest to your design (you will be able to change this later).

DSLR Remote Pro 3.7.3 Photobooth Setup wizard step 1. Landscape layout with 1 large and 3 small photos

Next Step 2. Tell the program which folder to save the photo booth photos you are going to shoot.

DSLR Remote Pro 3.7.3 Photobooth Setup Wizard Step 2

Finally choose the options you want to offer your guests.

  • The first 5 check boxes tell the Wizard whether you are using a touchscreen, whether guests can choose between color and B&W prints, whether to display a preview of each photo after it is taken and the maximum number of prints allowed.
  • The next five check boxes tell the wizard whether a sharing screen (after the photos are taken) should offer uploads to guest’s Facebook and/or Twitter account, share photos by email or MMS/SMS, or offer optional printing. Hint: some operators prefer to offer browsing and sharing from a kiosk separate to the booth. You can use Breeze Kiosk for this. To share and print photos away from the booth leave these boxes unchecked.
  • Beginners should leave  ‘Add a background.jpeg’ blank at this stage. Print layouts can be branded/customised later.
  • To offer ‘boomerang’ animated GIFs check ‘Enable videobooth..’ and  ‘Capture Boomerang GIFs..’.
  • To offer video booth check ‘Enable videobooth..’

Click on <Finished> and you will see a final screen reminding you where the screen and print layouts created by the wizard have been stored; and where photos taken today will be stored.

DSLR Remote Pro 3.7.3 Photobooth Setup Wizard completed

Close this window, connect your camera and switch it on before selecting ‘Start Photobooth’. That’s it!

DSLR Remote Pro 3.7.3 default photo booth screen created by the Photobooth Setup Wizard

Customise your screens  Customise your prints

Buy DSLR Remote Pro

Copyright Breeze Systems 2017


Shooting Square photos with Breeze Photo Booth software

Usually photo booth images are shot in ‘landscape’ mode; so that you can comfortably include several people in the shot. Sometimes we want to vary this.

Update: DSLR Remote Pro 3.9 introduced a  simpler way to shoot square images

This post explains how to create and print square  photos using DSLR Remote Pro 3.7.3. Webcam Photobooth, NKRemote and PSRemote work in a very similar way. First we need to change the shape of the live view image; then change the print layout to match.

1. Start DSLR Remote Pro and run the Photobooth Setup Wizard to set up a basic booth, selecting a single photo at Step 1.

DSLR Remote Pro 3.7.3 main screen: Photobooth Setup Wizard button highlighted

2. Start the photo booth. DSLR Remote Pro allows you to customize your booth setup without connecting the camera. (NKRemote  and PSRemote users  connect and switch on the camera. Webcam Photobooth uses the PC’s internal camera if you have not connected an external camera.)

DSLR Remote Pro 3.7.3 main screen: Start Photobooth button highlighted

3. Crop the live view guests see by holding down the ‘shift’ key and pressing the cursor right arrow -> until the live view window is square. The amount of cropping is shown in the lower right corner of the screen. If you overshoot press ‘shift’ and the left arrow <- to reduce the cropping.

DSLR Remote Pro 3.7.3 : changing shape of Live View

4. Check the crop size to see whether the live view window is square: numbers in brackets show (width x height) of the live view.

DSLR Remote Pro 3.7.3 : 160 pixels have been cropped from each side of live view image to a create 640×640 square

5. Press <Escape> to exit Photobooth mode and select the large ‘Print Layout’ button to open the Print Layout Editor.

DSLR Remote Pro 3.7.3 main screen: Print Layout button highlighted

6. Right click on the photo in the print layout and select ‘Edit image position’. Set the image width and height to the same value to make the photo square.

DSLR Remote Pro 3.7.3 Print Layout editor: image on print cropped to square shape

7. Click OK, drag the photo to the required position and/or resize it by dragging the corners. Add any captions, background etc before exporting the layout to save your work.

DSLR Remote Pro 3.7.3 Print Layout editor: Export layout button highlighted

Square photos can be combined with filters to give a pop art effect, or used singly for a ‘polaroid’ look.

This method can be used to create rectangular photos of any proportions you choose. More details.

Ready for more? You can also create round (or any other shape) photos using  a live view overlay and print overlay. You will need to create these overlays in an image editor such as Photoshop. The DSLR Remote Pro help files explain how to customize screens and prints in more detail.

Copyright Breeze Systems 2017

Boomerang basics – animated GIFs with one extra click

Do you want to offer your guests something new with very little effort? You can add animated GIFs to your booth with just one extra click using the  Photo Booth Setup Wizard in DSLR Remote Pro.

DSLR Remote Pro and Webcam Photobooth include two kinds of animated GIFs: boomerang and slideshow. Boomerang GIFs are captured with a short video clip, and usually shared using social media or by email. Slideshow GIFs contain still photos taken during normal photobooth operation. These GIFs can also be shared. The same photos can be printed in a strip or other layouts.

This blog post explains how to create  simple boomerang GIFs using the Photo Booth Setup Wizard in DSLR Remote Pro. Webcam Photobooth works in a very similar way. You can customize your GIFs using the advanced settings.

You need DSLR Remote Pro 3.7, Webcam Photobooth 2.4 or a more recent release; a touchscreen, and your camera must support video. Customers with DSLR Remote Pro licenses issued before 22 February, 2016 also need to buy a DSLR Remote Pro upgrade license. Customers with Webcam Photobooth licenses issued before 17th May 2016 need to buy a Webcam Photobooth upgrade license.

1. Start DSLR Remote Pro. Select the Photobooth Setup Wizard.

DSLR Remote Pro 3.8 main screen showing Photobooth Setup Wizard button


2. At Step 3: Select the sharing and other options you need (B), then check the box to capture animated GIFs (C) . Choose any other options you need before clicking on <Finish> (D).


3. The next screen confirms that you have completed running the Setup Wizard. Close this to return to the main screen.

4. Connect your camera and switch it on before selecting ‘Start Photobooth’. That’s it!

DSLR Remote Pro 3.8 main screen showing Start Photobooth button


5. This is the default photo booth screen created by the Photo Booth Setup Wizard in DSLR Remote Pro 3.7.3 . Guests  switch between boomerang GIFs and still photos using the button in the top right corner.

6. You can choose whether guests share GIFs directly from the booth as shown here, or take time to browse and share them away from the booth with Breeze Kiosk (purchased separately).

7. The dinosaur chase at the top of this page shows what you can achieve just using the photobooth setup wizard.

You can modify the default settings to change the video length and playback speed;  add overlays and a title page to brand GIFs for each event. This example shows the same GIF overlaid with a simple border. The capture rate and image interval have also been altered to give a smoother result. Find out how to customize your own Boomerang GIFs .

7 December 2018: This post has been updated to show the new Photobooth Setup Screens in in DSLR Remote Pro 3.8

Copyright Breeze Systems Ltd 2017