Breeze have always respected our customers’ privacy and that of guests captured with our software. Our software is sold worldwide; our customers have differing ethical and legal responsibilities about processing and handling data (including photos and other images).
No Breeze photo booth program (ie DSLR Remote Pro, Webcam Photobooth, DSLR Remote Pro for Mac, and PSRemote) shares photos online by default; photos are only shared if the program is explicitly set up to do so.
Breeze Kiosk was developed to enable social sharing. The current release Breeze Kiosk 1.4.4 will only transfer images to/from any social media site if the program is explicitly set up to do so.
Note: Older releases of Breeze Kiosk defaulted to allow images to be uploaded to Facebook. Images are only uploaded to other social media sites or downloaded from Instagram and Twitter if the program is explicitly set up to do so.
Breeze Kiosk privacy mode will only allow images to be displayed, shared or printed if the user enters the correct code.
Breeze Systems have no access to or control over guest images or data generated by our software, with two exceptions documented in the help files:
When animated GIFs are shared on Facebook, Breeze software stores a copy of the GIF on GIPHY
When images are shared by MMS and ‘SMS + Image’ using Twilio, the shared images and file names are stored on Breeze servers for 7 days and then deleted. The mobile number is not stored on Breeze servers. It is possible (although not necessary) for a user to generate image file names which include personal information about the event or guests. The Breeze servers are hosted by an EU based ISP.
The current versions of our photo booth software and Breeze Kiosk allow you to offer ‘opt in’ consent to image sharing.
Where oursoftware enables users to upload, download, and store photos the user controls where and how the images are sent; often using third party services such as Facebook, Twitter, and Dropbox. Don’t forget that it is your responsibility as user to ensure the third-party services you use are appropriate for your events and the jurisdiction you are working in.
This post explains how to set up your booth with the Photobooth Setup Wizard in DSLR Remote Pro.
Note: This post was updated in November 2018 and shows DSLR Remote Pro 3.12
We recommend everyone from beginner to expert uses the Photobooth Setup Wizard as a start point for setting up a booth. The wizard also helps generate profiles quickly. This is a simple, speedy and safe way to generate a working system.
This video shows how easy it is to prepare your system using the default settings:
Create a GIF/Photo booth in less than a minute
Now let’s run through how to customize your own booth using just the wizard.
The 3 Step Wizard in more detail
Select Photobooth Setup Wizard (1). First you will be prompted to save your current settings
Saving your current settings before running the Photobooth Setup Wizard DSLR Remote Pro 3.12
Step 1
Step 1 simply asks you to name the folder (2) where your photo booth images will be stored. These ‘images’ are the set of screen designs and layout images you will use. (This is usually a subfolder for your PhotoBoothImages folder.) Press Next (3) to move on to Step 1.
Step 1 of the Photobooth Setup Wizard DSLR Remote Pro 3.12
Step 2
The second step is to define the screens used by guests to interact with the booth. Adjust the default settings to meet your needs.
Dropdown list to give guests choices (Photos/Boomerang GIF, Photos only, Boomerang GIFs only, Photo or video, Video only)
This drop down list is a super-fast way to set up the booth to offer guests choice (DSLR Remote Pro 3.12 Photobooth Setup Wizard Step 2)
Single ready screen to choose from Photos or Animated GIFs
Check this box for single ready screen (DSLR Remote Pro 3.12 Photobooth Setup Wizard Step 2)
Choose Photos or Boomerang GIFs and check Single ready screen so that guests start the booth and choose between still photos and boomerang GIFs from a single screen (as in the video above)
Dropdown list to choose a predefined theme
Selecting a predefined theme to use with DLSR Remote Pro 3.12 at Step 2 of the Photobooth Setup Wizard
You can create, load and save DSLR Remote Pro themes containing screen background, touchscreen button, and caption sets, or buy them from third parties.
Your themes may include localized sets of captions in a variety of languages. DSLR Remote Pro 3.12 is shipped with English, German, Polish, Italian and Romanian captions.
Button placement
Buttons can be placed down the side or across the bottom of the screen by the wizard. (DSLR Remote Pro 3.12 Wizard Step 2)
Dropdown list to adjust live view
Live view drop down list – choose from normal, square, full screen, 4:3 and disabled (DSLR Remote Pro 3.12 Photobooth Setup Wizard Step 2)
Changing the live view in the Wizard will automatically adjust the shape of images in both animated GIFs and prints created by DSLR Remote Pro 3.12.
Color of the background screens and text
Defining colors of the background screens and fonts (including custom colors) with the Photobooth Setup Wizard in DSLR Remote Pro 3.12
Editing individual captions
Import complete captions sets using themes as above. Change (or remove) the text for individual captions using Edit captions:
Editing individual captions in the Photobooth Setup Wizard DSLR Remote Pro 3.12
Additional checkboxes
Checkboxes in the Photobooth Setup Wizard Step 2 DSLR Remote Pro 3.12
The first 5 check boxes highlighted in green tell the Wizard whether you are using a touchscreen, whether guests can choose between color and B&W prints, whether to display a preview of each photo after it is taken and the maximum number of prints allowed.
Sharing checkboxes in the Photobooth Setup Wizard Step 2 DSLR Remote Pro 3.12
The next five check boxes tell the wizard whether a sharing screen (after the photos are taken) should offer uploads to guests Twitter* accounts, share photos by email or MMS/SMS, or offer optional printing.
Hint: some operators prefer to offer browsing and sharing from a kiosk separate to the booth. You can use Breeze Kiosk for this. To share and print photos away from the booth leave these boxes unchecked.
*Facebook No Longer Available
Please note: On 1st August 2018 Facebook withdrew the permissions required to upload photos from a desktop app in response to the Cambridge Analytica scandal. This means that it is no longer be possible to upload photos to Facebook directly from DSLR Remote Pro. Photos can be shared on Facebook by emailing or texting them to users where they will be able to share them using the Facebook app running on their own device. Alternatively upload the photos to a website or microsite and provide sharing links to allow users to share the photos on Facebook when they view the page on their device.
Inactivity timeout & use default settings
Inactivity timeout and ‘Use default setting’ button DSLR Remote Pro 3.12 wizard
The inactivity timeout is useful if the photo booth is not in continuous use because it disables the live view display and puts the booth into standby mode. Disabling live view will allow the camera’s sensor to cool down to avoid possible overheating problems. The booth can be reactivated by touching the screen. To use the inactivity timeout, just set the number of seconds after which you want to put the booth into standby.
Select Use Default Settings to restore the default settings for the photo booth.
Next takes you to the third and final step (unless you chose only GIFs or video, in which case you skip Step 3).
Step 3
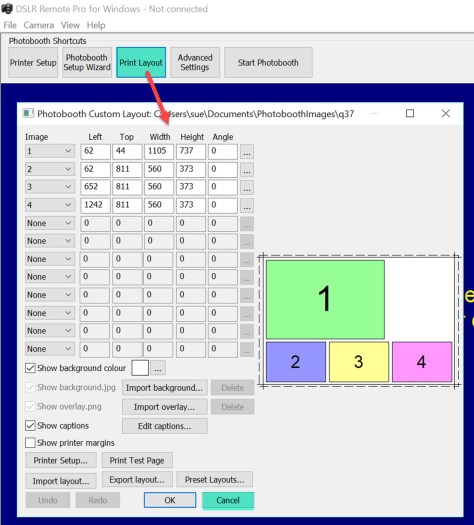
At Step 3 you choose the print layout and adjust your printer settings if necessary( DSLR Remote Pro 3.12 Photobooth Setup Wizard)
The wizard offers a choice of 8 popular layouts; if you want something different choose whichever is closest to your design (you will be able to change this using the Print Layout Editor later).
Running a GIF booth with animated GIFs and no printing is increasingly popular. The DSLR Remote Pro Wizard no longer asks you to select a printer when you offer only Boomerang GIFs or Video.
Check a single box in the Photobooth Setup Wizard to shoot and print square photos using Breeze DSLR Remote Pro 3.9.
Usually photo booth images are shot in ‘landscape’ mode; so that you can comfortably include several people in the shot. Sometimes we want to vary this.
Run the Photobooth Setup Wizard
Start DSLR Remote Pro and run the Photobooth Setup Wizard (1) to set up a basic booth, selecting a square live view (2) at Step 2. DSLR Remote Pro allows you to customize your booth setup without connecting the camera.
Selecting square live view using the Photobooth setup Wizard: DSLR Remote Pro 3.9.1
In this example I have chosen a single photo (3) at Step 3.
Photoboth Setup Wizard: selecting a single photo DSLR Remote Pro 3.9.1
Customize the print layout
Opening the Print Layout Editor DSLR Remote Pro 3.9.1
When you open the Print Layout Editor you will see that the print layout is square. Customize your print as usual.
Square Photo layout in Print Layout Editor DSLR Remote Pro 3.9.1
Start the photo booth
Select Start Photobooth to run the booth DSLR Remote Pro 3.9.1
The Photobooth Setup Wizard has cropped both the live view and print layout for you.
Default ready screen for square photo DSLR Remote Pro 391.jpg
Square photos can be combined with filters to give a pop art effect, or used singly for a ‘polaroid’ look.
Ready for more? You can also create round (or any other shape) photos using a live view overlay and print overlay. You will need to create these overlays in an image editor such as Photoshop. The DSLR Remote Pro help files explain how to customize screens and prints in more detail.
There are two main ways to import layouts into DSLR Remote Pro.
Drag and drop the template directly into DSLR Remote Pro (best for single templates).
Copy the templates into your template folder, then import each template into DSLR Remote Pro using the Print Layout Editor when you need it (more effective for collections of templates).
First set up your printer
If necessary, download and install the printer drivers to your computer.
This example will import a 6” x 4” (15cm x 10cm) print layout. Before you start you need to load the printer with 6” by 4“media and set it to 300dpi.
Put the print template(s) into an accessible folder
Whether you download print layouts from a third-party website or copy them from another computer they need to be kept in folder(s) accessible to your booth computer.
In this post I will copy the template into the template folder on my PC. You may prefer to store templates in Dropbox or another cloud-based system accessible to multiple booths.
Download the photo booth layout and open zipped files
In this example I am using a 6” x4” template with a 1 +3 layout.
Copy the zipped file to another folder to unzip it. I have copied the file to my templates folder Sue Photobooth Print Templates which is in the same directory as my PhotoboothImages Folder.
Start DSLR Remote Pro and run the Photobooth Setup Wizard
At Step 3
1. Check the printer is set correctly.
2. Choose the print layout closest to the template you are using
3. Click on <Finish>
If you look at the Print Layout Editor now you will see the default 1 + 3 print layout. (Cancel to leave the Layout Editor).
Drag and drop into DSLR Remote Pro
DSLR Remote Pro allows you to drag and drop a print layout into the main screen or into the Print Layout Editor
Drag and drop a print layout template into Breeze DSLR Remote Pro 3.9.1 main screenDrag and drop a print layout template into Breeze DSLR Remote Pro 3.9.1 Print Layout Editor (also works for Webcam Photbooth 2.4)
You will be asked to confirm whether you want to import the template:
Print Template import confirmation window DSLR Remote Pro 3.9.1
Select Yes and the Print Layout Editor will display the template you imported.
Customize and save the revised template
First save a backup copy of the original layout using Export Layout, then customize the layout to meet your needs.This post does not explain how to use the Print Layout Editor; you can find detailed instructions here. In this example I will change the caption.
Editing a caption in the Print Layout Editor DSLR Remote Pro 3.9.1
The changes are shown immediately in the Print Layout Editor.
When you have finished customising the print layout, export the template to save it.
Alternative: Use the Print Layout Editor to import templates
There is an alternative to dragging and dropping templates into DSLR Remote Pro. You can copy templates into a folder accessible to your booth, then import the template you need using the Import Layout (1) button in the Print Layout Editor.
Importing a layout into the Print Layout Editor DSLR Remote Pro 3.9.1 (also works with Webcam Photobooth 2.4)
(2) Select the folder containing your layout(s), and then the layout you want to import. (3) Click on OK to import the layout into the Print Layout Editor. You can edit and save the customized template as before.
Notes
Webcam Photobooth users need to select the “DSLR template compatibility” option at Step 3 of the Photobooth Setup Wizard to use templates designed for DSLR Remote Pro.
Selecting DSLR template compatiblity mode using the Setup Wizard in Webcam Photobooth 2.4 S
Zipped files: many templates are downloaded or copied as zipped (compressed) files, which need to be unzipped before they can be used. The example here uses a zipped file downloaded from the Breeze website.
Printer drivers: you may need to download and install drivers for your printer to the computer you are using.
Using a second computer to edit print layouts. You do not need to create and edit print layouts on the booth computer. Keep a copy of DSLR Remote Pro on an office computer to design, customize and edit your print layouts; export them from the program and either store them somewhere accessible to your booths, or copy the complete layouts to each booth computer.
Do you want to learn how to run Multi-Camera activations or become a DSLR Remote Pro Ninja? Chris is running two premium workshops at Photo Booth Expo 2018 this year. These are small classes with lots of opportunities for interaction and questions.
Please note an additional charge is made for premium workshops.
Multi-Camera Arrays Tuesday March 13 (9:00 – 10:30am)
Chris has a unparalled worldwide reputation in multi-camera arrays. DSLR Remote Pro Multi-Camera has been used in block buster movies, the video games industry and high-profile activations for more than 10 years. Multi-camera activations are increasingly popular at events, and attract premium prices.
The multi-camera workshop has just 20 places. Don’t miss this amazing opportunity to learn from Chris
What you can do with a camera array
Five, fifteen or ninety five cameras?
Choosing equipment and triggering the cameras
Time it right – syncing with flash
How to create animated GIFs and MP4 movies from your images
PBPI delegates last month enthused about a pre-release version of the program. One even exclaimed “I’ve fallen in love with Breeze again”. I am delighted to announce the release of DSLR Remote Pro 3.9 on Valentine’s Day.
What’s new?
Improvements to the Photobooth Setup Wizard
Animated GIFs with soundtrack
Extra branding/ logo overlay for animated GIFs
Faster, higher quality green screen processing
Fix for issue with complex HTML emails
DSLR Remote Pro 3.9 supports most Canon DSLR cameras and runs on Windows 10, 8 and 7. This release is a free upgrade for all registered users who purchased a license on or after 15th February 2017. Customers with an older DSLR Remote Pro license (and any NKRemote license holder) can buy an upgrade license to use this release.
Photobooth Setup Wizard – a piece of cake with Breeze DSLR Remote Pro 3.9
Chris has improved the flow of the Wizard, making it a piece of cake to build a system offering guests choices (such as Photos or GIF), and run the booth with square or full screen live view as an alternative to normal landscape images.
New dropdown list to give guests choices (Photos/Boomerang GIF, Photos only, Boomerang GIFs only, Photo or video, Video only)
This drop down list is a super-fast way to set up the booth to offer guests choice (DSLR Remote Pro 3.9 Photobooth Setup Wizard Step 2)
New dropdown list to adjust live view
Live view drop down list – choose from normal, square and full screen (DSLR Remote Pro 3.9 Photobooth Setup Wizard Step 2)
Use the setup wizard to customize the live view. Changing the live view in the Wizard will automatically adjust the animated GIFs and prints created by DSLR Remote Pro 3.9.
New improved ready screen to choose from Photos or Animated GIFs
Check box for single ready screen (DSLR Remote Pro 3.9 Photobooth Setup Wizard Step 2)
Choose Photos or Boomerang GIFs and check Single ready screen so that guests start the booth and choose between still photos and boomerang GIFs from a single screen as here:
Ready screen generated by Photobooth Setup Wizard: choice of still photos or animated GIF, and full screen live view (DSLR Remote Pro 3.9 using simulated camera)
Shoot and share without printing
Running a ‘shoot and share’ booth with animated GIFs and no printing is increasingly popular. The DSLR Remote Pro 3.9 Wizard no longer asks you to select a printer when you offer only Boomerang GIFs or Video.
New animated GIFs with audio
You can now add an optional soundtrack to the MP4 copy of your animated GIFs. Learn more
Enhanced animated GIF branding with additional overlay
New: add a second overlay to animated GIFs with branding & logo. The additional overlay is an easy way to brand animated GIFs you have created yourself or sourced from third parties. Learn more
Greenscreen processing – higher quality and faster
Print higher quality green screened images more quickly. DSLR Remote Pro 3.9 green screen algorithms have been rewritten to be bothfaster and produce higher quality results. Greenscreen photobooth
Start the booth when DSLR Remote Pro is started and the camera connected
To start the Photobooth running as soon as DSLR Remote Pro is started and the camera connected and switched on, select Advanced Settings then check the box Start full screen photobooth automatically ….
Starting the photobooth when the camera is connected DSLR Remote Pro 3.8.1
Hide the camera controls on the main screen
DSLR Remote Pro allows you to control the camera from your PC. You can find these settings on the left of the main screen (highlighted in green below).
DSLR Remote Pro 3.8.1 main screen with camera settings highlighted
To hide these settings select View then uncheck Show Camera Controls:
To hide the camera controls at the left of the screen select View then uncheck Show Camera Controls (DSLR Remote Pro 3.8.1)
The main screen will no longer show the camera settings:
Main screen DSLR Remote Pro 3.8.1 with camera controls hidden
Hide or reveal the large Photobooth Shortcut buttons
The large buttons at the top of the main screen (highlighted in green below) are called Photobooth Shortcut buttons. They are quick ways to control your booth.
Default Photobooth Shortcut buttons DSLR Remote Pro 3.8.1
To hide or reveal these buttons select View then check or uncheck Photobooth Shortcuts
To hide or show the Photobooth Shortcut buttons at the top of the screen select View then (un)check Photobooth Shortcuts (DSLR Remote Pro 3.8.1)Main screen with both Photobooth Shortcut buttons and camera controls hidden DSLR Remote Pro 3.8.1
Choose which Photobooth Shortcut buttons are shown on the main screen
If necessary show the Photobooth Shortcut buttons as above.
Select View then Photobooth Shortcuts Settings to see the Photobooth Shortcut Setp Screen
Photobooth Shortcut Setting window DSLR Remote Pro 3.8.1
The standard buttons are highlighted in green above. Check or uncheck any of these buttons to change the Shortcut buttons on the main screen. In this example the operator will only see buttons to start the booth and access the Print Layout Editor (which lets them make changes to the Print Layout)
Photobooth Shortcut buttons limited to 2 choices DSLR Remote Pro 3.8.1
You can display any combination of the following standard Shortcut buttons in DSLR Remote Pro 3.8.1
Printer Setup
Edit QR code
Photobooth Setup Wizard
Print Layout
Advanced Settings
Event Info
Videobooth Settings
Reprint Photobooth Photo
Start Photobooth
Take Test Photo
Camera Settings
The default set of five buttons are shown in red in this list.
Change the wording of the Photobooth Shortcut buttons (great for localization)
Select View then Photobooth Shortcuts Settings to see the Photobooth Shortcut Setp Screen.
Photobooth Shortcut Buttons screen DSLR Remote Pro 3.8.1. Shows where to change the text and size of buttons.
1. Edit the text of any button; here Start Photobooth has been changed to Go!
2. You can also change the size of the buttons
3. Press OK to save the new settings before leaving this screen.
Main screen with customized Shortcut Buttons. Start Photobooth has been changed to Go! DLSR Remote Pro 3.8.1
Password protect or lockdown the settings
You can prevent unauthorized access to the Advanced Settings and Photobooth Setup Wizard using Lockdown.
Select view then Lockdown mode..
Setting Lockdown mode in DSLR Remote Pro 3.8.1
Enter a password and press OK to save it.
Lockdown mode is protected with a password
Lockdown prevents unauthorised access to the Advanced Settings and Photobooth Setup Wizard. Operators will still be able to alter the print layout if necessary during an event.
Note: The lockdown password can be reset if necessary. Contact support@breezesys.com for details.
Create your own Shortcut buttons to run specific profiles
Profiles are a powerful tool in Breeze software; they are often used to offer guests choices. You can also use profiles to give the operator a menu of common ways to set the booth up, which are tailored to your business model. Profile 1 might be a basic booth with simple prints; Profile 2 a choice of prints or animated GIFs, Profile 3 prints and GIFs with social sharing. See this post for an introduction to profiles
This section explains how to link profiles you have already created to Shortcut buttons. It does not explain how to create profiles.
Select View then Photobooth Shortcuts Settings to return to the Photobooth Shortcut Setup Screen
PBPI starts this Sunday! Our bags are (almost) packed; Chris and I can’t wait for this amazing opportunity to learn more about the industry, and spend time with as many of you as possible.
Here’s a sneak preview of the breakout sessions Chris will be running at PBPI this year.
Monday 3:30pm – Breeze Systems Photo Booth Software
The first session will focus getting the most from DSLR Remote Pro; including
Chris has a unparalled worldwide reputation in multi-camera arrays. DSLR Remote Pro Multi-Camera has been used in block buster movies, the video games industry and high profile activations for more than 10 years. Learn from the man himself:
What you can do with a camera array
Five, fifteen or ninety five cameras?
Choosing equipment and triggering the cameras
Time it right – syncing with flash
How to create animated GIFs and MP4 movies from your images
Wednesday 2:45pm – Open Session
On the final afternoon Chris will run an Open Session covering topics raised by delegates at PBPI. Likely subjects include
Panoramic photo booth photos
Green screen
Sharing for camera arrays
Hashtag Monitoring
Worked examples
Automation and startup scripts
Find us at the Breeze table in Tech Alley & around the Academy.
The content of sessions may vary to meet the needs of those attending.
PS Just heard from Lisa that there is still time to join in – Enroll here!


You must be logged in to post a comment.