Several people have asked why they can’t copy their backgrounds, logos, print layouts etc into their PhotoboothImages folder recently – they see an error similar to this:
Error copying to C:|Program Files (x86)\Breezesys…
This error happens because Windows 10, 8 and 7 all protect the Program Files (x86) folders from accidental or malicious damage to applications.
Please do not try to use C:\Program Files (x86)\Breezesys\DSLR Remote Pro\PhotoboothImages\ or C:\Program Files (x86)\Breezesys\Webcam Photobooth\PhotoboothImages\ or C:\Program Files (x86)\Breezesys\Hotfolder Prints\PhotoboothImages\ for your PhotoBoothImages folder.
Instead place your PhotoboothImages folder in your Documents folder C:\Users\yourname\Documents\PhotoboothImages
Setting the locations of your PhotoBoothImages folder
DSLR Remote Pro
Location of PhotoBoothImages folder DSLR Remote Pro 3.13
Webcam Photobooth
Location of PhotoBoothImages folder Webcam Photobooth 2.4
Hotfolder Prints
Te equivalent to a PhotoBoothImages folder where you place print layouts and backgrounds etc in Hotfolder Prints is here:
Location of folder containing print layouts etc Hotfolder Prints 1.7
You can also use Kiosk with still (JPEG) and animated (GIF, MP4 or MOV) images captured by third party software.
What’s new in Kiosk 1.5.1?
Social sharing counters
Collect stats on emails, texts and tweets sent from each Kiosk as well as the number of prints.
Breeze Kiosk 1.5.1 includes new counters for the number of emails, texts, tweets and prints from the kiosk at an event
Flexible printing
Print up to 3 different print sizes
Control several printers
Print up to 3 different sizes of print on the same or different printers with Breeze Kiosk 1.5.1
Choose up to 3 different printer settings. In the screenshot above the default printer (1) is a Mitsubishi CP70D printing 4″ x 6″ layouts. Prints prefixed square (2) are printed square on the same CP70D printer. Single 2″x 6″ strips are displayed in Kiosk as single strips, but printed (3) as double strips on 4″x6″media.
This feature can also be used to print to 3 different printers.
Slideshow plays full video before advancing
New option to play videos at least once when running a slideshow i.e. don’t advance the slideshow until the video has played from start to finish at least once.
Performance improvements
Performance improvements for swiping images when running on Microsoft Surface Go
Fixes
Fixed glitch with the selected thumbnail changing when new images are added with the “Display newest images first” option selected
Fixed issue which caused the wrong photo to being printed if a new photo was added while the print confirmation screen was displayed
Fixed issue setting the initial values of check boxes in keyboards
This release is a free upgrade for all registered users who bought a Kiosk license on or after 30th May, 2018.
Customers with older Kiosk licenses need to buy an upgrade to use this release.
Downloader Pro 2.6 adds support for downloading directly from the Canon EOS RP, Canon EOS 250D/Rebel SL3 and Canon PowerShot SX70HS. This release adds support for Canon CR3 format raw files in the Adobe DNG converter plug-in and fixes an issue with registering for Windows AutoPlay when installing Downloader Pro.
Downloader Pro minimises the time spent downloading and organising images on your PC, and is often partnered with BreezeBrowser Pro.
Downloader Pro runs on PCs running Windows 10, 8 or 7, and will run as a free trial for up to 30 days.
Download, Try, Buy
You can find details, download and purchase links on the Breeze website here
This release is a free upgrade for all registered users who purchased a license within the last 18 months. Users with older licenses need to buy an upgrade license to use this release.
Slideshow GIF with the new top/bottom mirror effect
Save logos with Photo Booth Print Layouts
Logos provide a quick and easy way to add graphics to prints without using an image editor such as Photoshop.
DSLR Remote Pro 3.12 introduced the ability to add up to five JPEG and/or PNG logos to your prints. Many of you want to save these logos with your photo booth print layouts, so we have added this feature to v3.13.
Add up to 5 logos to each print and export them with the Print Layout (Breeze DSLR Remote Pro 3.13)
Total number of prints counter
Keeps count of the number of prints made (Breeze DSLR Remote Pro 3.13)
The new Total number of prints counter is shared with other Breeze apps running on the PC such as Kiosk, and incremented each time any of these apps prints. Learn more
Note to advanced users: The token for this counter {eventPrintTotal} can be used in filenames, caption text in print layouts and message text.
Try DSLR Remote Pro 3.13 for yourself
DSLR Remote Pro 3.13 is a free upgrade for all registered users who purchased DSLR Remote Pro after 14th April 2018. Customers with older licenses need to buy an upgrade license to use this release.
Pop Art and mirror effects are a doddle in DSLR Remote Pro. Set up your booth as usual, copy PhotoboothcreativeFilter.dll into your PhotoboothImages folder, then select the filter you want to use. That’s it!
DSLR Remote Pro 3.13 ships with ten creative filters and six Instagram style filters as standard. This post explains how to use mirror, Pop Art and other filters in still photos, slideshow and boomerang (burst) GIFs.
This post was updated on 2 September 2021 to add a link to the profile tutorial which explains how to build a menu. Use menus to offer guests a choice of filters.
Copy PhotoboothcreativeFilter.dll into your PhotoboothImages folder
Copy PhotoboothcreativeFilter.dll from your installation folder (usually C:\Program Files (x86)\BreezeSys\DSLR Remote Pro) into your PhotoboothImages folder
Copying PhotoboothcreativeFilter.dll from C:\Program Files (x86)\BreezeSys\DSLR Remote Pro
Just paste PhotoboothcreativeFilter.dll into your PhotoboothImages folder
Connect your camera and choose a filter
Start the booth and DSLR Remote Pro will display the default filter (color negative).
Color negative filter (Breeze DSLR Remote Pro 3.13)
Type Ctrl+Shift+C to display the setup page and choose one of the mirror filters:
Drop down list of creative filters. DSLR Remote Pro 3.13 introduces mirroring and an ‘off’ setting.
Selecting one of the creative filters in DSLR Remote Pro
You are away! Here are a few examples of mirroring, Pop Art and Posterized effects:
Left/right mirroring
Left/right mirroring GIF in DSLR Remote Pro (new in Breeze DSLR Remote Pro 3.13)
Top/bottom mirroring
Square images on a square print with top/bottom mirroring (new in Breeze DSLR Remote Pro 3.13)
Two by two mosaic
Create multiple reflections with the two by two mosaic filter (DSLR Remote Pro 3.13)
Pop Art
Breeze gives total control over Pop Art effect colors. This print layout fills a square 6 x 6 print with 4 square images
Pop art effect slideshow GIF (Breeze DSLR Remote Pro 3.13)
Posterize
Posterize effect in slideshow GIF (Breeze DSLR Remote Pro)
Switch between filters or turn them off
Type Ctrl+Shift+C on the Ready screen to switch to a different filter or turn them off completely.
Set up filters for boomerang GIFs in exactly the same way as for still photos/slideshow GIFs. Guests see the effect of each filter as they pose, not just on their prints and GIFs:
Creative filters work with both photos and boomerang GIFs
Save the current filter for future use
The current filter is automatically saved* for the Photobooth Images folder you are using. When you next load this Photobooth Images folder into DSLR Remote Pro, it will automatically run the same filter.
*Filter settings are saved in the program registry for each Photobooth Images folder.
Where the outputs are stored
Screenshot of subfolders containing outputs from the booth
DSLR Remote Pro gives you a lot of control over where your images are stored. This can be really useful when you want to use a watch folder to share, display or upload images from the booth. This post explains where DSLR Remote Pro usually places different types of images.
Mirroring filters in portrait
If you shoot in portrait the top/bottom and left/right filters are swapped. The two by two mosaic works but ‘swap top halves’ is not designed for portrait orientation.
DSLR Remote Pro 3.13 is a free upgrade for all registered users who purchased DSLR Remote Pro after 14th April 2018. Customers with older licenses need to buy an upgrade license to use this release.
Mirror booths usually do not display the camera’s live view because guests see themselves pose in the mirror.
Breeze DSLR Remote Pro’s support for bespoke interfaces and custom menus makes it a great choice for magic mirrors and photo booths. You can hide the live view whether you are offering still photos, GIFs, slow mo or video booth:
Fusion Booth running DSLR Remote Pro with choice of boomerang GIF, slow motion or photos (Image courtesy of Incredible Booth)
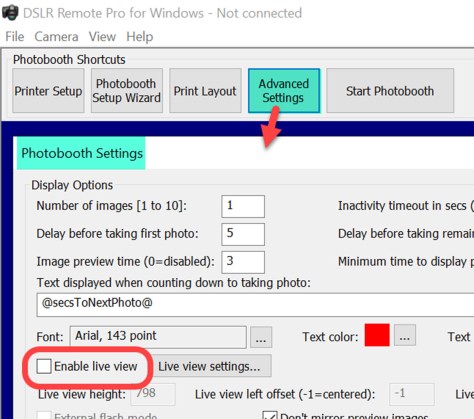
To capture still photos without displaying the live view simply switch it off in Advanced Settings.
Live view unchecked to hide the live view when capturing still images (Breeze DSLR Remote Pro 3.12)
This is great when you want to make slideshow GIFs from a set of still photos.
Breeze boomerang GIFs are captured from the camera’s live view, so when live view is switched off you cannot shoot boomerang GIFs.
Hide the live view
Mirror booth users and others who want to shoot boomerang GIFs without showing the live view need to hide it. There is a simple trick to this – move the live view so that it is no longer displayed on screen. If your screen is 1080 x 1920 pixels, offset the live view by more than this (In this example I have offset by 2000 pixels in both directions):
This slideshow requires JavaScript.
Guests will still see the countdown but not the live view. Magic!
Breeze DSLR Remote Pro powers photo booths and mirror booths worldwide. Licenses cost just US $275* each and include one year’s free upgrades. This post shows screenshots from Breeze DSLR Remote Pro 3.12
This Windows based App runs as a fully functional trial for up to 14 days supporting most Canon DSLR cameras and Canon’s mirrorless M50.
Greetings everyone! My name is Peyton Vincent with CEG Interactive, an award-winning company that specializes in photo booth rental in San Diego as well as specialty photo activations nationwide. I first started using Breeze Systems software in 2007 with our very first portable photo booth. Back in those days, we were renting photo booths for weddings and parties but as we expanded our offerings, our clientbase grew to include concert tours, conventions, and sporting events nationwide.
While the majority of our jobs have relied on DSLR Remote Pro over the years, we found our niche by being photo booth technologists and innovators that wanted to constantly find new ways to re-invent the photo booth. We also regularly use Hotfolder Prints, Breeze Viewer, Webcam Photo Booth, Breeze Kiosk, and last but not least, Breeze Multi-Camera.
I have been invited by Chris and Sue to write some helpful features that are focused mostly around that last one which goes by a bunch of different names. See how many you recognize!
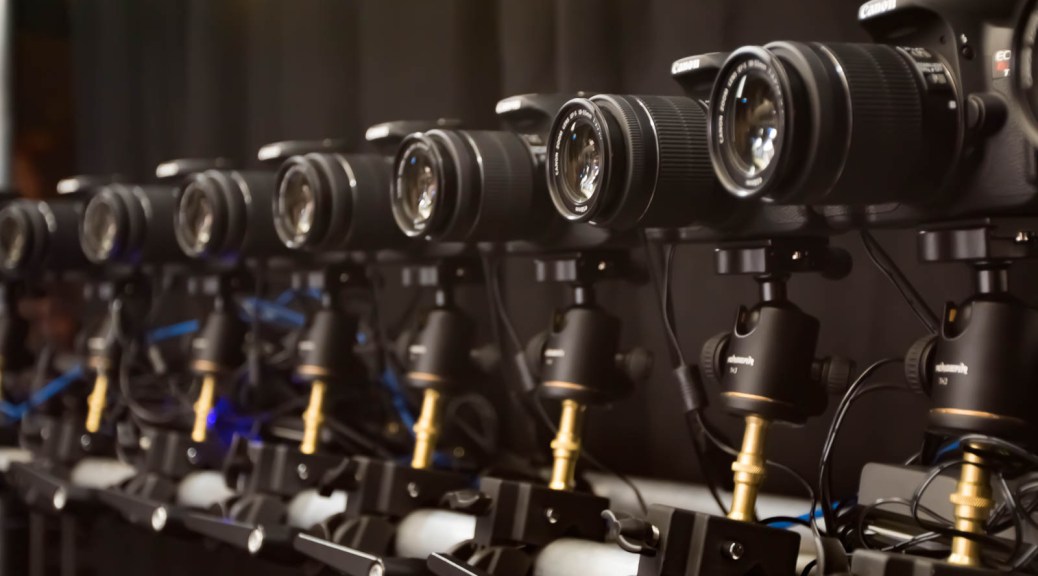
Other than the obvious, a multi-camera array photo booth consists of a system of interconnected cameras that are usually defined as follows:
Rigidly-attached to a curved structure that keeps them from shifting
Aimed at a central point or axis
Evenly-spaced so that the animation effect shifts between the cameras at a constant speed
DSLR cameras and lenses are of the same make/model/focal length. Breeze Multi-Camera is designed to tether exclusively with Canon DSLRs. However, with some custom work, it’s probably possible to use the animator program with image file sets captured by cameras of a different make.
Each camera is fired in either a “chase” where there’s a specified delay between each angle which creates a “virtual dolly” and/or slow motion bullet time effect OR they are all fired at the exact same instant to create a true “time freeze” effect.
I’m a visual guy (which is probably why I’m a photo booth nerd instead of a writer) so lets move on to the fun stuff…photo examples! I will end this first article with a multi-camera comparison guide that shows you how the number of cameras, type of backdrop, triggering method, etc can create a wide variety of different effects.
2 Camera “3D Photo Booth”
Event guests showing off their stylish 3D glasses and 3D photo prints!Full color traditional photo prints as well as anaglyphic prints that can be viewed in 3D with the red/blue 3D glasses.
6 Camera Array Photo Booth
6 camera array with printed 10×10 tension fabric backdrop6 camera photo booth with a 10×14 printed backdrop
7 Camera – Super Wide Angle
6 camera array using Canon EF-S 10-18mm Super Wide Angle Lenses. This was a test shot and we ended up fine tuning calibration before the event began.
6 Camera – Green Screen Array
12 Camera Array – 3D Light Painting
12 Camera Array
We used two 9×9 black sequin backdrops for this shoot.
12 Camera Array – Green Screen
3D green screen confetti plus hand-tossed white confetti!
12 Camera Array – Creative Set
12 Camera Array – Green Screen with 3D artwork
18 Camera Array – 180 Photo Booth
18 Camera Array – Time Delay Trigger “Virtual Dolly” Effect
Please stay tuned for our next feature were we cover more topics like hardware component selection, software settings, system design, and more! In the meantime, check out our website more information about the multi-camera photo booth services that we offer to our customers at CEG Interactive.
BreezeBrowser Pro 1.10 and Downloader Pro 2.5 introduce support for the new Canon CR3 raw file format and recent Canon cameras including the EOS R and M50.
BreezeBrowser Pro 1.10
BreezeBrowser Pro is a smart tool used by professional photographers to organize, cull and enhance photos.
What’s new?
Support for the CR3 raw files used by the mirrorless EOS R and M50 cameras.
Raw file conversion and shooting data display for Canon’s EOS R, M50, EOS 1500D/2000D/Rebel T7 and EOS 3000D/4000D cameras.
Both releases are a free upgrade for all registered users who purchased a license within the last 18 months. Users with older licenses will need to buy an upgrade license to use the latest versions of BreezeBrowser Pro and Downloader Pro.
Guests often want to share images to several email addresses. The default versions of both DSLR Remote Pro and Breeze Kiosk send emails to one address at a time. DSLR Remote Pro 3.12 and Breeze Kiosk 1.5introduce the ability to cc additional addresses when sending emails.
Sending images to multiple addresses from DSLR Remote Pro
Example 1: Adding a CC line to the email keyboard
We need to add a second prompt to the email keyboard. We do this by editing the default email_keyboard.xml file. I am going to walk you through this step by step. It doesn’t matter if you have never seen xml before.
First open the touchscreen editor, click on Test keyboard… and select Email keyboard.
Accessing the email keyboard in DSLR Remote Pro 3.12
Email keyboard created by setup wizard in DSLR Remote Pro 3.12
Then left click the mouse while holding down both Shift and Ctrl keys. This lets you save the XML file and the keyboard images.
First delete the four keyboard image files from the PhotoBoothImages folder(otherwise we won’t see any any changes we make to the text prompts).
PhotoBoothImages folder showing email_keyboard.xml and keyboard images (DSLR Remote PRo 3.12)
Open the email_keyboard.xml file in a text editor such as Microsoft Notepad (which comes free with Windows 10)
Replace the highlighted text with this and save the changes:
<prompt1 email_address=”1″ mandatory=”1″>Please enter your email address:</prompt1>
<text1_x>38</text1_x>
<text1_y>170</text1_y>
<text1_r>1882</text1_r>
<prompt2 email_address=”1″>CC:</prompt2>
<text2_x>38</text2_x>
<text2_y>356</text2_y>
<text2_r>1882</text2_r>
Note: Here the second prompt will appear below the first prompt. This is achieved by using the same x coordinate, and different y coordinates. The CC email address is optional and so prompt2 does not need the ‘mandatory’ attribute.
xml changed to share to two email addresses
Two is not enough?
There is usually room on a booth or kiosk screen to add the second line above. You may find it more difficult to find space to enter three or more addresses. The screen size, orientation ( there is usually more empty space in portrait oriented mirror booths than landscape photo booths and kiosks) and the numberof characters allowed for email addresses all make a difference.
These examples in this post have been created for a screen 1920 pixels wide by 1080 pixels high. If your screen is different you may need to adjust the values you use. It is also possible (but more complicated) to change the size and position of the keyboard buttons on your screen. More details
Example 2 has space for 3 email addresses to be entered below each other. Example 3 includes 4 email addresses in 2 rows. Both are created by editing the email_keyboard.xml in the same way as before. Each time you edit the xml, use DSLR Remote Pro’s test keyboard to check whether your changes work as you expect.
Example 2: Adding two CC lines to the email keyboard
Here a third prompt has been added below the others. To fit this in above the keyboard, the y coordinates of all 3 fields have been adjusted and the size of the text reduced (DSLR Remote Pro 3.12)
Example 3: Four email addresses on the email keyboard
In this example a single email is sent to four different addresses:
For more detail and other ways you can customize the touch screen keyboards in DSLR Remote Pro see the help files
Sending images to multiple addresses from Breeze Kiosk
Use the same technique with Breeze Kiosk. Start with the default email_keyboard.xml file by (1) selecting Settings. (2) Check that sending emails is enabled, and (3) click on Test keyboard…
Accessing the email keyboard in Breeze Kiosk 1.5
Then left click the mouse while holding down both Shift and Ctrl keys. This lets you save the XML file and the keyboard images. Delete the keyboard images and edit the xml in the same way as for DSLR Remote Pro.
For more detail and other ways you can customize the Breeze Kiosk touch screen keyboards see the touchscreen keyboard section of the help files
Summary
This post has walked you through adding cc email addresses to your DSLR Remote Pro screens, and outlined how to make similar changes to Breeze Kiosk.


You must be logged in to post a comment.