Improved control for placing green screen image against background
DSLR Remote Pro 3.11.3 introduces cropping and rotation of green screen images, and improves image positioning against the background
Video sharing
Share photo booth videos from the booth
Easy to adjust MP4 quality (fast for ease of sharing, slow for high quality)
Optional delay to allow post processing video (allows scripts to process video before sharing)
This release is a free upgrade for all registered users who purchased DSLR Remote Pro after 15th August 2017. Customers with older licenses need to buy an upgrade license to use this release.
Guests can email photos, animated GIFs and Canon M50 slowmo videos and other videos* they create in DSLR Remote Pro 3.11.3. If Internet access during the event is poor, you can send the emails later.
Update March 2021: This post has been replaced by a new tutorial
This post explains how to email images from a touchscreen photo booth running DSLR Remote Pro. You will also learn how to tell the program about your email server settings, brand and customize the emails you send.
Let’s run through this in more detail, starting with the setup wizard:
Run the Photobooth Setup Wizard
Start DSLR Remote Pro and run the Photobooth Setup Wizard (1). Choose which options to offer guests at Step 2 (2). In this example guests can choose between still photos and boomerang (aka burst) GIFs (3). You can offer video (or photos and video) instead at this point.
Check the option Email photos (4) .
Checking the box Email photos at Step 2 of the setup wizard ( DSLR Remote Pro 3.11.3)
Select any other options you need before clicking on <Next> and completing Step 3 of the wizard.
You can set up your own booth with this sharing screen using just the 3 step wizard:
Email sharing screen created by the Photobooth Setup Wizard (DSLR Remote Pro 3.11.3)
Setup the email server settings
The first time you email from DSLR Remote Pro you need to set up the email server settings:
Select File (5) then Photobooth Settings(6) to access these settings
This will display the Photobooth Settings screen.
Go to the Output Settings(8) and check Email (9). You can then select Email Server Settings screen at (10)
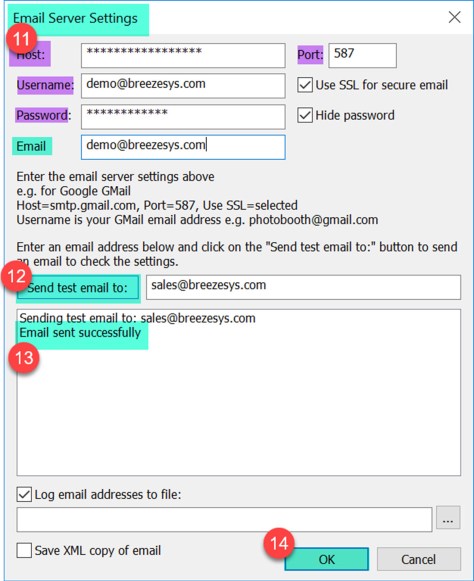
To send an email you need to specify the host name and port number of your email server. Most email servers also require a username and a password. For additional security check Use SSL for secure email.
The values of Host, Username, Password, Email and Port(11) you enter on the Email Server Settings screen are specific to the email provider you are using.
Before you move on, check everything works by sending a test email to your own email address(12). DSLR Remote Pro displays Email sent successfully(13) when this message has been sent. Check that you receive the test email.
Remember to click OK(14) to save your settings as you leave this screen.
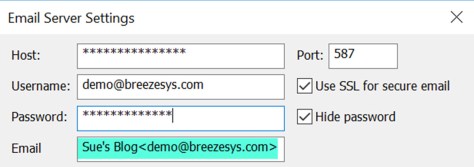
Including your name with the email address
To include the name of the sender with the email address enter the name followed by the email address enclosed in angle brackets e.g. Sue’s Blog <demo@breezesys.com>.
Here the sender name is ‘Sue’s Blog’ and the email address demo@breezesys.com (DSLR Remote Pro 3.11.3)
Logging guest email addresses & sending them after the event
You can keep a log of email addresses used by guests, providing valuable data for your own or corporate client’s use.
If an event Internet connection is flaky or non-existent you can save the email details and send them later.
The port number is usually 587 when using SSL secure email or 25 otherwise (but check the port numbers used by your ISP).
Emails look more professional when sent from your own domain.
Most free email services require the sender’s email address to the be the same as the email account specified by the username and password.
Gmail users should set access for less secure apps to Turn on in your Google account settings otherwise GMail will refuse to send the email.
Customize and brand your email messages
Use the standard email message
You do not have to customize the message sent with your photos and animated GIFS. If you use the standard settings in DSLR Remote Pro all emails will include the image(s) captured in the booth and the text Your photo booth photos taken on 14 August 2018 (or whatever date the images were taken).
Customizing the email subject and message
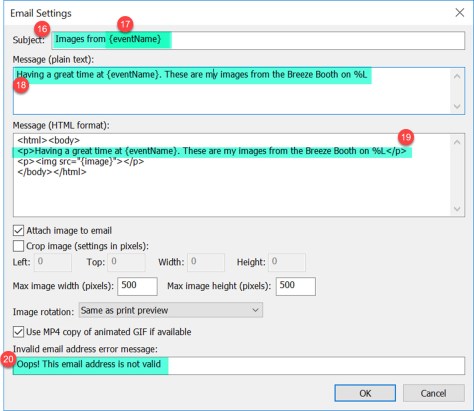
The emails guests send can be a powerful marketing tool for your business. Make them work for you by customizing the message sent with your image(s). Use Breeze tokens, your own text, images and html in the Email Settingsscreen.
Select File, then Output Settings, then Email settings to reach this screen:
Select File, then Output Settings, then Email settings to customize emails sent from DSLR Remote Pro
The first time you see the email settings screen it contains the default message DSLR Remote Pro sends with your emails. Edit this to meet your needs.
Default Email Settings screen in Breeze DSLR Remote Pro 3.11.3
You can change the both the subject and content of the emails sent with guest images.
Reduce the time and bandwidth taken to send and receive emails by choosing a suitable maximum image size.
Creating a standard email template using the {eventName} token
{eventName} is a special Breeze token which can be shared between Breeze programs. You can use {eventName} in your emails and print layouts to save time customizing your booth for each event.
Here I have both changed the text and used {eventName} to customize the email subject (17), plain text (18) and html (19) versions of the content. I also changed the message seen by guests if they type an invalid email address (20).
When the email is sent Images from {eventName} will be replaced by Images from Sue & Chris’s Big Party. The text sent with the email will also say Having a great time at Sue & Chris’s Big Party. These are my images from the Breeze Booth on 14 August 2018.
{eventName} can also be used in print captions, and as part of folder and file names. For my next event I just need to change {eventName} to John & Jane’s Wedding ….
Note: %L is another Breeze token, which will be replaced by the date the images were taken.
How do I enter and change {eventName} for each event?
Start DSLR Remote Pro, click on File then Photobooth event info… to reach the Photo Booth Event Info screenPhoto Booth Event Info screen with {eventname} set to Sue & Chris’s big Party (DSLR Remote Pro 3.11.3)
You may have spotted Event Strings on this screen. You can use {eventString1} to {eventString5} in the same way as {eventName} .
Why do I need to send both plain text and html?
The emails DSLR Remote Pro sends from your booth may be viewed on lots of different devices including Apple and Android smart phones, tablets and PCs. Most modern devices can read html emails; we also send a plain text version in case the html version cannot be read.
Thank you for reading this post. I have covered how to send emails from DSLR Remote Pro, outlined how to brand and customize the emails, create your own standard template which is automatically updated for different events, and tell the program about your email service provider.
If you are ready for more, Steve’s video is a great introduction to using tokens. You can also learn more about customizing emails in the program help files.
If this post is helpful to you, please share it with others in our industry.
* DSLR Remote Pro 3.11.3 was released today 15 August 2018, and is a free upgrade for anyone whose license was issued in the last year. This release introduces the ability to share videos captured in video booth mode, including Canon M50 slow mo videos. Please note that emailing large attachments during events will slow the booth down.
Update 16 August: You can run this new script alongside DSLR Remote Pro 3.11.3to rotate and resize videos and add an optional overlay and soundtrack before videos are shared. We expect to include these features into DSLR Remote Pro in a future release.
Support for new cameras: Canon EOS 6D Mark II, 200D, Rebel SL2,1500D, 2000D, Rebel T7, 3000D, 4000D
What is Flipbook Photobooth?
Breeze Flipbook Photobooth is Windows based event software for creating flip books using a Canon DSLR camera. Guests capture a short animation and play it back by flicking through the pages of a printed flip book.
Run Flipbook Photobooth as a standalone app shooting the animation, creating and printing flip books
Print flip books from from boomerang GIFs created in DSLR Remote Pro
Most the equipment is the same as you need for a DSLR based photo booth. Books are usually printed on a dye sublimation printer capable of printing 6×2 strips.
Branding and customisation – front cover, individual flip book pages, and screens can all be branded and customised
Breeze flexibility as standard! Offer guests a choice of green screen backgrounds or book covers. Add an extra dimension by changing the background or overlay as the book progresses. Upsell larger books or more pages. Use multiple printers at large corporate events. Breeze Flipbook Photobooth supports dye sub media, laser and inkjet printers.
This slideshow requires JavaScript.
See Flipbook Photobooth in action
Thanks to Nick Andrews of Open Air Photobooth for allowing us to show this demo of Flipbook Photobooth at Osheaga 2014
Nick runs events and sells photo booth/flip book station packages using Breeze event software.
Printing flip books from boomerang GIFs created in DSLR Remote Pro
Flipbook photobooth 1.8 comes with two scripts which create flip books when guests make boomerang GIFs in DSLR Remote Pro. One script creates a flip book for every boomerang GIF, the other asks the guest whether to print the flip book.
You can find these scripts in the Flipbook Photobooth installation folder. This is usually C:\Program Files (x86)\Breezesys\Flip Book Photobooth (1) as as shown here:
Breeze Flipbook Photobooth 1.8 includes 2 scripts you can use to create flip books from DSLR Remote Pro boomerang GIFs
Note: These scripts use the free Windows scripting tool, AutoHotKey. You need to download and install AutoHotKey before you run them.
auto_print.ahk(2) prints the flip book automatically when the animated GIF is accepted in DSLR Remote Pro.
auto_print_with_prompt.ahk(3) ask the guests whether to print the flip book.
Breeze also provide a free script which creates a GIF animation of each flip book sequence. This script uses the free Windows scripting tool, AutoHotKey and the ImageMagick convert command line tool. AutoHotKey must be downloaded and installed before you run the script.
Download the script and unzip all the files in the ZIP file to a single folder
Double click on flipbook2GIF.ahk to run the script.
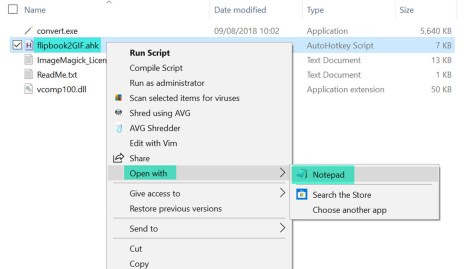
Open the script in a text editor such as Notepad for detailed instructions.
Please note that this script is provided free of charge and comes without any warranty or support.
You can share these GIFs using Breeze Kiosk or third party sharing software
Each Flipbook Photobooth license costs just US $250 (excluding any tax) and includes one year’s free upgrades. Buy your license online from the Breeze website
It’s great to hear that many more of you are using profiles. One common problem we come across runs something like this
I have been using profiles to do [… wonderful things I could never offer before]. Today I am running a different event, but whenever I start the program/each group of guests finish their session it goes back to the old settings. What is wrong?
When you use profiles you may have checked the boxes to load default profiles at start up/ after each session / when the program starts. You need to uncheck these boxes when you no longer want to use these proflies.
When you don’t want to use profiles for an event follow these steps:
The following notes are intended as a quick reference to some of the details in the video.
Some of the Breeze DSLR Remote Pro tokens used in this tutorial
Event tokens are special tokens which can be shared between different Breeze programs running on the same PC. They include the event name {eventName} , and several print counters.
Note: Tokens are case sensitive.
Print layouts
Tokens can be used to print information like today’s date less 8 hours {dateLess8h}) without editing the print layout each time it is used.
Why ‘date less 8 hours’? Use when events run past midnight, but you don’t want the images created after midnight to be stored under a different date. If your booths are always fast asleep before midnight you can use %d or %L token instead
{survey1_text1} stores the text a guest enters in response to the first question on the first survey screen
Information screens containing detailed information such as a Privacy Statement ot Terms and Conditions can also be added in DSLR Remote Pro 3.11.1 and later releases.
Tokens for check box surveys
Example of a checkbox survey used to obtained consent to specific uses of images taken in a booth. Breeze DSLR Remote Pro 3.11.1
In this example {survey1_chkbox1} will contain the value 1 if the first box (live feed) is checked, or 0 if it is not checked.
{survey1_chkbox2} will contain the value 1 if the second box (use for advertising) is checked, or 0 if it is not checked.
Check box surveys can also have multiple questions over several screens.
Friendly names for folders and images based on check box surveys
Example of separating images into two folders – one for images where guests have agreed that they are shared in a live feed, the other for images where guests have declined this.Tokens can be included in the pathname for the follder where images are stored during an event. In this example images are separated into two download folders based on the guest’s answer to the live feed question in the survey. (DSLR Remote Pro 3.11.1)DSLR Remote Pro creates the folders and stores images in appropriate folders as they are created
Print counters : DSLR Remote Pro 3.11 introduces tokens for accessing the print counters : {printQuotaUsed},{printCounterEvent} and {printCounterLocal}. Print counters can be used to automate a photo booth with a fixed print quota e.g. by loading a “share only” profile when the print quota has been used.. They can also be displayed in print captions.
February 2022:The information in this post has been replaced by a website page here
November 2021: Updated post to confirm support for Windows 11 as well as Windows 10 and Windows 8.
Breeze software is veryefficient. DSLR Remote Pro aka Breeze Booth ( Windows+DSLR) and Webcam Photobooth both run on low powered Windows computers running Windows 11, 10 and 8. The programs may run more quickly and print faster on a more powerful machine.
Breeze software is incredibly flexible. You can use it in many ways to produce and share photos, animated GIFs, slow motion and other videos. Some operators demand lightening fast results, others offer a more leisurely service. This short post is intended to help you choose the right computer to power your photo booth.
A budget laptop with an i3 processor and at least 4GB RAM should be fine for still photos. If you are planning to capture and playback boomerang GIFs, HD video, use AI background removal or green screen you may need a more powerful computer.
Touchscreens are flexible and an easy way to offer guests choices, share images and collect data. Laptops with built in touchscreens are popular, but not essential. Other ways to control the booth include contactless operation, buttons, coin operation, a wireless presenter and remote sensors.
Most photo booths need two USB 2.0 or 3.0 ports to connect the camera and printer. You can use a USB hub to increase the number of ports.
Background Removal, Green screen and burst GIFS
A more powerful PC will process background removal, green screen images and animated GIFs more quickly. A low powered PC is likely to take longer to produce the same result. Processing speed is affected by many other factors including the size of the image, background, overlay and print. Individual operators have different views about how fast their booth needs to work.
Try before you buy
If possible try the software either on the computer you plan to use, or a machine with a similar spec. You can download and try out DSLR Remote Pro and Webcam Photobooth for up to two weeks before buying the licenses.
We are often asked which camera is best for a photo booth. Canon cameras have very good live view quality, an important attribute for photo booths. The models below are not the only cameras you can use. Many older Canon DSLR cameras work very well. You can find a button linking to a list of the cameras you can use with Breeze DLSR Remote Pro here.
At the time of writing* (September 2021) we believe the ultimate photo booth cameras are ….. the mirrorless Canon EOS M50 Mark II and EOS M50 . For photo booth use there is no practical difference bewtween the two.
The standard kit lens ( EF-M 15-45mm STM ) has a flexible 15-45 mm zoom. For a super slim booth, try the EF-M 22mm STM lens
Best: Canon EOS M50 Mark II and EOS M50
Update: February 2019 Canon have released firmware version 1.0.2 for the M50 which fixes the issues with triggering external flash. The new firmware can be downloaded fromCanon’s UK site
A big thank you to Caroline Winata of Giggle and Riot Funbooth for sharing this example of slow motion video (EOS M50 with DSLR Remote Pro 3.10)
120FPS Slow motion video with no additional processing
Similar performance to the Canon EOS 200D/Rebel SL2 including Canon’s excellent dual pixel auto focus in live view.
Suitable for video with external microphone socket.
Compact, slim and light; the M50 will fit in a smaller housing than Canon’s DSLR cameras.
July 2018 This post has been updated to include cameras supported in DSLR Remote Pro 3.11.2 ie the Canon EOS 1500D (aka Canon EOS 2000D/Rebel T7/EOS Kiss X90) and Canon EOS 3000D (aka Canon EOS 4000D).
The photo below shows the different sizes of the EOS M50, EOS 200D/Rebel SL2 and new EOS 2000D/1500D/Rebel T7:
[top to bottom] EOS M50 with EF-M 22mm STM lens, EOS M50 with standard kit lens EF-M 15-45mm STM , EOS 200D/Rebel SL2 with 24mm pancake lens, EOS 2000D/1500D/Rebel T7with 18-55mm kit lens
Disadvantages
Access for external power is underneath the camera instead of at the side.
The external power cord connection for the M50 is on the camera base
Update February 2019
Canon have released firmware version 1.0.2 for the M50 which fixes the issues with triggering external flash. The new firmware can be downloaded from the Canon UK site (There was a bug in the original firmware of the Canon EOS M50 which meant that triggering an external flash or studio strobe via the hotshoe could be unreliable. We reported this bug to Canon, who have fixed it.)
Good for video: 200D/Rebel SL2, 850D/Rebel T8i/Kiss X 10i
These cameras do everything the M50 can do except slow motion video. They are larger and heavier than the M50.
Excellent auto focus in live view
Suitable for video & have an external microphone socket
The 2000D/T7 is an update of the popular Canon EOS 1300D/Rebel T6 with a higher resolution 24 mega pixel sensor. Unfortunately Canon initially removed the center contact on the hotshoe. This means early versions of this camera cannot trigger most external flashes or studio strobes so is not recommended for photo booth use.
Tuesday 25th February. Canon announced at Photo Booth Expo that the EOS Rebel T7/2000D camera has been updated to add a center contact (X sync) on the hotshoe, making this a great budget choice for photo booth users. More details.
Canon EOS 4000D/3000D
Similar to the Canon EOS 1300D/Rebel T6 with the same 18 mega pixel sensor but cheaper build quality (plastic lens mount, fewer buttons, no remote release socket and no cable access for external power). This camera has no center contact on the hotshoe. This means the camera cannot trigger most external flashes or studio strobes so is not recommended for photo booth use.
Web cameras & iPad booths
This post does not cover booths powered by web cameras or the built-in cameras provided with iPads, laptops and tablets. Breeze Booth (iPad + iPhone) uses either the device’s built in camera or Canon EOS DSLR cameras, some mirrorless and PowerShot models. Breeze Webcam Photobooth software will run a booth with either a webcam or built in camera in a Windows 11, 10 or 8 PC or laptop.
*This post has been updated in November 2021. As new cameras are introduced this post will inevitably become outdated.
120FPS Slow motion video with no additional processing
Support for small new mirrorless camera: Canon EOS M50
Support for new DSLR cameras: Canon EOS 2000D/Rebel T7 and EOS 4000D
Touchscreen designer: Set photo , print and sharing preview areas
Process individual images for sharing (includes resizing, sharpening and new overlay)
Limit number of prints per session
Custom messages when print counter reaches limit
More
New keyboard shortcuts to accept, retake and abort previews
New option to save XML copies of emails and texts
Privacy information added to the “Sharing Photos” section
Fixed an issue when using transparent green screen backgrounds with Instagram style filters or B&W styles
Fixed an issue with the full screen live view setting when the camera and screen are in portrait orientation
New cameras
Canon EOS M50
Canon’s new mirrorless M50 camera has great potential for photo booths
Smaller, lighter and slimmer than conventional DSLRs, this is the first model which can capture high quality slow motion video in a photo booth with no addional post processing.
Video is captured at 120 fps without sound and is saved at 30 fps resulting in high quality play back at 1/4 normal speed.
Canon EOS 200D/Rebel T7
Update of the Canon EOS 1300D/Rebel T6 and virtually identical but with a higher resolution 24 mega pixel sensor.
Canon EOS 4000D
Very similar to a Canon EOS 1300D/Rebel T6 with the same 18 mega pixel sensor but with cheaper build quality (plastic lens mount, fewer buttons, no remote release socket and no cable access for external power).
DSLR Remote Pro 3.10 is a free upgrade for all registered users who purchased a license on or after May 1st, 2017.
Steve explains how to create event specific versions of Breeze DSLR Remote Pro on your desktop (Facebook Live video 24th April 2018)
This video shows Breeze DSLR Remote Pro 3.9.1
“Inverted commas” aka quotation marks aka double quotes
The path of the settings file should be enclosed in inverted commas e.g. “C:\Program Files (x86)\BreezeSys\DSLR Remote Pro\DSlrRemote.exe” “C:\profiles\settings.xml”
If your path contains spaces and is not contained within inverted commas it won’t work.
Breeze have always respected our customers’ privacy and that of guests captured with our software. Our software is sold worldwide; our customers have differing ethical and legal responsibilities about processing and handling data (including photos and other images).
No Breeze photo booth program (ie DSLR Remote Pro, Webcam Photobooth, DSLR Remote Pro for Mac, and PSRemote) shares photos online by default; photos are only shared if the program is explicitly set up to do so.
Breeze Kiosk was developed to enable social sharing. The current release Breeze Kiosk 1.4.4 will only transfer images to/from any social media site if the program is explicitly set up to do so.
Note: Older releases of Breeze Kiosk defaulted to allow images to be uploaded to Facebook. Images are only uploaded to other social media sites or downloaded from Instagram and Twitter if the program is explicitly set up to do so.
Breeze Kiosk privacy mode will only allow images to be displayed, shared or printed if the user enters the correct code.
Breeze Systems have no access to or control over guest images or data generated by our software, with two exceptions documented in the help files:
When animated GIFs are shared on Facebook, Breeze software stores a copy of the GIF on GIPHY
When images are shared by MMS and ‘SMS + Image’ using Twilio, the shared images and file names are stored on Breeze servers for 7 days and then deleted. The mobile number is not stored on Breeze servers. It is possible (although not necessary) for a user to generate image file names which include personal information about the event or guests. The Breeze servers are hosted by an EU based ISP.
The current versions of our photo booth software and Breeze Kiosk allow you to offer ‘opt in’ consent to image sharing.
Where oursoftware enables users to upload, download, and store photos the user controls where and how the images are sent; often using third party services such as Facebook, Twitter, and Dropbox. Don’t forget that it is your responsibility as user to ensure the third-party services you use are appropriate for your events and the jurisdiction you are working in.


You must be logged in to post a comment.