Slideshow GIF with the new top/bottom mirror effect
Save logos with Photo Booth Print Layouts
Logos provide a quick and easy way to add graphics to prints without using an image editor such as Photoshop.
DSLR Remote Pro 3.12 introduced the ability to add up to five JPEG and/or PNG logos to your prints. Many of you want to save these logos with your photo booth print layouts, so we have added this feature to v3.13.
Add up to 5 logos to each print and export them with the Print Layout (Breeze DSLR Remote Pro 3.13)
Total number of prints counter
Keeps count of the number of prints made (Breeze DSLR Remote Pro 3.13)
The new Total number of prints counter is shared with other Breeze apps running on the PC such as Kiosk, and incremented each time any of these apps prints. Learn more
Note to advanced users: The token for this counter {eventPrintTotal} can be used in filenames, caption text in print layouts and message text.
Try DSLR Remote Pro 3.13 for yourself
DSLR Remote Pro 3.13 is a free upgrade for all registered users who purchased DSLR Remote Pro after 14th April 2018. Customers with older licenses need to buy an upgrade license to use this release.
Pop Art and mirror effects are a doddle in DSLR Remote Pro. Set up your booth as usual, copy PhotoboothcreativeFilter.dll into your PhotoboothImages folder, then select the filter you want to use. That’s it!
DSLR Remote Pro 3.13 ships with ten creative filters and six Instagram style filters as standard. This post explains how to use mirror, Pop Art and other filters in still photos, slideshow and boomerang (burst) GIFs.
This post was updated on 2 September 2021 to add a link to the profile tutorial which explains how to build a menu. Use menus to offer guests a choice of filters.
Copy PhotoboothcreativeFilter.dll into your PhotoboothImages folder
Copy PhotoboothcreativeFilter.dll from your installation folder (usually C:\Program Files (x86)\BreezeSys\DSLR Remote Pro) into your PhotoboothImages folder
Copying PhotoboothcreativeFilter.dll from C:\Program Files (x86)\BreezeSys\DSLR Remote Pro
Just paste PhotoboothcreativeFilter.dll into your PhotoboothImages folder
Connect your camera and choose a filter
Start the booth and DSLR Remote Pro will display the default filter (color negative).
Color negative filter (Breeze DSLR Remote Pro 3.13)
Type Ctrl+Shift+C to display the setup page and choose one of the mirror filters:
Drop down list of creative filters. DSLR Remote Pro 3.13 introduces mirroring and an ‘off’ setting.
Selecting one of the creative filters in DSLR Remote Pro
You are away! Here are a few examples of mirroring, Pop Art and Posterized effects:
Left/right mirroring
Left/right mirroring GIF in DSLR Remote Pro (new in Breeze DSLR Remote Pro 3.13)
Top/bottom mirroring
Square images on a square print with top/bottom mirroring (new in Breeze DSLR Remote Pro 3.13)
Two by two mosaic
Create multiple reflections with the two by two mosaic filter (DSLR Remote Pro 3.13)
Pop Art
Breeze gives total control over Pop Art effect colors. This print layout fills a square 6 x 6 print with 4 square images
Pop art effect slideshow GIF (Breeze DSLR Remote Pro 3.13)
Posterize
Posterize effect in slideshow GIF (Breeze DSLR Remote Pro)
Switch between filters or turn them off
Type Ctrl+Shift+C on the Ready screen to switch to a different filter or turn them off completely.
Set up filters for boomerang GIFs in exactly the same way as for still photos/slideshow GIFs. Guests see the effect of each filter as they pose, not just on their prints and GIFs:
Creative filters work with both photos and boomerang GIFs
Save the current filter for future use
The current filter is automatically saved* for the Photobooth Images folder you are using. When you next load this Photobooth Images folder into DSLR Remote Pro, it will automatically run the same filter.
*Filter settings are saved in the program registry for each Photobooth Images folder.
Where the outputs are stored
Screenshot of subfolders containing outputs from the booth
DSLR Remote Pro gives you a lot of control over where your images are stored. This can be really useful when you want to use a watch folder to share, display or upload images from the booth. This post explains where DSLR Remote Pro usually places different types of images.
Mirroring filters in portrait
If you shoot in portrait the top/bottom and left/right filters are swapped. The two by two mosaic works but ‘swap top halves’ is not designed for portrait orientation.
DSLR Remote Pro 3.13 is a free upgrade for all registered users who purchased DSLR Remote Pro after 14th April 2018. Customers with older licenses need to buy an upgrade license to use this release.
Mirror booths usually do not display the camera’s live view because guests see themselves pose in the mirror.
Breeze DSLR Remote Pro’s support for bespoke interfaces and custom menus makes it a great choice for magic mirrors and photo booths. You can hide the live view whether you are offering still photos, GIFs, slow mo or video booth:
Fusion Booth running DSLR Remote Pro with choice of boomerang GIF, slow motion or photos (Image courtesy of Incredible Booth)
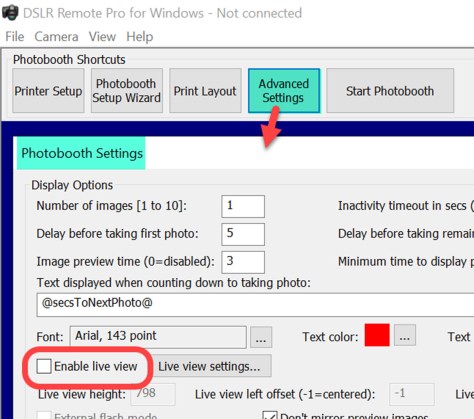
To capture still photos without displaying the live view simply switch it off in Advanced Settings.
Live view unchecked to hide the live view when capturing still images (Breeze DSLR Remote Pro 3.12)
This is great when you want to make slideshow GIFs from a set of still photos.
Breeze boomerang GIFs are captured from the camera’s live view, so when live view is switched off you cannot shoot boomerang GIFs.
Hide the live view
Mirror booth users and others who want to shoot boomerang GIFs without showing the live view need to hide it. There is a simple trick to this – move the live view so that it is no longer displayed on screen. If your screen is 1080 x 1920 pixels, offset the live view by more than this (In this example I have offset by 2000 pixels in both directions):
This slideshow requires JavaScript.
Guests will still see the countdown but not the live view. Magic!
Breeze DSLR Remote Pro powers photo booths and mirror booths worldwide. Licenses cost just US $275* each and include one year’s free upgrades. This post shows screenshots from Breeze DSLR Remote Pro 3.12
This Windows based App runs as a fully functional trial for up to 14 days supporting most Canon DSLR cameras and Canon’s mirrorless M50.
Guests often want to share images to several email addresses. The default versions of both DSLR Remote Pro and Breeze Kiosk send emails to one address at a time. DSLR Remote Pro 3.12 and Breeze Kiosk 1.5introduce the ability to cc additional addresses when sending emails.
Sending images to multiple addresses from DSLR Remote Pro
Example 1: Adding a CC line to the email keyboard
We need to add a second prompt to the email keyboard. We do this by editing the default email_keyboard.xml file. I am going to walk you through this step by step. It doesn’t matter if you have never seen xml before.
First open the touchscreen editor, click on Test keyboard… and select Email keyboard.
Accessing the email keyboard in DSLR Remote Pro 3.12
Email keyboard created by setup wizard in DSLR Remote Pro 3.12
Then left click the mouse while holding down both Shift and Ctrl keys. This lets you save the XML file and the keyboard images.
First delete the four keyboard image files from the PhotoBoothImages folder(otherwise we won’t see any any changes we make to the text prompts).
PhotoBoothImages folder showing email_keyboard.xml and keyboard images (DSLR Remote PRo 3.12)
Open the email_keyboard.xml file in a text editor such as Microsoft Notepad (which comes free with Windows 10)
Replace the highlighted text with this and save the changes:
<prompt1 email_address=”1″ mandatory=”1″>Please enter your email address:</prompt1>
<text1_x>38</text1_x>
<text1_y>170</text1_y>
<text1_r>1882</text1_r>
<prompt2 email_address=”1″>CC:</prompt2>
<text2_x>38</text2_x>
<text2_y>356</text2_y>
<text2_r>1882</text2_r>
Note: Here the second prompt will appear below the first prompt. This is achieved by using the same x coordinate, and different y coordinates. The CC email address is optional and so prompt2 does not need the ‘mandatory’ attribute.
xml changed to share to two email addresses
Two is not enough?
There is usually room on a booth or kiosk screen to add the second line above. You may find it more difficult to find space to enter three or more addresses. The screen size, orientation ( there is usually more empty space in portrait oriented mirror booths than landscape photo booths and kiosks) and the numberof characters allowed for email addresses all make a difference.
These examples in this post have been created for a screen 1920 pixels wide by 1080 pixels high. If your screen is different you may need to adjust the values you use. It is also possible (but more complicated) to change the size and position of the keyboard buttons on your screen. More details
Example 2 has space for 3 email addresses to be entered below each other. Example 3 includes 4 email addresses in 2 rows. Both are created by editing the email_keyboard.xml in the same way as before. Each time you edit the xml, use DSLR Remote Pro’s test keyboard to check whether your changes work as you expect.
Example 2: Adding two CC lines to the email keyboard
Here a third prompt has been added below the others. To fit this in above the keyboard, the y coordinates of all 3 fields have been adjusted and the size of the text reduced (DSLR Remote Pro 3.12)
Example 3: Four email addresses on the email keyboard
In this example a single email is sent to four different addresses:
For more detail and other ways you can customize the touch screen keyboards in DSLR Remote Pro see the help files
Sending images to multiple addresses from Breeze Kiosk
Use the same technique with Breeze Kiosk. Start with the default email_keyboard.xml file by (1) selecting Settings. (2) Check that sending emails is enabled, and (3) click on Test keyboard…
Accessing the email keyboard in Breeze Kiosk 1.5
Then left click the mouse while holding down both Shift and Ctrl keys. This lets you save the XML file and the keyboard images. Delete the keyboard images and edit the xml in the same way as for DSLR Remote Pro.
For more detail and other ways you can customize the Breeze Kiosk touch screen keyboards see the touchscreen keyboard section of the help files
Summary
This post has walked you through adding cc email addresses to your DSLR Remote Pro screens, and outlined how to make similar changes to Breeze Kiosk.
Note: This post was updated in September 2019 for the latest releases of Hotfolder Prints 1.8, and Webcam Photobooth 1.5.
If you are new to DSLR Remote Pro or Webcam Photobooth, first run the Photo booth Setup Wizard. This creates all the screens for a basic working system. It also creates print layouts with a plain white background. The video demonstrates
How to change the background color of your prints
How to add logos and other graphic icons to your prints (DSLR Remote Pro 3.12, Hotfolder Prints 1.8 and Webcam Photobooth 1.5)
How to add simple captions
how to use Breeze tokens to show the correct date on prints
How to use Breeze tokens to automatically add the event name to prints (DSLR Remote Pro 3.12 andHotfolder Prints 1.8 only)
How to import pre-designed layouts
How to add a QR code
Notes
The video is intended to give you a taste of the Print Layout Editor. See the program help files for more details
Find a great video introduction to using tokens with Breeze here
There are minor differences in the way tokens work in these three programs:
{eventName} and {dateLess8h} are new in Hotfolder Prints 1.8
{eventName} is not yet supported in Webcam Photobooth
DSLR Remote Pro Print Layout Editor displays the current value of tokens
Hotfolder Prints and Webcam Photobooth Print Layout Editors display the token names in the print layout editor
Importing pre-designed layouts into Breeze
Learn more about using layouts I used in the video here .These free templates were kindly provided by SMOVE for use by Breeze customers.
NB: Logos are not saved in the Photobooth Print Layout (pblt file) in this release. To use both predesigned layout and logos, you need to import the layout before adding the logos to your design.
Try for yourself
Download copies of DSLR Remote Pro, Hotfolder Prints and Webcam Photobooth from our website
If you found this post useful please share it with others.
Display both video background and GIF overlay on the same screen
live view overlay for video mode
much faster upload of images shared by text or Twitter
print count resets to initial value for each session
and also
fixes issue sharing boomerang GIFs captured in video booth mode (affected 3.11.4 only)
Canon EOS R support
Breeze DSLR Remote Pro 3.12 adds support for Canon’s EOS R mirrorless camera
Add logos to your prints
Logos provide a quick and easy way to add graphics to prints without using an image editor such as Photoshop.
Add up to 5 different png or jpg logos to prints with Breeze DSLR Remote Pro 3.12
Add up to five different logos to a print layout. Logos can be either png or jpg format.
Note: Logos are not saved in the Photobooth Print Layout (pblt file) in this release. To use both predesigned layout and logos, you need to import the layout before adding the logos to your design.
The print counter will reset to the initial value for each new session
The print counter now automatically resets to the initial value for each photo session
How to get your hands on v3.12
DSLR Remote Pro 3.12 is a free upgrade for all registered users who purchased DSLR Remote Pro after 26th November 2017. Customers with older licenses need to buy an upgrade license to use this release.
Have you tried Breeze transparent greenscreen? It’s a great way to make your GIFs stand out.
This tutorial assumes you can already shoot simple green screen photo booth images with DSLR Remote Pro, and explains how to add animated backgrounds and overlays to a slideshow GIF.
Usually when you shoot in greenscreen, each photo is saved with a single green screen background. Transparent greenscreen removes the background from an image and stores it as a png with a transparent background. This lets you add a variety of backgrounds later.
Selecting transparent greenscreen processing in Breeze DSLR Remote Pro 3.11.4
The original photo is shot against a greenscreen background
DLSR Remote Pro removes the green background and saves the photo on a transparent background
Breeze lets you combine these images into a slideshow GIF which has an animated background.
Add the GIF backgrounds
To make a slideshow GIF with an animated background, you need to add a series of GIF backgrounds to your PhotoBoothImages folder.
My GIF has 3 photos. Each of these photos will have 3 different background images.
9 GIF backgrounds in the PhotoBoothImages folder (Breeze DLSR Remote Pro 3.11.4)
The background images are named GIF_background_1.jpg through to GIF_background_9.jpg
Add the GIF overlays
My GIFs will have 9 overlays called GIF_overlay_1.png through to GIF_overlay_9.png
9 GIF overlays in the PhotoBoothImages folder (Breeze DLSR Remote Pro 3.11.4)
Add the on-screen background
To keep things simple I am using 1 still background image for the on screen preview. This is called greenscreen_background.jpg as usual.
Greenscreen background image in the PhotoBoothImages folder (Breeze DLSR Remote Pro 3.11.4)
There are 3 backgrounds and overlays for each photo
Each photo will be shown for one second
The GIF will be displayed for at least 3 seconds
Printing transparent greenscreen images
The photos are saved with transparent backgrounds, so you can print them against a white background, or on a single background image. The images can be a different color from the background.
This post explains how to add a custom attraction or standby screen to DSLR Remote Pro. Breeze calls this a welcome screen.
Use your welcome screen to attract people to your booth, as a quick method of branding, and to protect your camera*. The welcome screen can be a still image, animated GIF or video. You can add sound to attract people’s attention.
*Running live view for long periods drains battery power and can cause the camera’s sensor to heat up. If the photo booth is idle Breeze automatically cancels the live view and displays the welcome screen.
This post shows how to replace the standard welcome screen with a movie or your own still image. You can customize Webcam Photobooth in the same way.
Breeze Multi-Camera has a similar screen called standby.jpg which can be customized and animated in a similar way.
Note: This post was updated in September 2019 to make it clearer that you need to set the inactivity timeout value
Default screen set created by the photo booth setup wizard, showing the initial attraction screen welcome.jpg (DSLR Remote Pro 3.11.4)
Add a custom welcome screen
Rename the original welcome.jpg in case you want to use it again. (Mine is called welcome-old.jpg.)
Copy your new image into the same folder, and call it welcome.jpg To fill the screen, make the new image the same size in pixels as the image it replaces.
Paste a new welcome.jpg into your PhotoBoothImages folder. This should be the same size (in pixels) as the original (DSLR Remote Pro 3.11.4)
Inactivity timer
To control how long the booth waits before going into standby mode and displaying the welcome screen, adjust the inactivity timer. Go to Advanced Settings, and set the number of seconds you want to wait until the booth goes into standby mode:
Setting the inactivity time in DSLR Remote Pro 3.11.4
Run the booth, wait a while for it to go into idle mode and your welcome screen will be displayed.
Add a welcome screen with a movie
Add your movie to the PhotoBoothImages folder and name it welcome_loop.mp4 if you want the movie to loop, or welcome.mp4 to run it just once.
Note: You need both the background image ( welcome.jpg) as well as the animation in the PhotoboothImages folder. The background image is often plain black (mirror booths) or a copy of the first frame of your movie. It may appear briefly before the animation starts running.
Here a movie called welcome_loop.mp4 has been added to the PhotoBoothImages folder (DSLR Remote Pro 3.11.4)
That’s it! Start DSLR Remote Pro and check everything is working. You will need to wait for the inactivity timer to kick in before you see your video.
Finer details
What happens if my video is smaller than the screen?
If your video is smaller than your screen, it will be displayed in the center of the screen with your welcome.jpg behind it:
Here the attraction video is smaller than the screen (DSLR Remote Pro 3.11.4)
Yes, you can customize most other screens in the same way. Replace the original screen in your PhotoBoothImages folder with another still (.jpg), add a movie (.mp4 or .mov) or GIF file with the same name. For more details, see
Yes. To add animations and sound to magic mirrors include them in your PhotoBoothImages folder in the same way.
Where can I find animations for my booth/mirror?
There are lots of sources of animations on the web. These are some of the vendors who offer animations and complete Breeze themes for photo booths and mirrors
fixed – issue where video sharing screen showed previous print layouts
fixed – rotated images showing black in print layouts ( only affected 3.11.3)
Virtual props, emojis and stickers
July 2019 update: DSLR Remote Pro 3.14 adds the ability for guests to choose their own frame for the print. Details here
To let your guests draw on, sign and now add virtual props, emojis and stickers to their prints, select Advanced Settings, then Output Options Settings. Check the box marked Sign or draw on photos before printing, and OK as you leave.
Shows how to allow guests to add props & emoji, sign & draw on prints using DLSR Remote Pro 3.11.4
You can create your own icon sets, but we have included these emoji/basic props for starters:
Guests can rotate, expand and shrink the icons. You can restrict them to decorating part of the print, and even prevent them from defacing part of it if your clients are sensitive.
Specially for magic mirrors – move reprint button to the top of the screen
Here’s how:
How to position the reprint icons at the top of the screen (Breeze DSLR Remote Pro 3.11.4)
DSLR Remote Pro 3.11.4 is a free upgrade for all registered users who purchased DSLR Remote Pro after 11th September 2017. Customers with older licenses need to buy an upgrade license to use this release.
“Where are the images from my event? I am sure I saved them and have looked everywhere on the computer …..”
DSLR Remote Pro holds the key
Start DSLR Remote Pro, click on File then Preferences
Select File then Prefernces to show the DSLR Remote Pro prefernces screen (DSLR Remote Pro 3.11.3
This brings up the Preferences window, which tells you which folder images are saved in:
The DSLR Remote Pro Preferences screen shows the folder where images are stored, and displays an example image name
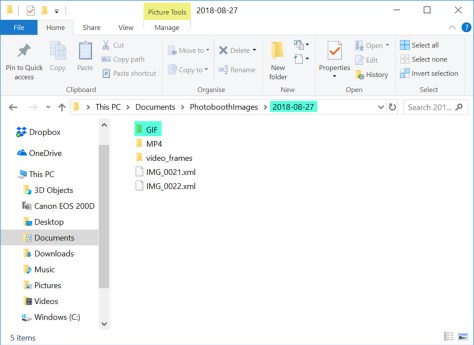
In this example the original photos are stored in a folder called C:\Users\sue\Documents\PhotoBoothImages\2018-09-06
PhotoBoothImages folder showing sub folder 2018-09-06 containing images taken on 6th September, 2018
Where are copies of prints, slideshow GIFs, green screen and other processed photos stored?
Usually you will find these in a sub folder of the main image folder, eg C:\Users\sue\Documents\PhotoBoothImages\2018-08-27\prints
DSLR Remote Pro gives you a huge amount of control over what and where you save images. Advanced users often use tokens as part of their file naming.
Use the Output Settings window to check where to find still images and slideshow GIFs.
Output Settings
Click on Advanced Settings, then the Output OptionsSettings… button to reach this window:
DSLR Remote Pro Output Settings screen (Breeze DSLR Remote Pro 3.11.3)
(1) Copies of each print are saved in a subfolder called Prints if Output is set to Save and print JPEG copy or JPEG copy only
(2) Copies of processed photos are saved in a subfolder called Processed. This includes images which have been rotated, cropped, digitally zoomed, green screened, converted to B&W, toned, had Instagram style filter applied or are post processed using Photoshop.
(3) If you select deletion of images which guests choose not to print, DSLR Remote Pro does delete them!
(4) Slideshow GIFs are either (a) stored in a sub folder called GIF or (b) in the prints sub folder
(4a) Folder showing images taken on 2018-08-27. Original images (IMG_0001.JPG etc) are in the main folder, slideshow GIFs in sub folder GIF, MP4 copies of the GIFs in sub folder MP4, print layouts in sub folder prints
(4b) Here the slideshow GIFs are stored in the prints sub folder with the JPG print layouts (DLSR Remote Pro 3.11.3
Boomerang GIFs are created from video, and are usually stored in either in (a)sub folder GIF or (b) sub folder prints
(a) Folder showing images taken on 2018-08-27. Boomerang GIFs in sub folder GIF, MP4 copies of the GIFs in sub folder MP4. (DSLR Remote Pro 3.11.3)
(b) Here boomerang GIFs are stored in the prints sub folder (DLSR Remote Pro 3.11.3)
Look in the Animated GIF Settings (Video Booth Mode) window to check where to find your boomerang GIFs. Click on File, then Video Booth Settings, then select the Animated GIF settings button to access this window:-
The Animated GIF Animated GIF Settings (Video Booth Mode) window shows where boomerang GIFs are stored. Select File, then Video Booth Settings, then Animated GIF settings to reach this window (DSLR Remote Pro 3.11.3)
(6) Check to save PNG copies of live view image frames used to construct GIFS will be stored in sub-folder GIF_frames,
(7) Check to save boomerang GIFs in the prints sub folder
(8) Checked to create MP4 copies of boomerang GIFs
(9) MP4 copies of GIFs can be stored in sub folder MP4, subfolder prints or the same folder as the GIFs


You must be logged in to post a comment.