You can also use Kiosk with still (JPEG) and animated (GIF, MP4 or MOV) images captured by third party software.
What’s new in Kiosk 1.5.1?
Social sharing counters
Collect stats on emails, texts and tweets sent from each Kiosk as well as the number of prints.
Breeze Kiosk 1.5.1 includes new counters for the number of emails, texts, tweets and prints from the kiosk at an event
Flexible printing
Print up to 3 different print sizes
Control several printers
Print up to 3 different sizes of print on the same or different printers with Breeze Kiosk 1.5.1
Choose up to 3 different printer settings. In the screenshot above the default printer (1) is a Mitsubishi CP70D printing 4″ x 6″ layouts. Prints prefixed square (2) are printed square on the same CP70D printer. Single 2″x 6″ strips are displayed in Kiosk as single strips, but printed (3) as double strips on 4″x6″media.
This feature can also be used to print to 3 different printers.
Slideshow plays full video before advancing
New option to play videos at least once when running a slideshow i.e. don’t advance the slideshow until the video has played from start to finish at least once.
Performance improvements
Performance improvements for swiping images when running on Microsoft Surface Go
Fixes
Fixed glitch with the selected thumbnail changing when new images are added with the “Display newest images first” option selected
Fixed issue which caused the wrong photo to being printed if a new photo was added while the print confirmation screen was displayed
Fixed issue setting the initial values of check boxes in keyboards
This release is a free upgrade for all registered users who bought a Kiosk license on or after 30th May, 2018.
Customers with older Kiosk licenses need to buy an upgrade to use this release.
Slideshow GIF with the new top/bottom mirror effect
Save logos with Photo Booth Print Layouts
Logos provide a quick and easy way to add graphics to prints without using an image editor such as Photoshop.
DSLR Remote Pro 3.12 introduced the ability to add up to five JPEG and/or PNG logos to your prints. Many of you want to save these logos with your photo booth print layouts, so we have added this feature to v3.13.
Add up to 5 logos to each print and export them with the Print Layout (Breeze DSLR Remote Pro 3.13)
Total number of prints counter
Keeps count of the number of prints made (Breeze DSLR Remote Pro 3.13)
The new Total number of prints counter is shared with other Breeze apps running on the PC such as Kiosk, and incremented each time any of these apps prints. Learn more
Note to advanced users: The token for this counter {eventPrintTotal} can be used in filenames, caption text in print layouts and message text.
Try DSLR Remote Pro 3.13 for yourself
DSLR Remote Pro 3.13 is a free upgrade for all registered users who purchased DSLR Remote Pro after 14th April 2018. Customers with older licenses need to buy an upgrade license to use this release.
Note: This post was updated in September 2019 for the latest releases of Hotfolder Prints 1.8, and Webcam Photobooth 1.5.
If you are new to DSLR Remote Pro or Webcam Photobooth, first run the Photo booth Setup Wizard. This creates all the screens for a basic working system. It also creates print layouts with a plain white background. The video demonstrates
How to change the background color of your prints
How to add logos and other graphic icons to your prints (DSLR Remote Pro 3.12, Hotfolder Prints 1.8 and Webcam Photobooth 1.5)
How to add simple captions
how to use Breeze tokens to show the correct date on prints
How to use Breeze tokens to automatically add the event name to prints (DSLR Remote Pro 3.12 andHotfolder Prints 1.8 only)
How to import pre-designed layouts
How to add a QR code
Notes
The video is intended to give you a taste of the Print Layout Editor. See the program help files for more details
Find a great video introduction to using tokens with Breeze here
There are minor differences in the way tokens work in these three programs:
{eventName} and {dateLess8h} are new in Hotfolder Prints 1.8
{eventName} is not yet supported in Webcam Photobooth
DSLR Remote Pro Print Layout Editor displays the current value of tokens
Hotfolder Prints and Webcam Photobooth Print Layout Editors display the token names in the print layout editor
Importing pre-designed layouts into Breeze
Learn more about using layouts I used in the video here .These free templates were kindly provided by SMOVE for use by Breeze customers.
NB: Logos are not saved in the Photobooth Print Layout (pblt file) in this release. To use both predesigned layout and logos, you need to import the layout before adding the logos to your design.
Try for yourself
Download copies of DSLR Remote Pro, Hotfolder Prints and Webcam Photobooth from our website
If you found this post useful please share it with others.
fixed – issue where video sharing screen showed previous print layouts
fixed – rotated images showing black in print layouts ( only affected 3.11.3)
Virtual props, emojis and stickers
July 2019 update: DSLR Remote Pro 3.14 adds the ability for guests to choose their own frame for the print. Details here
To let your guests draw on, sign and now add virtual props, emojis and stickers to their prints, select Advanced Settings, then Output Options Settings. Check the box marked Sign or draw on photos before printing, and OK as you leave.
Shows how to allow guests to add props & emoji, sign & draw on prints using DLSR Remote Pro 3.11.4
You can create your own icon sets, but we have included these emoji/basic props for starters:
Guests can rotate, expand and shrink the icons. You can restrict them to decorating part of the print, and even prevent them from defacing part of it if your clients are sensitive.
Specially for magic mirrors – move reprint button to the top of the screen
Here’s how:
How to position the reprint icons at the top of the screen (Breeze DSLR Remote Pro 3.11.4)
DSLR Remote Pro 3.11.4 is a free upgrade for all registered users who purchased DSLR Remote Pro after 11th September 2017. Customers with older licenses need to buy an upgrade license to use this release.
Support for new cameras: Canon EOS 6D Mark II, 200D, Rebel SL2,1500D, 2000D, Rebel T7, 3000D, 4000D
What is Flipbook Photobooth?
Breeze Flipbook Photobooth is Windows based event software for creating flip books using a Canon DSLR camera. Guests capture a short animation and play it back by flicking through the pages of a printed flip book.
Run Flipbook Photobooth as a standalone app shooting the animation, creating and printing flip books
Print flip books from from boomerang GIFs created in DSLR Remote Pro
Most the equipment is the same as you need for a DSLR based photo booth. Books are usually printed on a dye sublimation printer capable of printing 6×2 strips.
Branding and customisation – front cover, individual flip book pages, and screens can all be branded and customised
Breeze flexibility as standard! Offer guests a choice of green screen backgrounds or book covers. Add an extra dimension by changing the background or overlay as the book progresses. Upsell larger books or more pages. Use multiple printers at large corporate events. Breeze Flipbook Photobooth supports dye sub media, laser and inkjet printers.
This slideshow requires JavaScript.
See Flipbook Photobooth in action
Thanks to Nick Andrews of Open Air Photobooth for allowing us to show this demo of Flipbook Photobooth at Osheaga 2014
Nick runs events and sells photo booth/flip book station packages using Breeze event software.
Printing flip books from boomerang GIFs created in DSLR Remote Pro
Flipbook photobooth 1.8 comes with two scripts which create flip books when guests make boomerang GIFs in DSLR Remote Pro. One script creates a flip book for every boomerang GIF, the other asks the guest whether to print the flip book.
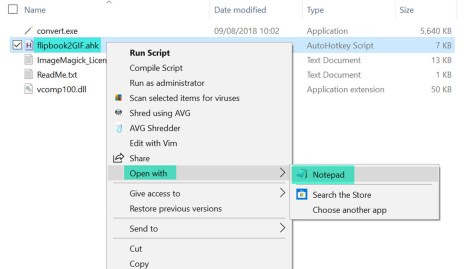
You can find these scripts in the Flipbook Photobooth installation folder. This is usually C:\Program Files (x86)\Breezesys\Flip Book Photobooth (1) as as shown here:
Breeze Flipbook Photobooth 1.8 includes 2 scripts you can use to create flip books from DSLR Remote Pro boomerang GIFs
Note: These scripts use the free Windows scripting tool, AutoHotKey. You need to download and install AutoHotKey before you run them.
auto_print.ahk(2) prints the flip book automatically when the animated GIF is accepted in DSLR Remote Pro.
auto_print_with_prompt.ahk(3) ask the guests whether to print the flip book.
Breeze also provide a free script which creates a GIF animation of each flip book sequence. This script uses the free Windows scripting tool, AutoHotKey and the ImageMagick convert command line tool. AutoHotKey must be downloaded and installed before you run the script.
Download the script and unzip all the files in the ZIP file to a single folder
Double click on flipbook2GIF.ahk to run the script.
Open the script in a text editor such as Notepad for detailed instructions.
Please note that this script is provided free of charge and comes without any warranty or support.
You can share these GIFs using Breeze Kiosk or third party sharing software
Each Flipbook Photobooth license costs just US $250 (excluding any tax) and includes one year’s free upgrades. Buy your license online from the Breeze website
Check a single box in the Photobooth Setup Wizard to shoot and print square photos using Breeze DSLR Remote Pro 3.9.
Usually photo booth images are shot in ‘landscape’ mode; so that you can comfortably include several people in the shot. Sometimes we want to vary this.
Run the Photobooth Setup Wizard
Start DSLR Remote Pro and run the Photobooth Setup Wizard (1) to set up a basic booth, selecting a square live view (2) at Step 2. DSLR Remote Pro allows you to customize your booth setup without connecting the camera.
Selecting square live view using the Photobooth setup Wizard: DSLR Remote Pro 3.9.1
In this example I have chosen a single photo (3) at Step 3.
Photoboth Setup Wizard: selecting a single photo DSLR Remote Pro 3.9.1
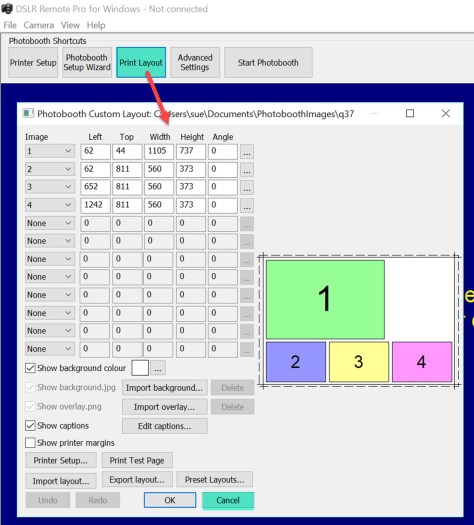
Customize the print layout
Opening the Print Layout Editor DSLR Remote Pro 3.9.1
When you open the Print Layout Editor you will see that the print layout is square. Customize your print as usual.
Square Photo layout in Print Layout Editor DSLR Remote Pro 3.9.1
Start the photo booth
Select Start Photobooth to run the booth DSLR Remote Pro 3.9.1
The Photobooth Setup Wizard has cropped both the live view and print layout for you.
Default ready screen for square photo DSLR Remote Pro 391.jpg
Square photos can be combined with filters to give a pop art effect, or used singly for a ‘polaroid’ look.
Ready for more? You can also create round (or any other shape) photos using a live view overlay and print overlay. You will need to create these overlays in an image editor such as Photoshop. The DSLR Remote Pro help files explain how to customize screens and prints in more detail.
There are two main ways to import layouts into DSLR Remote Pro.
Drag and drop the template directly into DSLR Remote Pro (best for single templates).
Copy the templates into your template folder, then import each template into DSLR Remote Pro using the Print Layout Editor when you need it (more effective for collections of templates).
First set up your printer
If necessary, download and install the printer drivers to your computer.
This example will import a 6” x 4” (15cm x 10cm) print layout. Before you start you need to load the printer with 6” by 4“media and set it to 300dpi.
Put the print template(s) into an accessible folder
Whether you download print layouts from a third-party website or copy them from another computer they need to be kept in folder(s) accessible to your booth computer.
In this post I will copy the template into the template folder on my PC. You may prefer to store templates in Dropbox or another cloud-based system accessible to multiple booths.
Download the photo booth layout and open zipped files
In this example I am using a 6” x4” template with a 1 +3 layout.
Copy the zipped file to another folder to unzip it. I have copied the file to my templates folder Sue Photobooth Print Templates which is in the same directory as my PhotoboothImages Folder.
Start DSLR Remote Pro and run the Photobooth Setup Wizard
At Step 3
1. Check the printer is set correctly.
2. Choose the print layout closest to the template you are using
3. Click on <Finish>
If you look at the Print Layout Editor now you will see the default 1 + 3 print layout. (Cancel to leave the Layout Editor).
Drag and drop into DSLR Remote Pro
DSLR Remote Pro allows you to drag and drop a print layout into the main screen or into the Print Layout Editor
Drag and drop a print layout template into Breeze DSLR Remote Pro 3.9.1 main screen
Drag and drop a print layout template into Breeze DSLR Remote Pro 3.9.1 Print Layout Editor (also works for Webcam Photbooth 2.4)
You will be asked to confirm whether you want to import the template:
Print Template import confirmation window DSLR Remote Pro 3.9.1
Select Yes and the Print Layout Editor will display the template you imported.
Customize and save the revised template
First save a backup copy of the original layout using Export Layout, then customize the layout to meet your needs.This post does not explain how to use the Print Layout Editor; you can find detailed instructions here. In this example I will change the caption.
Editing a caption in the Print Layout Editor DSLR Remote Pro 3.9.1
The changes are shown immediately in the Print Layout Editor.
When you have finished customising the print layout, export the template to save it.
Alternative: Use the Print Layout Editor to import templates
There is an alternative to dragging and dropping templates into DSLR Remote Pro. You can copy templates into a folder accessible to your booth, then import the template you need using the Import Layout (1) button in the Print Layout Editor.
Importing a layout into the Print Layout Editor DSLR Remote Pro 3.9.1 (also works with Webcam Photobooth 2.4)
(2) Select the folder containing your layout(s), and then the layout you want to import. (3) Click on OK to import the layout into the Print Layout Editor. You can edit and save the customized template as before.
Notes
Webcam Photobooth users need to select the “DSLR template compatibility” option at Step 3 of the Photobooth Setup Wizard to use templates designed for DSLR Remote Pro.
Selecting DSLR template compatiblity mode using the Setup Wizard in Webcam Photobooth 2.4 S
Zipped files: many templates are downloaded or copied as zipped (compressed) files, which need to be unzipped before they can be used. The example here uses a zipped file downloaded from the Breeze website.
Printer drivers: you may need to download and install drivers for your printer to the computer you are using.
Using a second computer to edit print layouts. You do not need to create and edit print layouts on the booth computer. Keep a copy of DSLR Remote Pro on an office computer to design, customize and edit your print layouts; export them from the program and either store them somewhere accessible to your booths, or copy the complete layouts to each booth computer.
This is the first of a series of posts explaining how to setup your photo booth using the DSLR Remote Pro 3.7.3 Photobooth Setup Wizard.
Getting Started with DSLR Remote Pro (2) will explain how to customize your prints. Getting Started with DSLR Remote Pro (3) will explain how to customize your screens.
Downloading the program
First download DSLR Remote Pro from our website; and install the program on your computer. You can run the program as a free trial for up to two weeks from the day you download it.
Downloading DSLR Remote Pro 3.7.3 from http://breezesys.com/downloads.htm#dslr
Start the program. If you are running a trial version of the program you will see the registration window each time you start. Click on Evaluate.
DSLR Remote Pro 3.7.3 registration dialog
There are five buttons at the top of the main screen. They are shortcuts to the most used parts of the program.
DSLR Remote Pro 3.7.3 Photobooth Shortcut buttons
Printer Setup
Photobooth Setup Wizard
Print Layout
Advanced Settings
Start Photobooth
First connect your printer to the computer and switch it on. You can also connect and switch on your camera now; or use the ‘simulated camera’ at this stage.
Select Printer Setup to tell DSLR Remote Pro about about the printer you intend to use. Choose prints in Portrait or Landscape orientation.
Hint: Portrait is used for narrow strips of 3 or 4 photos, unless you have a DNP printer.
DSLR Remote Pro 3.7.3 Printer Setup screen showing Landscape oriented 6″ x 4″ print layout (non DNP printers)
Hint: For DNP printers using 6″ by 4″ media portrait and landscape orientation are swapped.
DSLR Remote Pro 3.7.3 Printer Setup screen showing Landscape oriented 6″ x 4″ print layout ( DNP printers only select ‘Portrait’ instead of ‘Landscape’)
Finish by clicking on OK.
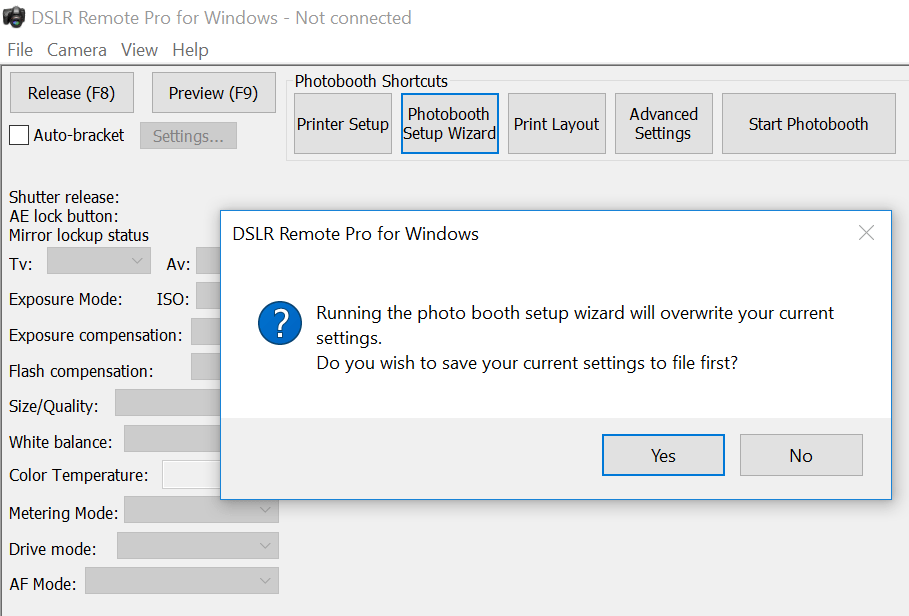
Now start the PhotoboothSetup Wizard. The program will prompt you to save any existing settings before the wizard overwrites them
DSLR Remote Pro 3.7.3 check at start of Photobooth Setup Wizard
At Step 1 you choose the photo layout you need. The wizard offers a choice of 8 popular layouts; if you want something different choose whichever is closest to your design (you will be able to change this later).
DSLR Remote Pro 3.7.3 Photobooth Setup wizard step 1. Landscape layout with 1 large and 3 small photos
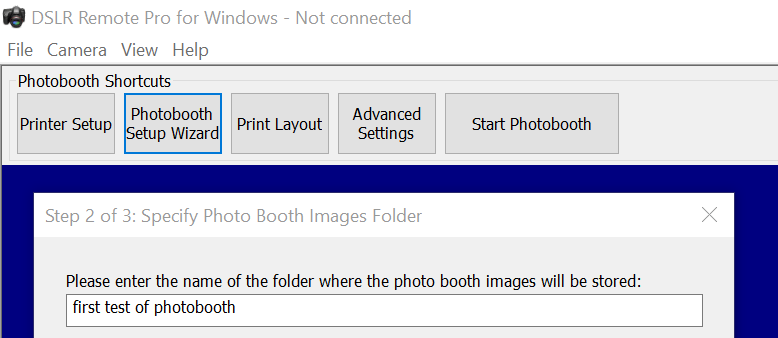
Next Step 2. Tell the program which folder to save the photo booth photos you are going to shoot.
DSLR Remote Pro 3.7.3 Photobooth Setup Wizard Step 2
Finally choose the options you want to offer your guests.
The first 5 check boxes tell the Wizard whether you are using a touchscreen, whether guests can choose between color and B&W prints, whether to display a preview of each photo after it is taken and the maximum number of prints allowed.
The next five check boxes tell the wizard whether a sharing screen (after the photos are taken) should offer uploads to guest’s Facebook and/or Twitter account, share photos by email or MMS/SMS, or offer optional printing. Hint: some operators prefer to offer browsing and sharing from a kiosk separate to the booth. You can use Breeze Kiosk for this. To share and print photos away from the booth leave these boxes unchecked.
Beginners should leave ‘Add a background.jpeg’ blank at this stage. Print layouts can be branded/customised later.
To offer ‘boomerang’ animated GIFs check ‘Enable videobooth..’ and ‘Capture Boomerang GIFs..’.
To offer video booth check ‘Enable videobooth..’
Click on <Finished> and you will see a final screen reminding you where the screen and print layouts created by the wizard have been stored; and where photos taken today will be stored.
DSLR Remote Pro 3.7.3 Photobooth Setup Wizard completed
Close this window, connect your camera and switch it on before selecting ‘Start Photobooth’. That’s it!
DSLR Remote Pro 3.7.3 default photo booth screen created by the Photobooth Setup Wizard


You must be logged in to post a comment.