Each Breeze Kiosk license costs just US $150 for a lifetime license & one year’s free upgrades. For this great price you can run one kiosk and have a second backup/office copy of the program.
Breeze Kiosk 1.5 is a free upgrade for all registered users who purchased a license on or after 28th November 2017. Customers with an older Breeze Kiosk license can buy an upgrade license for just US $75 to use this release.
Prices quoted are correct at 28th November 2018, and are valid for online sales from our website. They exclude any tax due.
How to get your hands on it
Download Breeze Kiosk and try it for yourself for up to 14 days before buying a license.
This release enhances Photo Booth Mode and adds support for Canon’s EOS R camera.
Breeze Multi-Camera 2.1 – what’s new
Support for Canon EOS R camera
Photo booth mode supports cameras in portrait as well as landscape orientation
Photo booth mode includes new screen ready_no_live_view.jpg . This disables live view, and allows external triggers to capture action shots with minimum delay
Animate Photo booth screens with full screen MP4 videobehind live view images
Multi-Camera Animator can save GIF and MP4 animations with a unique id making it easier to provide privacy when sharing images on a microsite
Product name shortened to “Multi-Camera”
New name – same product
Please note that DSLR Remote Pro Multi-Camera has been shortened to Multi-Camera in this release. It is the same software and registrations for DSLR Remote Pro Multi-Camera issued within the last twelve months still work.
Breeze Multi-Camera 2.1 is a free upgrade for all registered users of DSLR Remote Pro Multi-Camera who purchased a license on or after 29th November 2017. Customers with older licenses can buy an upgrade license to use this release.
Note: This post was updated in September 2019 for the latest releases of Hotfolder Prints 1.8, and Webcam Photobooth 1.5.
If you are new to DSLR Remote Pro or Webcam Photobooth, first run the Photo booth Setup Wizard. This creates all the screens for a basic working system. It also creates print layouts with a plain white background. The video demonstrates
How to change the background color of your prints
How to add logos and other graphic icons to your prints (DSLR Remote Pro 3.12, Hotfolder Prints 1.8 and Webcam Photobooth 1.5)
How to add simple captions
how to use Breeze tokens to show the correct date on prints
How to use Breeze tokens to automatically add the event name to prints (DSLR Remote Pro 3.12 andHotfolder Prints 1.8 only)
How to import pre-designed layouts
How to add a QR code
Notes
The video is intended to give you a taste of the Print Layout Editor. See the program help files for more details
Find a great video introduction to using tokens with Breeze here
There are minor differences in the way tokens work in these three programs:
{eventName} and {dateLess8h} are new in Hotfolder Prints 1.8
{eventName} is not yet supported in Webcam Photobooth
DSLR Remote Pro Print Layout Editor displays the current value of tokens
Hotfolder Prints and Webcam Photobooth Print Layout Editors display the token names in the print layout editor
Importing pre-designed layouts into Breeze
Learn more about using layouts I used in the video here .These free templates were kindly provided by SMOVE for use by Breeze customers.
NB: Logos are not saved in the Photobooth Print Layout (pblt file) in this release. To use both predesigned layout and logos, you need to import the layout before adding the logos to your design.
Try for yourself
Download copies of DSLR Remote Pro, Hotfolder Prints and Webcam Photobooth from our website
If you found this post useful please share it with others.
Display both video background and GIF overlay on the same screen
live view overlay for video mode
much faster upload of images shared by text or Twitter
print count resets to initial value for each session
and also
fixes issue sharing boomerang GIFs captured in video booth mode (affected 3.11.4 only)
Canon EOS R support
Breeze DSLR Remote Pro 3.12 adds support for Canon’s EOS R mirrorless camera
Add logos to your prints
Logos provide a quick and easy way to add graphics to prints without using an image editor such as Photoshop.
Add up to 5 different png or jpg logos to prints with Breeze DSLR Remote Pro 3.12
Add up to five different logos to a print layout. Logos can be either png or jpg format.
Note: Logos are not saved in the Photobooth Print Layout (pblt file) in this release. To use both predesigned layout and logos, you need to import the layout before adding the logos to your design.
The print counter will reset to the initial value for each new session
The print counter now automatically resets to the initial value for each photo session
How to get your hands on v3.12
DSLR Remote Pro 3.12 is a free upgrade for all registered users who purchased DSLR Remote Pro after 26th November 2017. Customers with older licenses need to buy an upgrade license to use this release.
Have you tried Breeze transparent greenscreen? It’s a great way to make your GIFs stand out.
This tutorial assumes you can already shoot simple green screen photo booth images with DSLR Remote Pro, and explains how to add animated backgrounds and overlays to a slideshow GIF.
Usually when you shoot in greenscreen, each photo is saved with a single green screen background. Transparent greenscreen removes the background from an image and stores it as a png with a transparent background. This lets you add a variety of backgrounds later.
Selecting transparent greenscreen processing in Breeze DSLR Remote Pro 3.11.4
The original photo is shot against a greenscreen background
DLSR Remote Pro removes the green background and saves the photo on a transparent background
Breeze lets you combine these images into a slideshow GIF which has an animated background.
Add the GIF backgrounds
To make a slideshow GIF with an animated background, you need to add a series of GIF backgrounds to your PhotoBoothImages folder.
My GIF has 3 photos. Each of these photos will have 3 different background images.
9 GIF backgrounds in the PhotoBoothImages folder (Breeze DLSR Remote Pro 3.11.4)
The background images are named GIF_background_1.jpg through to GIF_background_9.jpg
Add the GIF overlays
My GIFs will have 9 overlays called GIF_overlay_1.png through to GIF_overlay_9.png
9 GIF overlays in the PhotoBoothImages folder (Breeze DLSR Remote Pro 3.11.4)
Add the on-screen background
To keep things simple I am using 1 still background image for the on screen preview. This is called greenscreen_background.jpg as usual.
Greenscreen background image in the PhotoBoothImages folder (Breeze DLSR Remote Pro 3.11.4)
There are 3 backgrounds and overlays for each photo
Each photo will be shown for one second
The GIF will be displayed for at least 3 seconds
Printing transparent greenscreen images
The photos are saved with transparent backgrounds, so you can print them against a white background, or on a single background image. The images can be a different color from the background.
This post explains how to add a custom attraction or standby screen to DSLR Remote Pro. Breeze calls this a welcome screen.
Use your welcome screen to attract people to your booth, as a quick method of branding, and to protect your camera*. The welcome screen can be a still image, animated GIF or video. You can add sound to attract people’s attention.
*Running live view for long periods drains battery power and can cause the camera’s sensor to heat up. If the photo booth is idle Breeze automatically cancels the live view and displays the welcome screen.
This post shows how to replace the standard welcome screen with a movie or your own still image. You can customize Webcam Photobooth in the same way.
Breeze Multi-Camera has a similar screen called standby.jpg which can be customized and animated in a similar way.
Note: This post was updated in September 2019 to make it clearer that you need to set the inactivity timeout value
Default screen set created by the photo booth setup wizard, showing the initial attraction screen welcome.jpg (DSLR Remote Pro 3.11.4)
Add a custom welcome screen
Rename the original welcome.jpg in case you want to use it again. (Mine is called welcome-old.jpg.)
Copy your new image into the same folder, and call it welcome.jpg To fill the screen, make the new image the same size in pixels as the image it replaces.
Paste a new welcome.jpg into your PhotoBoothImages folder. This should be the same size (in pixels) as the original (DSLR Remote Pro 3.11.4)
Inactivity timer
To control how long the booth waits before going into standby mode and displaying the welcome screen, adjust the inactivity timer. Go to Advanced Settings, and set the number of seconds you want to wait until the booth goes into standby mode:
Setting the inactivity time in DSLR Remote Pro 3.11.4
Run the booth, wait a while for it to go into idle mode and your welcome screen will be displayed.
Add a welcome screen with a movie
Add your movie to the PhotoBoothImages folder and name it welcome_loop.mp4 if you want the movie to loop, or welcome.mp4 to run it just once.
Note: You need both the background image ( welcome.jpg) as well as the animation in the PhotoboothImages folder. The background image is often plain black (mirror booths) or a copy of the first frame of your movie. It may appear briefly before the animation starts running.
Here a movie called welcome_loop.mp4 has been added to the PhotoBoothImages folder (DSLR Remote Pro 3.11.4)
That’s it! Start DSLR Remote Pro and check everything is working. You will need to wait for the inactivity timer to kick in before you see your video.
Finer details
What happens if my video is smaller than the screen?
If your video is smaller than your screen, it will be displayed in the center of the screen with your welcome.jpg behind it:
Here the attraction video is smaller than the screen (DSLR Remote Pro 3.11.4)
Yes, you can customize most other screens in the same way. Replace the original screen in your PhotoBoothImages folder with another still (.jpg), add a movie (.mp4 or .mov) or GIF file with the same name. For more details, see
Yes. To add animations and sound to magic mirrors include them in your PhotoBoothImages folder in the same way.
Where can I find animations for my booth/mirror?
There are lots of sources of animations on the web. These are some of the vendors who offer animations and complete Breeze themes for photo booths and mirrors
fixed – issue where video sharing screen showed previous print layouts
fixed – rotated images showing black in print layouts ( only affected 3.11.3)
Virtual props, emojis and stickers
July 2019 update: DSLR Remote Pro 3.14 adds the ability for guests to choose their own frame for the print. Details here
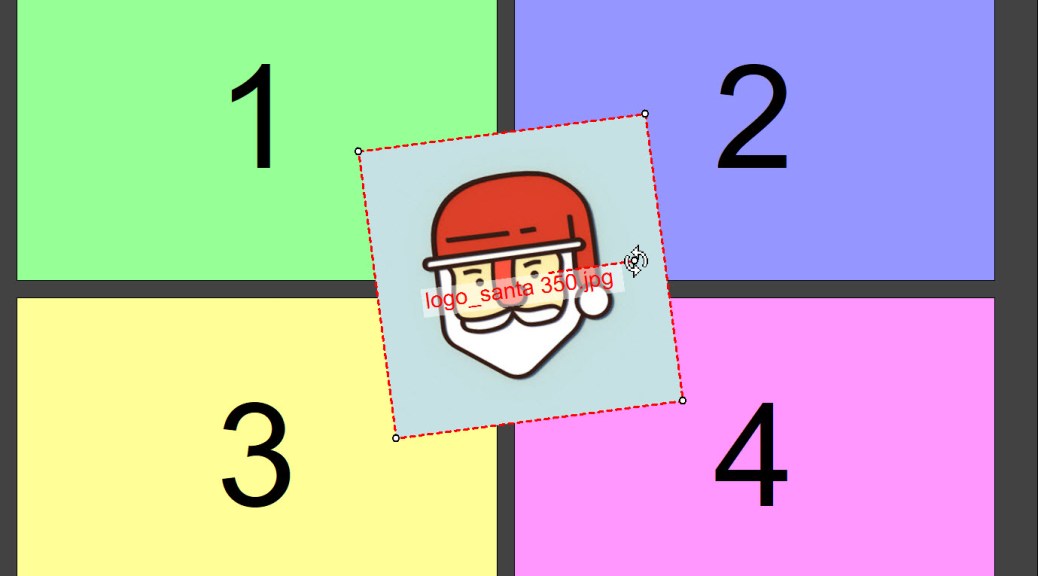
To let your guests draw on, sign and now add virtual props, emojis and stickers to their prints, select Advanced Settings, then Output Options Settings. Check the box marked Sign or draw on photos before printing, and OK as you leave.
Shows how to allow guests to add props & emoji, sign & draw on prints using DLSR Remote Pro 3.11.4
You can create your own icon sets, but we have included these emoji/basic props for starters:
Guests can rotate, expand and shrink the icons. You can restrict them to decorating part of the print, and even prevent them from defacing part of it if your clients are sensitive.
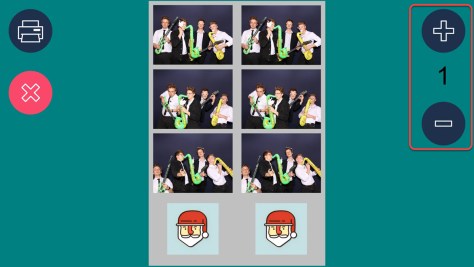
Specially for magic mirrors – move reprint button to the top of the screen
Here’s how:
How to position the reprint icons at the top of the screen (Breeze DSLR Remote Pro 3.11.4)
DSLR Remote Pro 3.11.4 is a free upgrade for all registered users who purchased DSLR Remote Pro after 11th September 2017. Customers with older licenses need to buy an upgrade license to use this release.
“Where are the images from my event? I am sure I saved them and have looked everywhere on the computer …..”
DSLR Remote Pro holds the key
Start DSLR Remote Pro, click on File then Preferences
Select File then Prefernces to show the DSLR Remote Pro prefernces screen (DSLR Remote Pro 3.11.3
This brings up the Preferences window, which tells you which folder images are saved in:
The DSLR Remote Pro Preferences screen shows the folder where images are stored, and displays an example image name
In this example the original photos are stored in a folder called C:\Users\sue\Documents\PhotoBoothImages\2018-09-06
PhotoBoothImages folder showing sub folder 2018-09-06 containing images taken on 6th September, 2018
Where are copies of prints, slideshow GIFs, green screen and other processed photos stored?
Usually you will find these in a sub folder of the main image folder, eg C:\Users\sue\Documents\PhotoBoothImages\2018-08-27\prints
DSLR Remote Pro gives you a huge amount of control over what and where you save images. Advanced users often use tokens as part of their file naming.
Use the Output Settings window to check where to find still images and slideshow GIFs.
Output Settings
Click on Advanced Settings, then the Output OptionsSettings… button to reach this window:
DSLR Remote Pro Output Settings screen (Breeze DSLR Remote Pro 3.11.3)
(1) Copies of each print are saved in a subfolder called Prints if Output is set to Save and print JPEG copy or JPEG copy only
(2) Copies of processed photos are saved in a subfolder called Processed. This includes images which have been rotated, cropped, digitally zoomed, green screened, converted to B&W, toned, had Instagram style filter applied or are post processed using Photoshop.
(3) If you select deletion of images which guests choose not to print, DSLR Remote Pro does delete them!
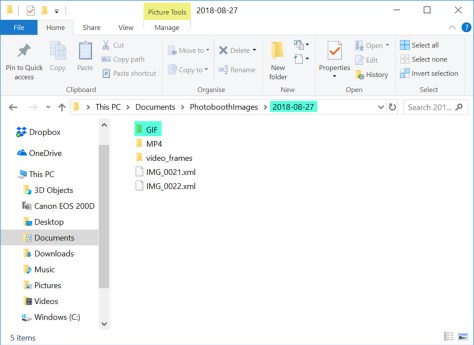
(4) Slideshow GIFs are either (a) stored in a sub folder called GIF or (b) in the prints sub folder
(4a) Folder showing images taken on 2018-08-27. Original images (IMG_0001.JPG etc) are in the main folder, slideshow GIFs in sub folder GIF, MP4 copies of the GIFs in sub folder MP4, print layouts in sub folder prints(4b) Here the slideshow GIFs are stored in the prints sub folder with the JPG print layouts (DLSR Remote Pro 3.11.3
Boomerang GIFs are created from video, and are usually stored in either in (a)sub folder GIF or (b) sub folder prints
(a) Folder showing images taken on 2018-08-27. Boomerang GIFs in sub folder GIF, MP4 copies of the GIFs in sub folder MP4. (DSLR Remote Pro 3.11.3)(b) Here boomerang GIFs are stored in the prints sub folder (DLSR Remote Pro 3.11.3)
Look in the Animated GIF Settings (Video Booth Mode) window to check where to find your boomerang GIFs. Click on File, then Video Booth Settings, then select the Animated GIF settings button to access this window:-
The Animated GIF Animated GIF Settings (Video Booth Mode) window shows where boomerang GIFs are stored. Select File, then Video Booth Settings, then Animated GIF settings to reach this window (DSLR Remote Pro 3.11.3)
(6) Check to save PNG copies of live view image frames used to construct GIFS will be stored in sub-folder GIF_frames,
(7) Check to save boomerang GIFs in the prints sub folder
(8) Checked to create MP4 copies of boomerang GIFs
(9) MP4 copies of GIFs can be stored in sub folder MP4, subfolder prints or the same folder as the GIFs
Improved control for placing green screen image against background
DSLR Remote Pro 3.11.3 introduces cropping and rotation of green screen images, and improves image positioning against the background
Video sharing
Share photo booth videos from the booth
Easy to adjust MP4 quality (fast for ease of sharing, slow for high quality)
Optional delay to allow post processing video (allows scripts to process video before sharing)
This release is a free upgrade for all registered users who purchased DSLR Remote Pro after 15th August 2017. Customers with older licenses need to buy an upgrade license to use this release.
Guests can email photos, animated GIFs and Canon M50 slowmo videos and other videos* they create in DSLR Remote Pro 3.11.3. If Internet access during the event is poor, you can send the emails later.
Update March 2021: This post has been replaced by a new tutorial
This post explains how to email images from a touchscreen photo booth running DSLR Remote Pro. You will also learn how to tell the program about your email server settings, brand and customize the emails you send.
Let’s run through this in more detail, starting with the setup wizard:
Run the Photobooth Setup Wizard
Start DSLR Remote Pro and run the Photobooth Setup Wizard (1). Choose which options to offer guests at Step 2 (2). In this example guests can choose between still photos and boomerang (aka burst) GIFs (3). You can offer video (or photos and video) instead at this point.
Check the option Email photos (4) .
Checking the box Email photos at Step 2 of the setup wizard ( DSLR Remote Pro 3.11.3)
Select any other options you need before clicking on <Next> and completing Step 3 of the wizard.
You can set up your own booth with this sharing screen using just the 3 step wizard:
Email sharing screen created by the Photobooth Setup Wizard (DSLR Remote Pro 3.11.3)
Setup the email server settings
The first time you email from DSLR Remote Pro you need to set up the email server settings:
Select File (5) then Photobooth Settings(6) to access these settings
This will display the Photobooth Settings screen.
Go to the Output Settings(8) and check Email (9). You can then select Email Server Settings screen at (10)
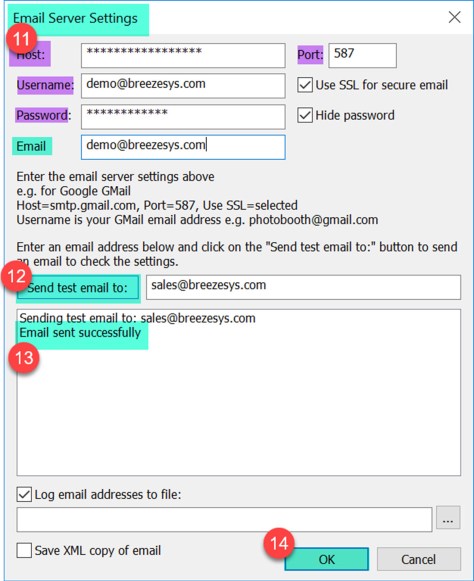
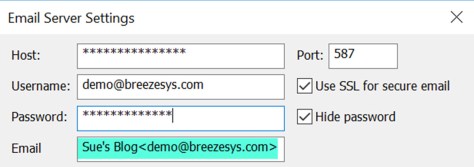
To send an email you need to specify the host name and port number of your email server. Most email servers also require a username and a password. For additional security check Use SSL for secure email.
The values of Host, Username, Password, Email and Port(11) you enter on the Email Server Settings screen are specific to the email provider you are using.
Before you move on, check everything works by sending a test email to your own email address(12). DSLR Remote Pro displays Email sent successfully(13) when this message has been sent. Check that you receive the test email.
Remember to click OK(14) to save your settings as you leave this screen.
Including your name with the email address
To include the name of the sender with the email address enter the name followed by the email address enclosed in angle brackets e.g. Sue’s Blog <demo@breezesys.com>.
Here the sender name is ‘Sue’s Blog’ and the email address demo@breezesys.com (DSLR Remote Pro 3.11.3)
Logging guest email addresses & sending them after the event
You can keep a log of email addresses used by guests, providing valuable data for your own or corporate client’s use.
If an event Internet connection is flaky or non-existent you can save the email details and send them later.
The port number is usually 587 when using SSL secure email or 25 otherwise (but check the port numbers used by your ISP).
Emails look more professional when sent from your own domain.
Most free email services require the sender’s email address to the be the same as the email account specified by the username and password.
Gmail users should set access for less secure apps to Turn on in your Google account settings otherwise GMail will refuse to send the email.
Customize and brand your email messages
Use the standard email message
You do not have to customize the message sent with your photos and animated GIFS. If you use the standard settings in DSLR Remote Pro all emails will include the image(s) captured in the booth and the text Your photo booth photos taken on 14 August 2018 (or whatever date the images were taken).
Customizing the email subject and message
The emails guests send can be a powerful marketing tool for your business. Make them work for you by customizing the message sent with your image(s). Use Breeze tokens, your own text, images and html in the Email Settingsscreen.
Select File, then Output Settings, then Email settings to reach this screen:
Select File, then Output Settings, then Email settings to customize emails sent from DSLR Remote Pro
The first time you see the email settings screen it contains the default message DSLR Remote Pro sends with your emails. Edit this to meet your needs.
Default Email Settings screen in Breeze DSLR Remote Pro 3.11.3
You can change the both the subject and content of the emails sent with guest images.
Reduce the time and bandwidth taken to send and receive emails by choosing a suitable maximum image size.
Creating a standard email template using the {eventName} token
{eventName} is a special Breeze token which can be shared between Breeze programs. You can use {eventName} in your emails and print layouts to save time customizing your booth for each event.
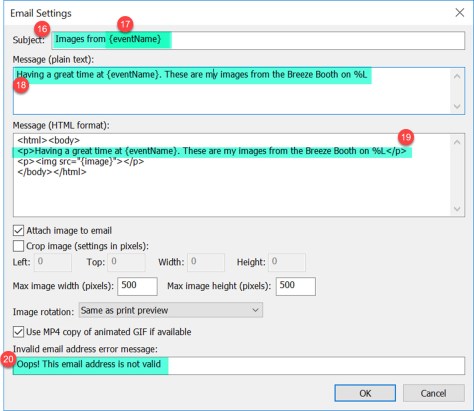
Here I have both changed the text and used {eventName} to customize the email subject (17), plain text (18) and html (19) versions of the content. I also changed the message seen by guests if they type an invalid email address (20).
When the email is sent Images from {eventName} will be replaced by Images from Sue & Chris’s Big Party. The text sent with the email will also say Having a great time at Sue & Chris’s Big Party. These are my images from the Breeze Booth on 14 August 2018.
{eventName} can also be used in print captions, and as part of folder and file names. For my next event I just need to change {eventName} to John & Jane’s Wedding ….
Note: %L is another Breeze token, which will be replaced by the date the images were taken.
How do I enter and change {eventName} for each event?
Start DSLR Remote Pro, click on File then Photobooth event info… to reach the Photo Booth Event Info screenPhoto Booth Event Info screen with {eventname} set to Sue & Chris’s big Party (DSLR Remote Pro 3.11.3)
You may have spotted Event Strings on this screen. You can use {eventString1} to {eventString5} in the same way as {eventName} .
Why do I need to send both plain text and html?
The emails DSLR Remote Pro sends from your booth may be viewed on lots of different devices including Apple and Android smart phones, tablets and PCs. Most modern devices can read html emails; we also send a plain text version in case the html version cannot be read.
Thank you for reading this post. I have covered how to send emails from DSLR Remote Pro, outlined how to brand and customize the emails, create your own standard template which is automatically updated for different events, and tell the program about your email service provider.
If you are ready for more, Steve’s video is a great introduction to using tokens. You can also learn more about customizing emails in the program help files.
If this post is helpful to you, please share it with others in our industry.
* DSLR Remote Pro 3.11.3 was released today 15 August 2018, and is a free upgrade for anyone whose license was issued in the last year. This release introduces the ability to share videos captured in video booth mode, including Canon M50 slow mo videos. Please note that emailing large attachments during events will slow the booth down.
Update 16 August: You can run this new script alongside DSLR Remote Pro 3.11.3to rotate and resize videos and add an optional overlay and soundtrack before videos are shared. We expect to include these features into DSLR Remote Pro in a future release.


You must be logged in to post a comment.